
/ Collaborave distributed version control documentaon
Collaborative distributed version control
We have learned how to make a Git repository for a single person. What about sharing?
Share the folder using email or using some file sharing service: This would lead to many
back and forth emails and would be difficult keep all copies synchronized.
One person’s repository on the web: allows one person to keep track of more projects,
gain visibility, feedback, and recognion.
Common repository for a group: everyone can directly update the same repository. Good
for small groups.
Forks or copies with different owners: anyone can suggest changes, even without
advance permission. Maintainers approve what they agree with.
Being able to share more easily (going down the above list) is transformave (easier to change
something, that is you are not the sole owner) because it allows projects to scale to a new
level. This can’t be done without proper tools.
In this lesson we will learn how to keep repositories in sync and how to work with remote
repositories on GitHub and other services. We will discover and exercise the centralized as
well as the forking workflows, and finally look into how to automate tasks using Git hooks.
⚙ Prerequisites
1. Basic understanding of Git.
2. You need a GitHub account.
We will do this exercise on GitHub but also GitLab and Bitbucket allow similar workflows
and basically everything that we will discuss is transferable. With this material and these
exercises we do not endorse the company GitHub. We have chosen to demonstrate a
number of concepts using examples with GitHub because it is currently the most popular
web plaorm for hosng Git repositories and the chance is high that you will interact
with GitHub-based repositories even if you choose to host your Git repository on another
plaorm.
Concepts around collaboration
Objecves
Be able to decide whether to divide work at the branch level or at the repository level.
Instructor note
15 min teaching
Motivation
Someone has given you access to a repository online and you want to contribute?
We will learn how to make a copy and send changes back.
Then, we make a “pull request” that allows a review.
Once we know how code review works, we will be able to propose changes to
repositories of others and review changes submied by external contributors.
Commits, branches, repositories, forks, clones
repository: The project, contains all data and history (commits, branches, tags).
commit: Snapshot of the project, gets a unique idenfier (e.g.
c7f0e8bfc718be04525847fc7ac237f470add76e ).
branch: Independent development line. The main development line is oen called main .
tag: A pointer to one commit, to be able to refer to it later. Like a commemorave plaque
that you aach to a parcular commit (e.g. phd-printed or paper-submitted ).
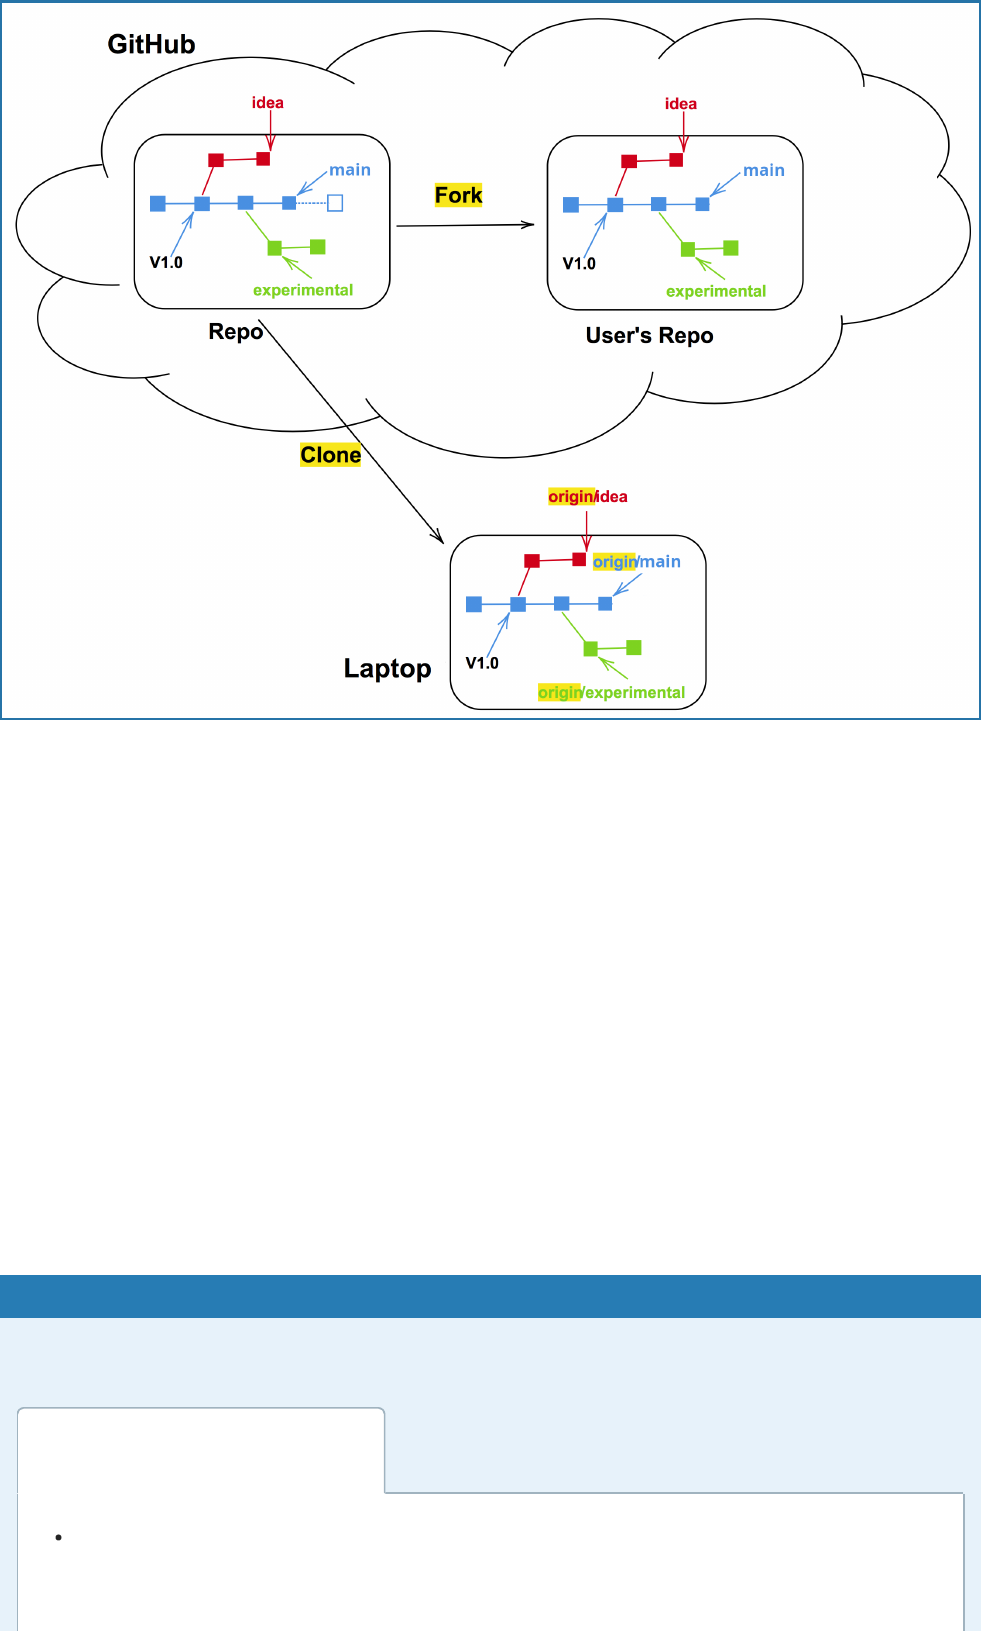
cloning: Copying the whole repository to your laptop - the first me. It is not necessary to
download each file one by one.
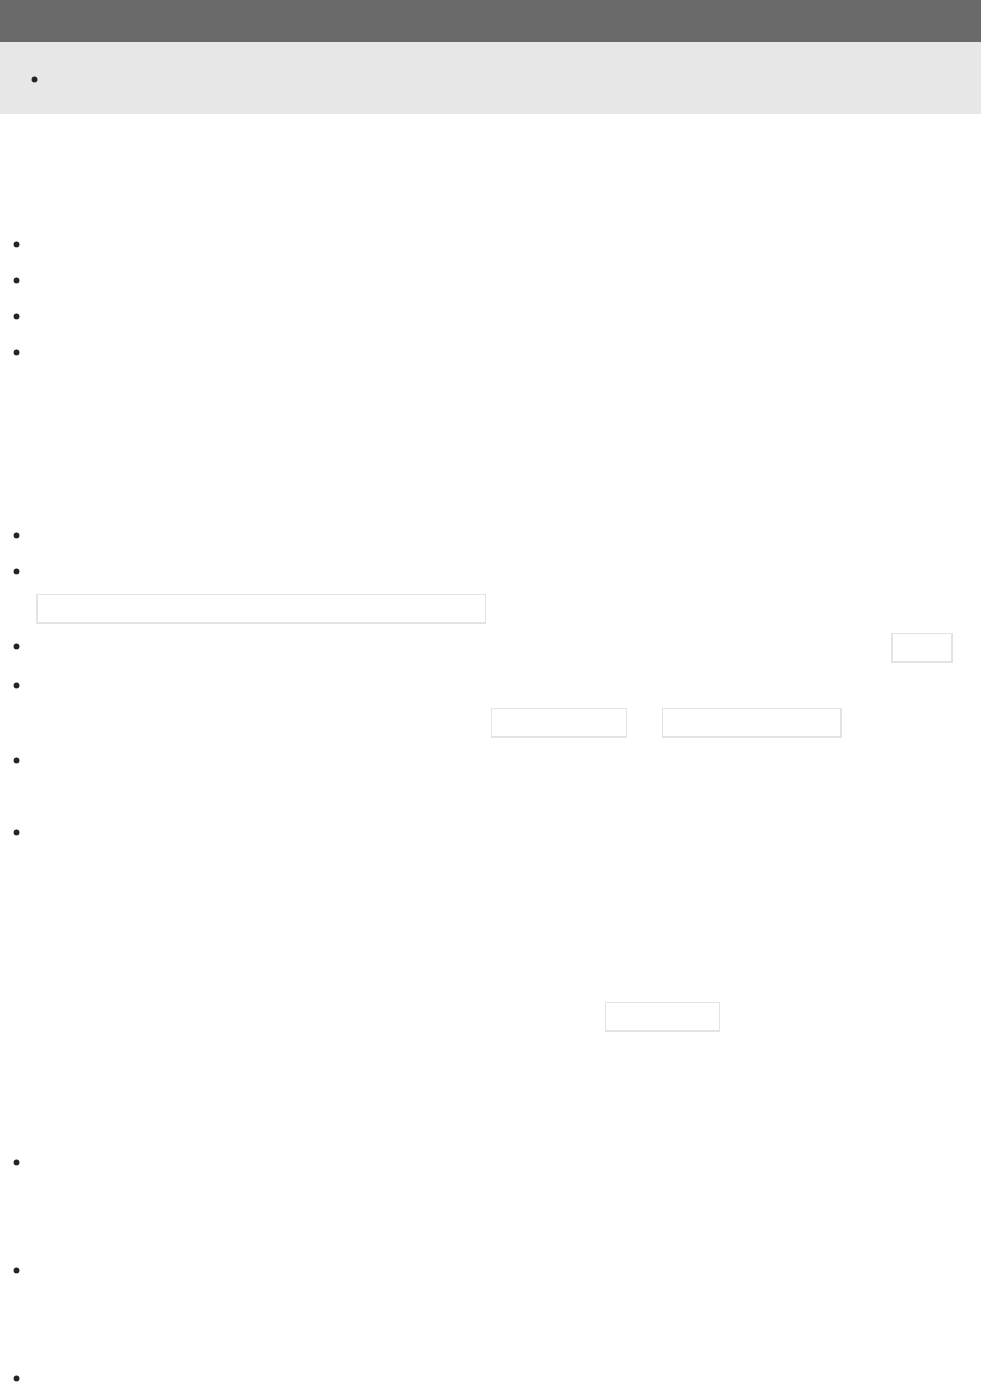
forking: Taking a copy of a repository (which is typically not yours) - your copy (fork) stays
on GitHub/GitLab and you can make changes to your copy.
Cloning a repository
In order to make a complete copy a whole repository, the git clone command can be used.
When cloning, all the files, of all or selected branches, of a repository are copied in one
operaon. Cloning of a repository is of relevance in a few different situaons:
Working on your own, cloning is the operaon that you can use to create mulple
instances of a repository on, for instance, a personal computer, a server, and a
supercomputer.
The parent repository could be a repository that you or your colleague own. A common
use case for cloning is when working together within a smaller team where everyone has
read and write access to the same git repository.
Alternavely, cloning can be made from a public repository of a code that you would like
to use. Perhaps you have no intenon to work on the code, but would like to stay in tune
with the latest developments, also in-between releases of new versions of the code.

Cloning
Forking a repository
When a fork is made on GitHub/GitLab a complete copy, of all or selected branches, of the
repository is made. The copy will reside under a different account on GitHub/GitLab. Forking
of a repository is of high relevance when working with a git repository to which you do not
have write access.
In the fork repository commits can be made to the base branch ( main or master ), and to
other branches.
The commits that are made within the branches of the fork repository can be contributed
back to the parent repository by means of pull or merge requests.
Forking
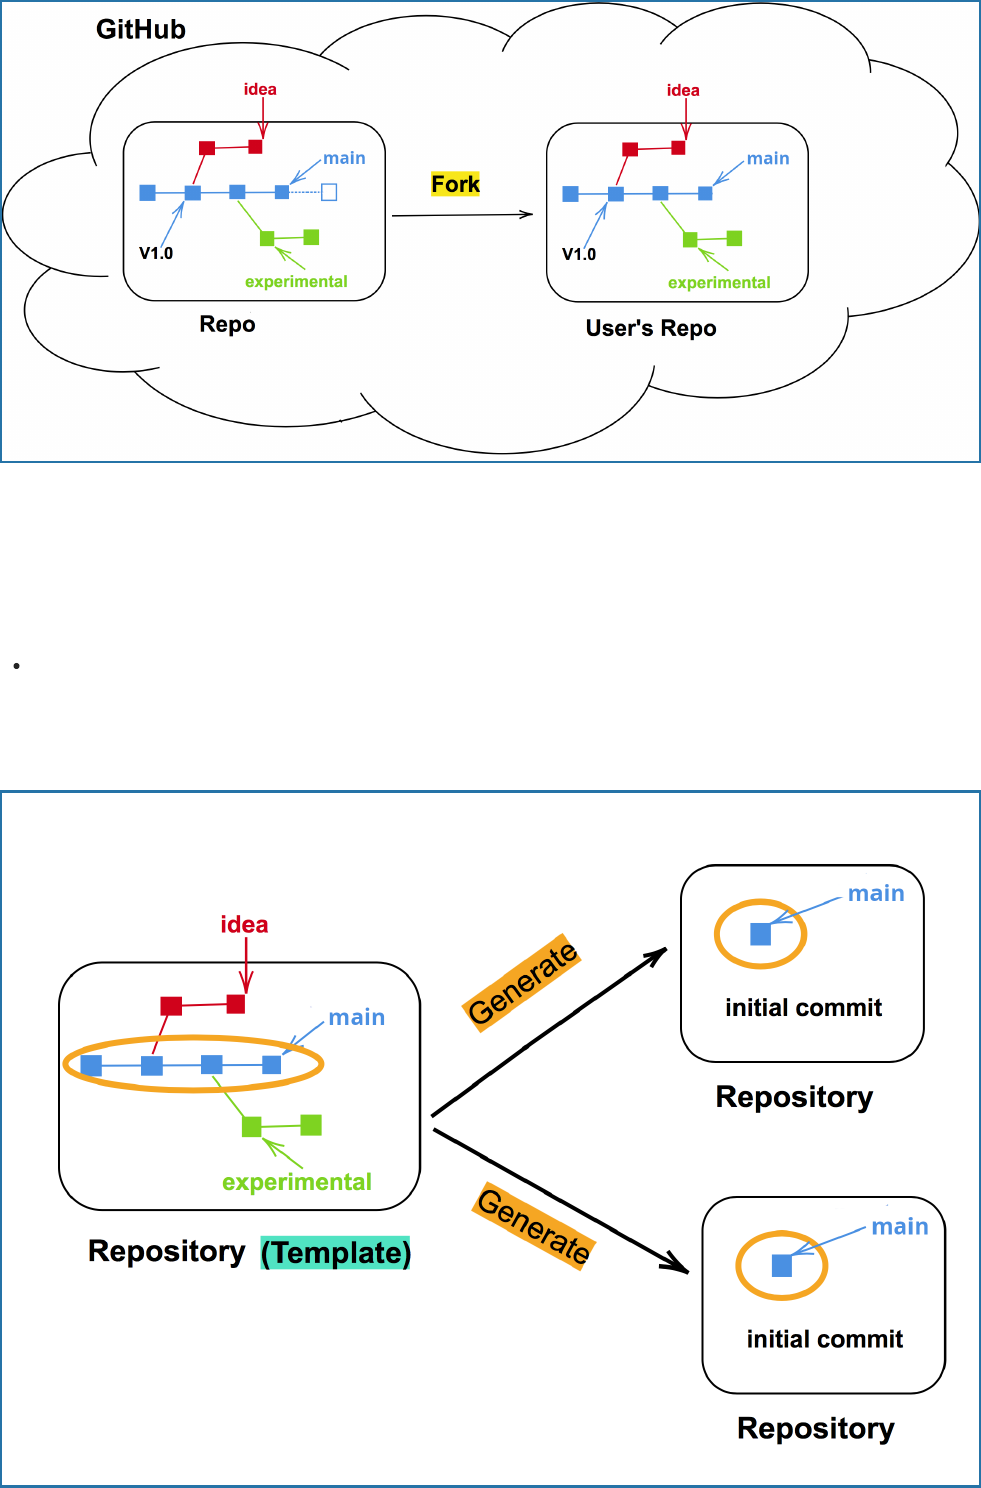
Generating from templates and importing
There are two more ways to create “copies” of repositories into your user space:
A repository can be marked as template and new repositories can be generated from it,
like using a cookie-cuer. The newly created repository will start with a new history, only
one commit, and not inherit the history of the template.
Generang from a template.
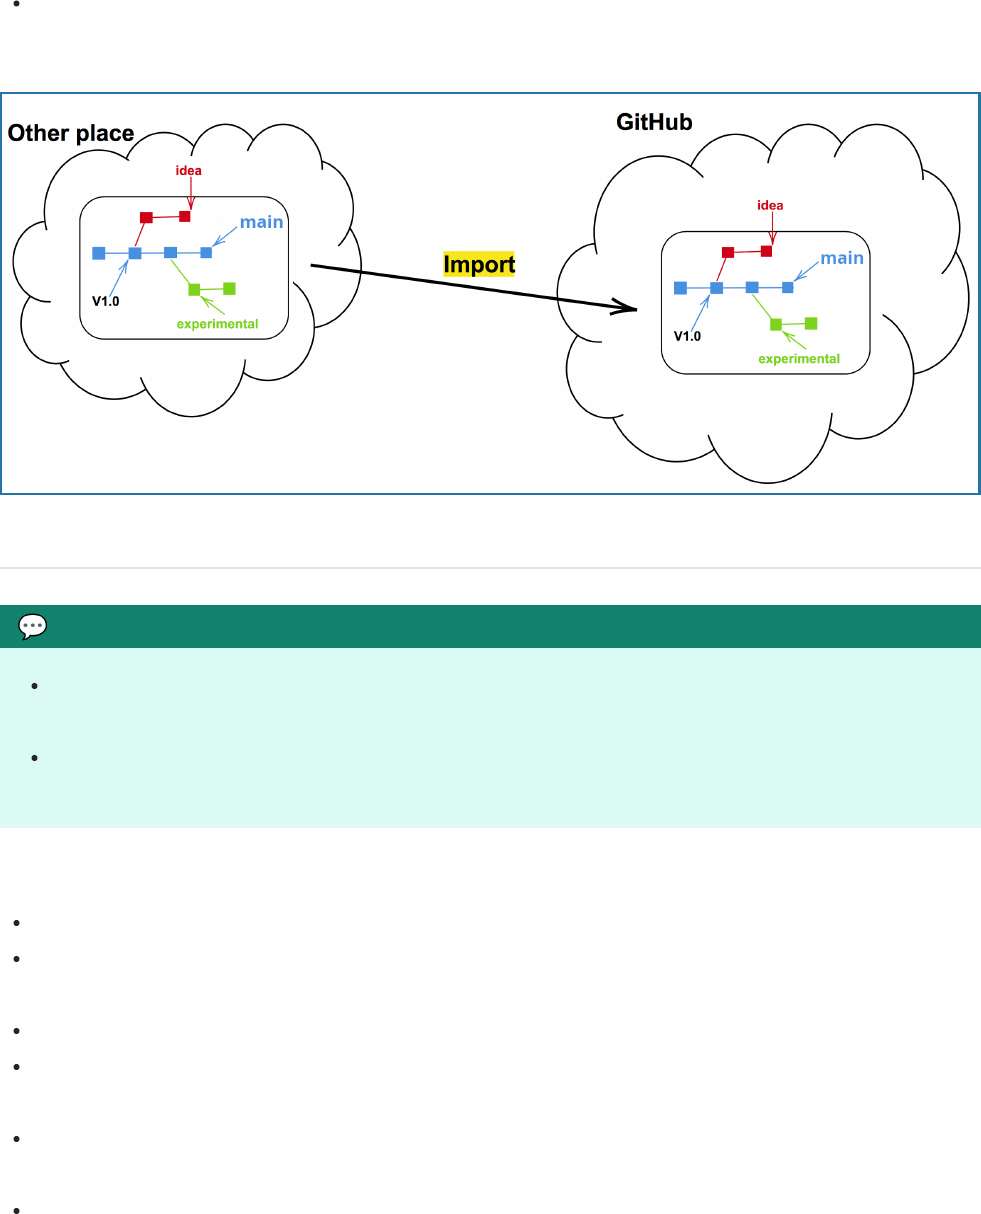
You can import a repository from another hosng service or web address. This will
preserve the history of the imported project.
Imporng a repository.
Discussion
Visit one of the repositories/projects that you have used recently and try to find out
how many forks exist and where they are.
In which situaons could it be useful to start from a “template” repository by
generang?
Synchronizing changes between repositories
We need a mechanism to communicate changes between the repositories.
We will pull or fetch updates from remote repositories (we will soon discuss the
difference between pull and fetch).
We will push updates to remote repositories.
We will learn how to suggest changes within repositories on GitHub and across
repositories (pull request).
Repositories that are forked or cloned do not automacally synchronize themselves: We
will learn how to update forks (by pulling from the “central” repository).
A main difference between cloning a repository and forking a repository is that the former
is a general operaon for generang copies of a repository to different computers,
whereas forking is a parcular operaon implemented on GitHub/GitLab.
Forking and cloning
Collaborating within the same repository
In this episode, we will learn how to collaborate within the same repository. We will learn
how to cross-reference issues and pull requests, how to review pull requests, and how to use
dra pull requests.
This exercise will form a good basis for collaboraon that is suitable for most research
groups.
Exercise
In this exercise, we will contribute to a repository via a pull request. This means that you
propose some change, and then it is accepted (or not).
⚙ Exercise preparaon
First, we need to get access to some repository to which we will contribute.
Part of team/exercise room Following on your own
Form not too large groups (4-5 persons).
Don’t forget to accept the invitaon
Check hps://github.com/sengs/organizaons/
Alternavely check the inbox for the email account you registered with GitHub.
GitHub emails you an invitaon link, but if you don’t receive it you can go to your
GitHub noficaons in the top right corner. The maintainer can also “copy invite
link” and share it within the group.
Watching and unwatching repositories
Now that you are a collaborator, you get nofied about new issues and pull
requests via email.
Each group needs to appoint someone who will host the shared GitHub
repository: the maintainer. This is typically the exercise lead (if available).
Everyone else is a collaborator.
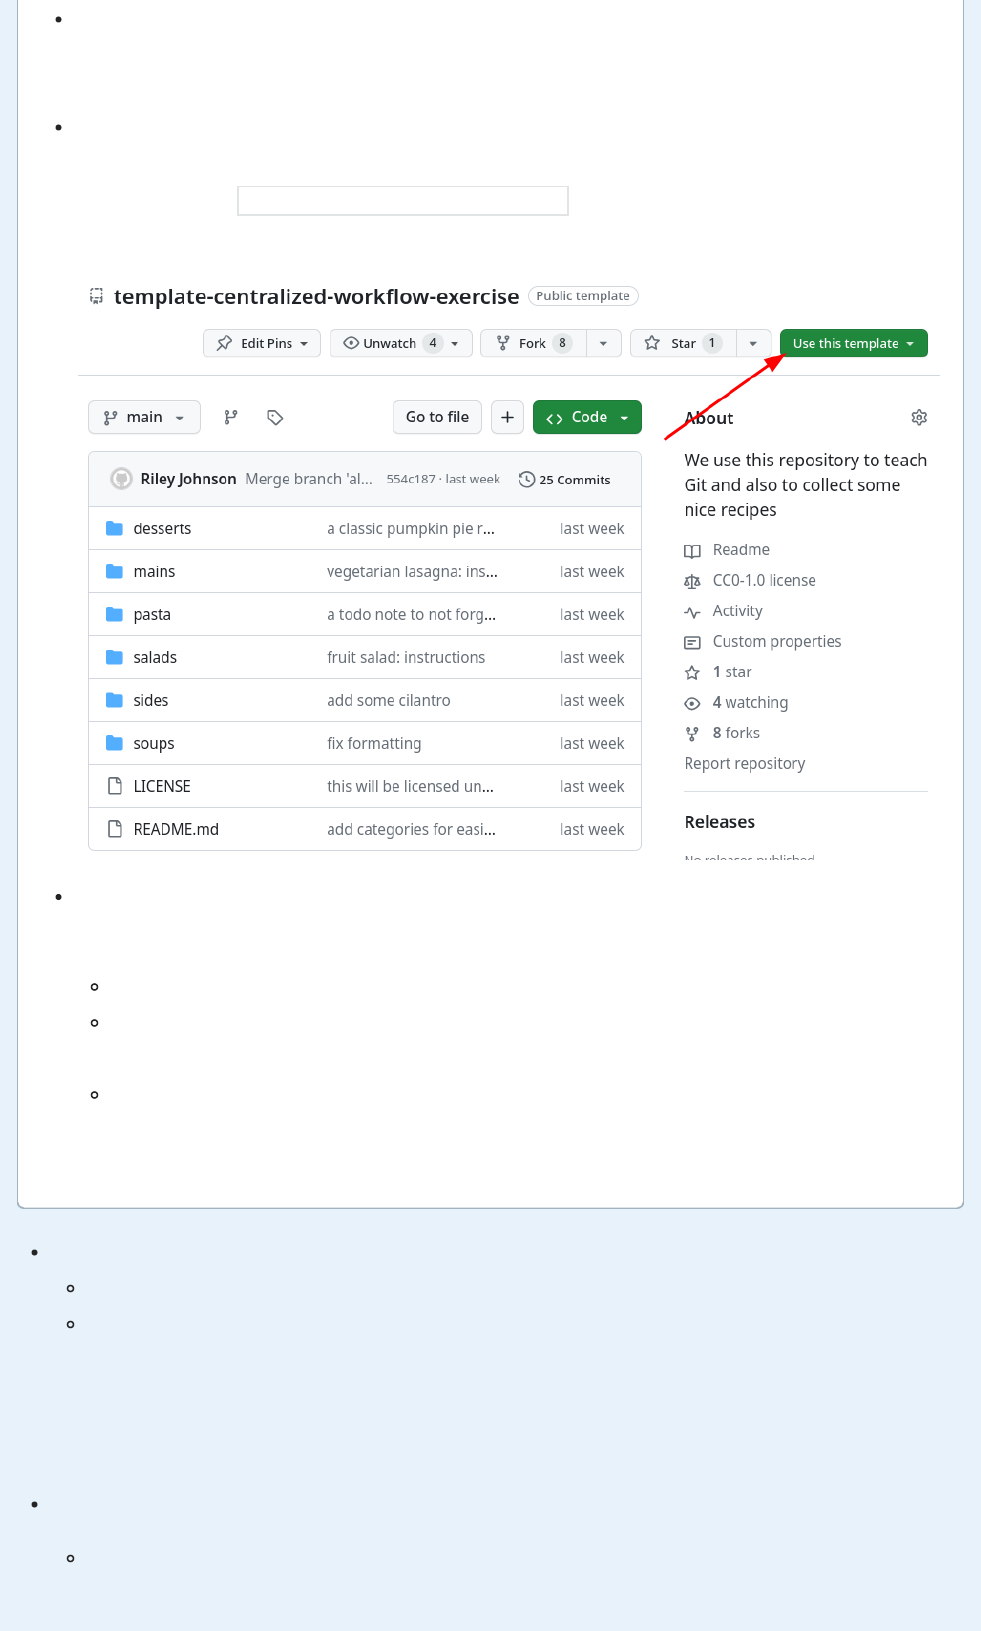
The maintainer (one person per group) generates a new repository from the
template hps://github.com/coderefinery/template-centralized-workflow-
exercise called centralized-workflow-exercise (There is no need to ck “Include
all branches” for this exercise):
Then everyone in your group needs their GitHub account to be added as
collaborator to the exercise repository:
Collaborators give their GitHub usernames to their chosen maintainer.
Maintainer gives the other group members the newly created GitHub
repository URL.
Maintainer adds parcipants as collaborators to their project (Sengs ->
Collaborators and teams -> Manage access -> Add people).
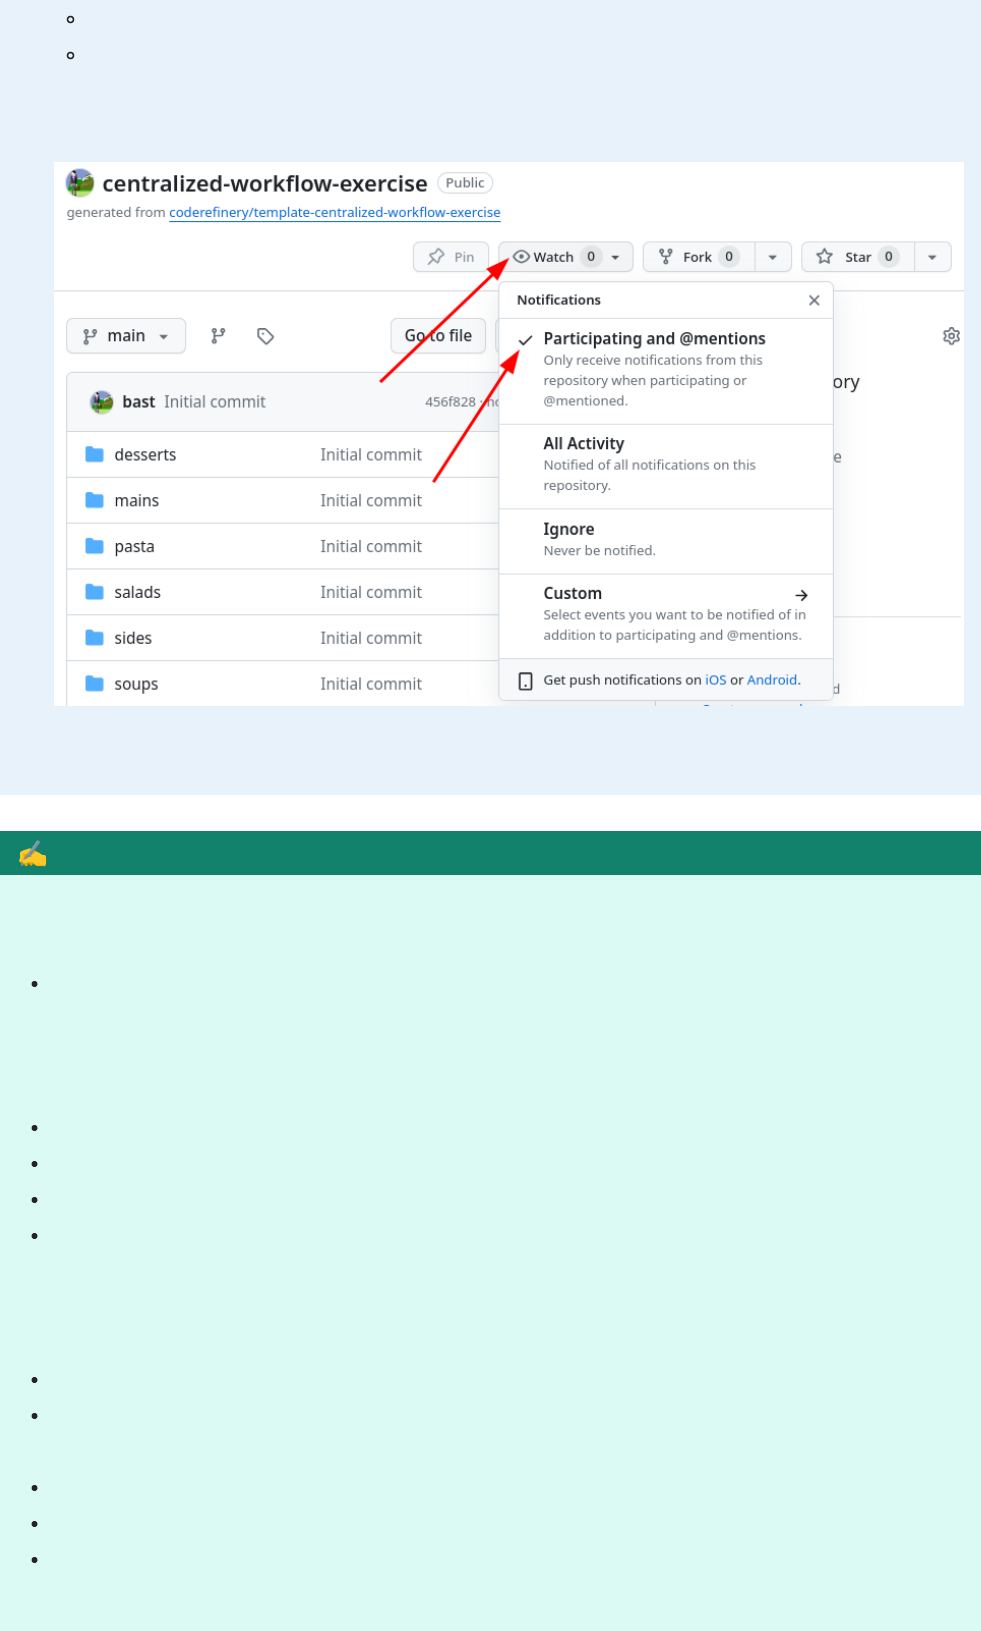
If you do not wish this, you can “unwatch” a repository (top of the project page).
However, we recommend watching repositories you are interested in. You can
learn things from experts just by watching the acvity that come through a
popular project.
Unwatch a repository by clicking “Unwatch” in the repository view, then “Parcipang and
@menons” - this way, you will get noficaons about your own interacons.
Exercise: Collaborang within the same repository (25 min)
Technical requirements (from installaon instrucons):
If you create the commits locally: Being able to authencate to GitHub
What is familiar from the previous workshop days (not repeated here):
Cloning a repository (previous lesson)
Creang a branch (previous lesson)
Comming a change on the new branch (previous lesson)
Submit a pull request towards the main branch (previous lesson)
What will be new in this exercise:
If you create the changes locally, you will need to push them to the remote repository.
Learning what a protected branch is and how to modify a protected branch: using a
pull request.
Cross-referencing issues and pull requests.
Pracce to review a pull request.
Learn about the value of dra pull requests.

Exercise tasks:
1. Open an issue where you describe the change you want to make. Note down the issue
number since you will need it later.
2. Create a new branch.
3. Make a change to the recipe book on the new branch and in the commit cross-
reference the issue you opened (see the walk-through below for how to do that).
4. Push your new branch (with the new commit) to the repository you are working on.
5. Open a pull request towards the main branch.
6. Review somebody else’s pull request and give construcve feedback. Merge their pull
request.
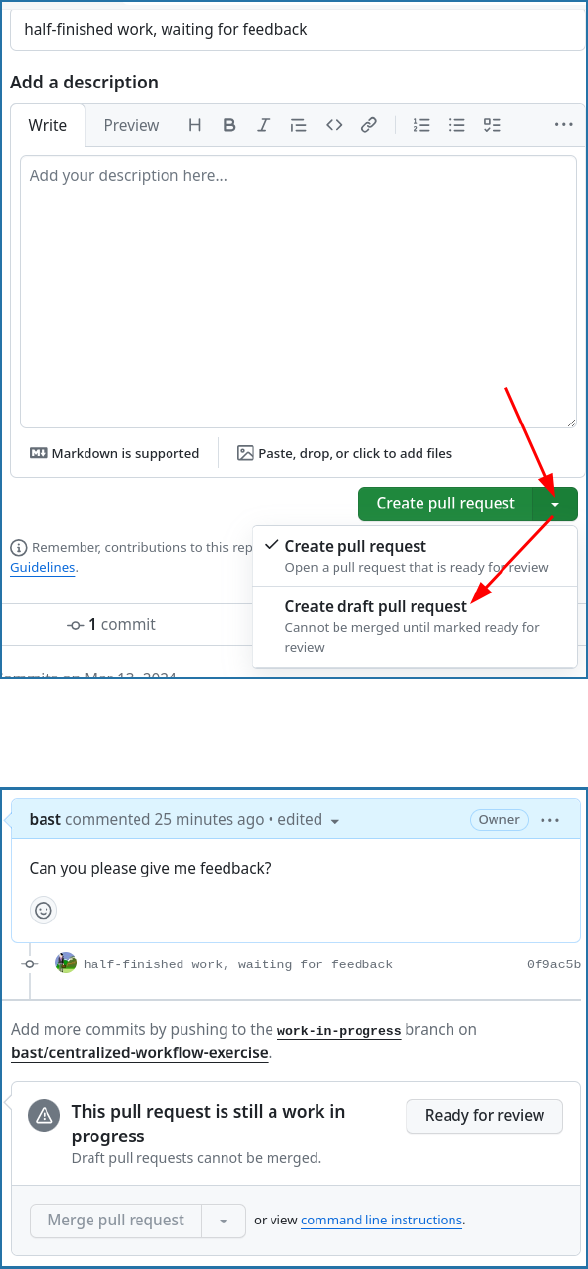
7. Try to create a new branch with some half-finished work and open a dra pull request.
Verify that the dra pull request cannot be merged since it is not meant to be merged
yet.
Solution and hints
(1) Opening an issue
This is done through the GitHub web interface. For example, you could give the name of the
recipe you want to add (so that others don’t add the same one). It is the “Issues” tab.
(2) Create a new branch.
If on GitHub, you can make the branch in the web interface (Comming changes). If working
locally, you need Cloning a Git repository and working locally.
(3) Make a change adding the recipe
Add a new file with the recipe in it. Commit the file. In the commit message, include the note
about the issue number, saying that this will close that issue.
Cross-referencing issues and pull requests
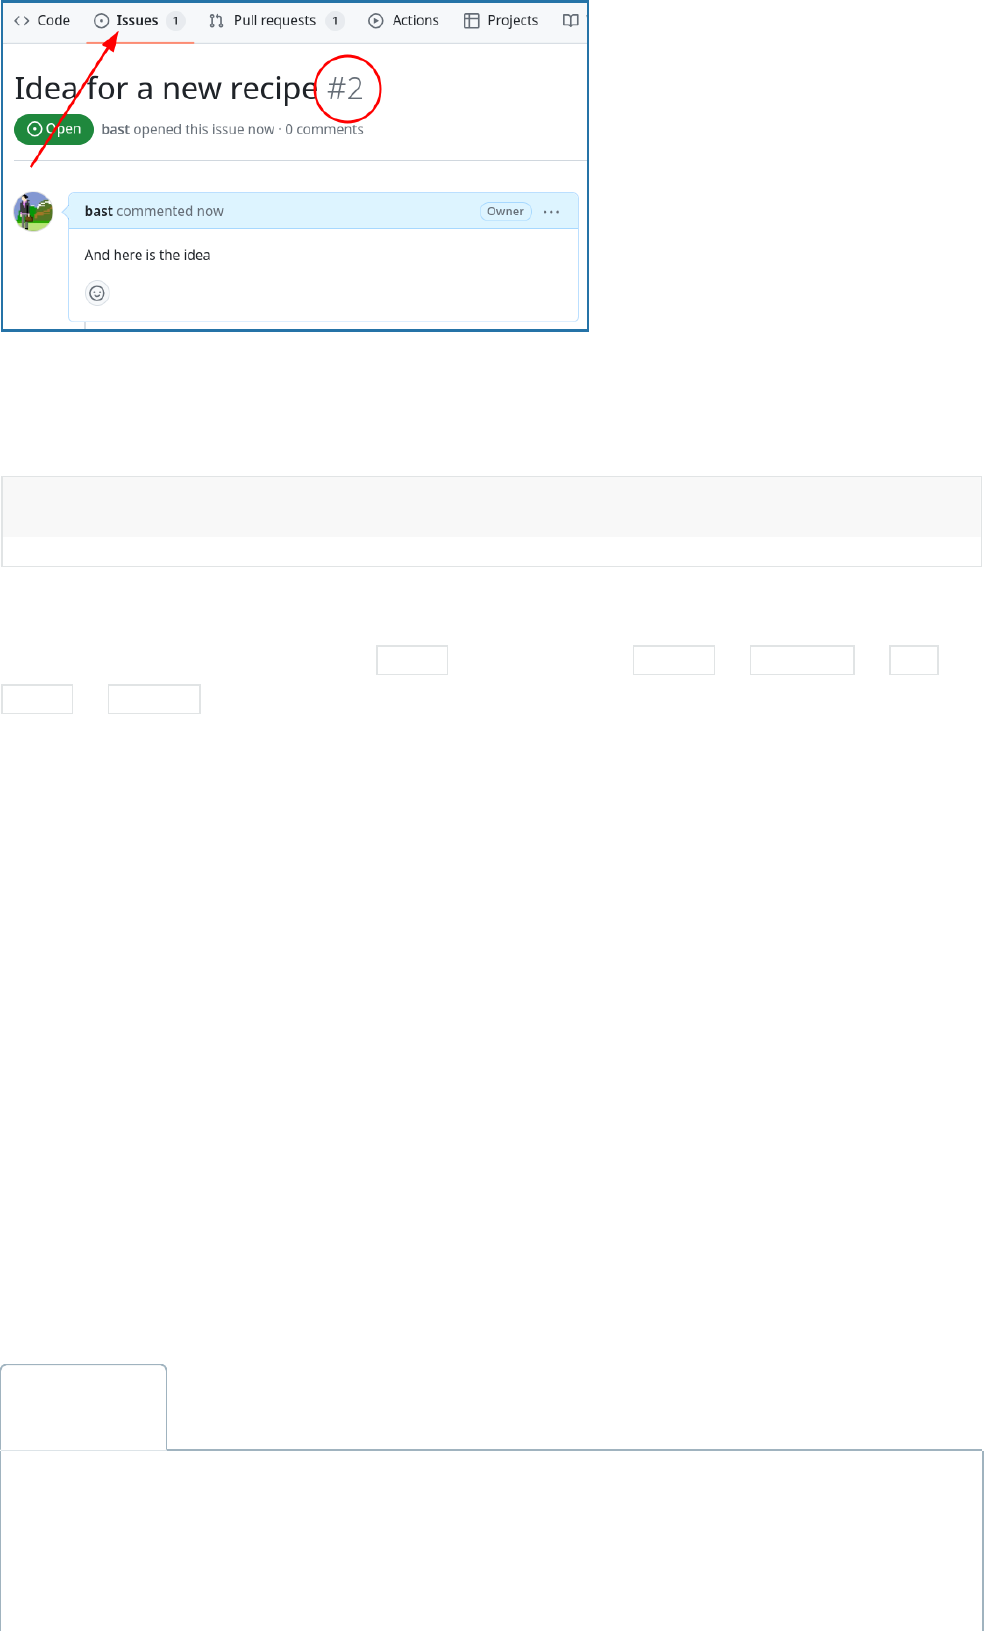
Each issue and each pull request gets a number and you can cross-reference them.
When you open an issue, note down the issue number (in this case it is #2 ):
You can reference this issue number in a commit message or in a pull request, like in this
commit message:
If you forget to do that in your commit message, you can also reference the issue in the pull
request descripon. And instead of fixes you can also use closes or resolves or fix or
close or resolve (case insensive).
Here are all the keywords that GitHub recognizes:
hps://help.github.com/en/arcles/closing-issues-using-keywords
Then observe what happens in the issue once your commit gets merged: it will automacally
close the issue and create a link between the issue and the commit. This is very useful for
tracking what changes were made in response to which issue and to know from when unl
when precisely the issue was open.
(4) Push to GitHub as a new branch
Covered in Cloning a Git repository and working locally.
Push the branch to the repository. You should end up with a branch visible in the GitHub
web view.
This is only necessary if you created the changes locally. If you created the changes directly
on GitHub, you can skip this step.
this is the new recipe; fixes #2
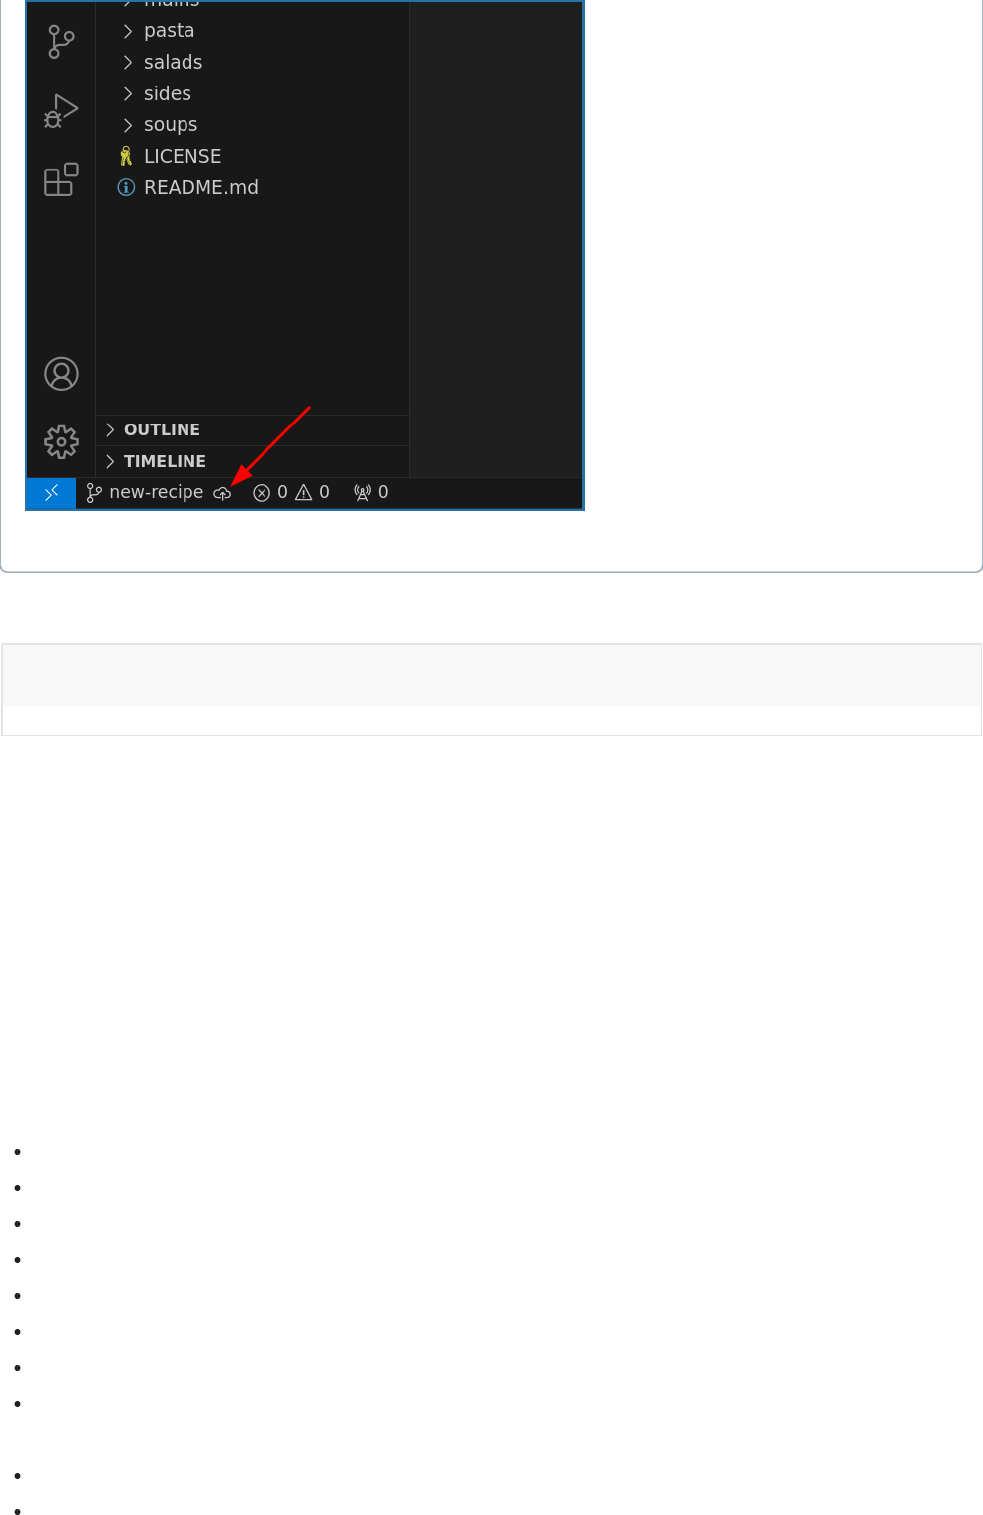
VS Code Command line
In VS Code, you can “publish the branch” to the remote repository by clicking the cloud
icon in the boom le corner of the window:
If the remote points to the wrong place, you can change it with:
(5) Open a pull request towards the main branch
This is done through the GitHub web interface. We saw this in, for example, in a previous
lesson.
(6) Reviewing pull requests
You review through the GitHub web interface.
Checklist for reviewing a pull request:
Be kind, on the other side is a human who has put effort into this.
Be construcve: if you see a problem, suggest a soluon.
Towards which branch is this directed?
Is the tle descripve?
Is the descripon informave?
Scroll down to see commits.
Scroll down to see the changes.
If you get incredibly many changes, also consider the license or copyright and ask where
all that code is coming from.
Again, be kind and construcve.
Later we will learn how to suggest changes directly in the pull request.
$ git remote set-url origin NEWADDRESS
If someone is new, it’s oen nice to say something encouraging in the comments before
merging (even if it’s just “thanks”). If all is good and there’s not much else to say, you could
merge directly.
(7) Draft pull requests
Try to create a dra pull request:
Verify that the dra pull request cannot be merged unl it is marked as ready for review:
Dra pull requests can be useful for:
Feedback: You can open a pull request early to get feedback on your work without
signaling that it is ready to merge.
Informaon: They can help communicang to others that a change is coming up and in
progress.
What is a protected branch? And how to modify it?
A protected branch on GitHub or GitLab is a branch that cannot (accidentally) deleted or
force-pushed to. It is also possible to require that a branch cannot be directly pushed to or
modified, but that changes must be submied via a pull request.
To protect a branch in your own repository, go to “Sengs” -> “Branches”.
Summary
We used all the same pieces that we’ve learned the last two days
But we successfully contributed to someone else’s project!
The pull request allowed us to contribute without changing directly: this is very good
when it’s not mainly our project.
Practicing code review
In this episode we will pracce the code review process. We will learn how to ask for
changes in a pull request, how to suggest a change in a pull request, and how to modify a pull
request.
This will enable research groups to work more collaboravely and to not only improve the
code quality but also to learn from each other.
Exercise
⚙ Exercise preparaon
We can connue in the same exercise repository which we have used in the previous
episode.
Exercise: Praccing code review (25 min)
Technical requirements:
If you create the commits locally: Being able to authencate to GitHub
What is familiar from the previous workshop days:
Creang a branch (previous lesson)
Comming a change on the new branch (previous lesson)
Opening and merging pull requests (previous lesson)

What will be new in this exercise:
As a reviewer, we will learn how to ask for changes in a pull request.
As a reviewer, we will learn how to suggest a change in a pull request.
As a submier, we will learn how to modify a pull request without closing the
incomplete one and opening a new one.
Exercise tasks:
1. Create a new branch and one or few commits: in these improve something but also
deliberately introduce a typo and also a larger mistake which we will want to fix
during the code review.
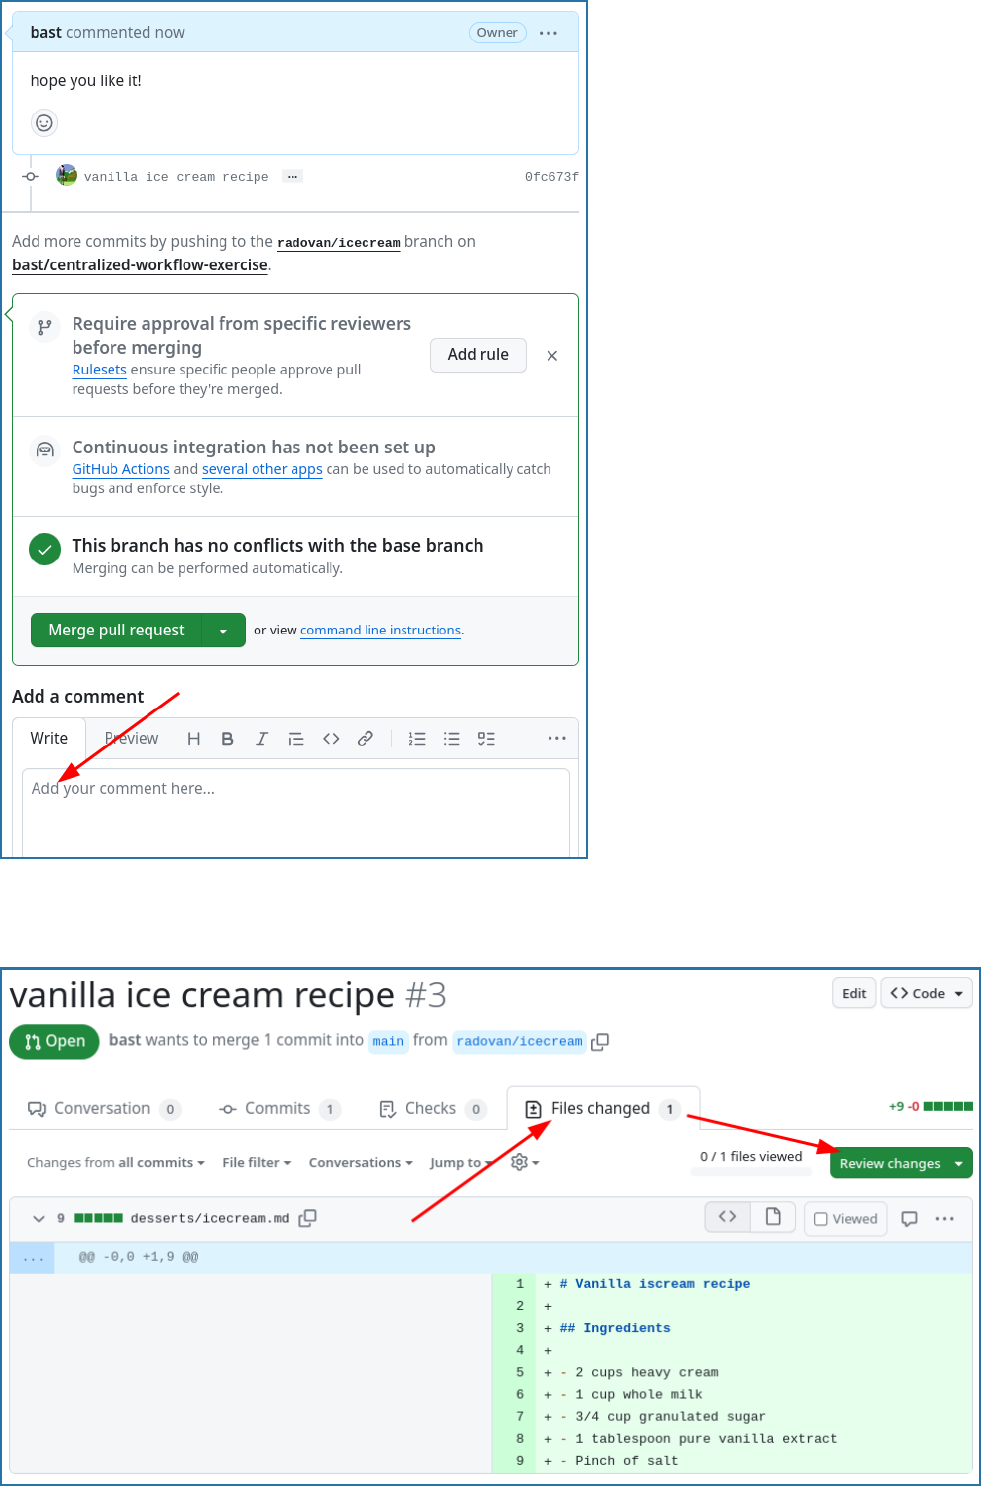
2. Open a pull request towards the main branch.
3. As a reviewer to somebody else’s pull request, ask for an improvement and also
directly suggest a change for the small typo. (Hint: suggesons are possible through
the GitHub web interface, view of a pull request, “Files changed” view, aer selecng
some lines. Look for the “±” buon.)
4. As the submier, learn how to accept the suggested change. (Hint: GitHub web
interface, “Files Changed” view.)
5. As the submier, improve the pull request without having to close and open a new
one: by adding a new commit to the same branch. (Hint: push to the branch again.)
6. Once the changes are addressed, merge the pull request.
Help and discussion
From here on out, we don’t give detailed steps to the soluon. You need to combine what you
know, and the extra info below, in order to solve the above.
How to ask for changes in a pull request
Technically, there are at least two common ways to ask for changes in a pull request.
Either in the comment field of the pull request:
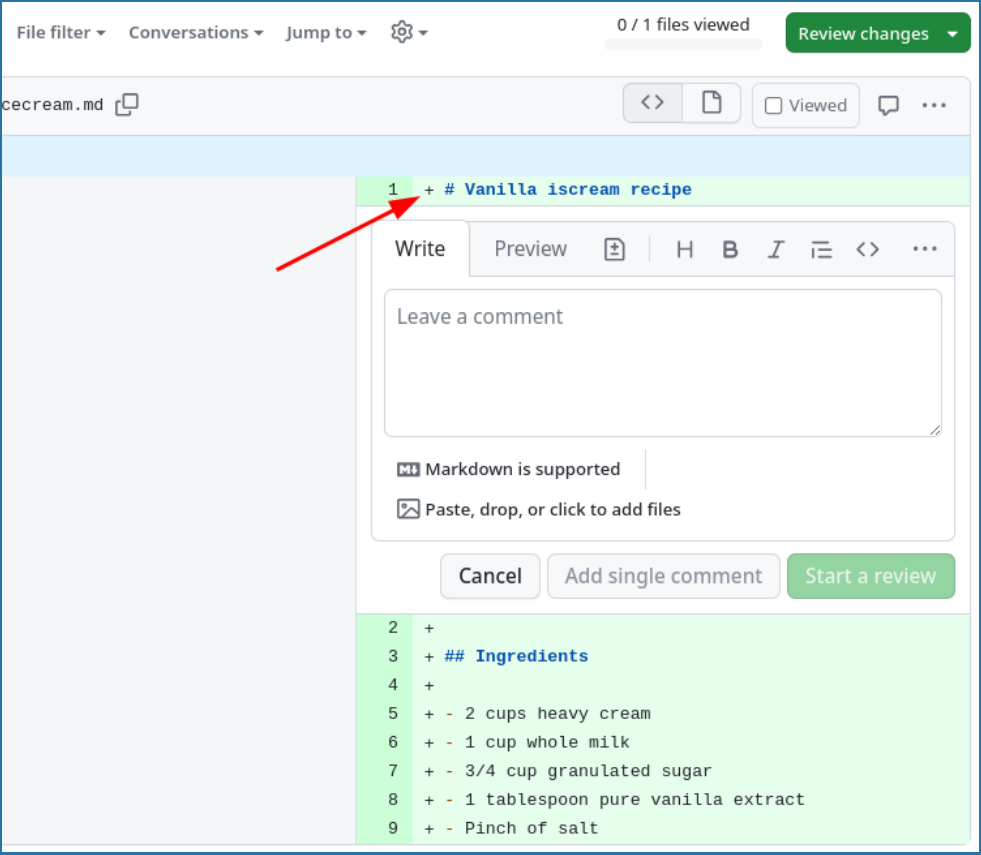
If you see a very small problem that is easy to fix, you can suggest a change as a reviewer.
Instead of asking the submier to ny problem, you can suggest a change by clicking on the
plus sign next to the line number in the “Files changed” tab:
Here you can comment on specific lines or even line ranges.
But now the interesng part is to click on the “Add a suggeson” symbol (the one that looks
like plus and minus). Now you can fix the ny problem (in this case a typo) and then click on
the “Add single comment” buon:

The result is this and the submier can accept the change with a single click:
Aer accepng with “Commit suggeson”, the improvement gets added to the pull request.
How to modify a pull request to address the review comments
If the reviewer asks for changes, it is not necessary to close the pull request and later open a
new one. It can even be counter-producve to do so: This can fragment the discussion and
the history of the pull request and can make it harder to understand the context of the
changes.
A much beer mechanism to recognize that pull requests are not implemented from a
specific commit to a specific branch, but always from a branch to a branch.
This means that you can make amendments to the pull request by adding new commits to the
same source branch. This way the pull request will be updated automacally and the
reviewer can see the new changes and comment on them.
The fact that pull requests are from branch to branch also strongly suggests that it is a good
pracce to create a new branch for each pull request. Otherwise you could accidentally
modify an open pull request by adding new commits to the source branch.
Summary
Our process isn’t just about code now. It’s about discussion and working together to
make the whole process beer.
GitHub discussions and reviewing is quite powerful and can make small changes easy.
How to contribute changes to repositories that belong to
others
In this episode we prepare you to suggest and contribute changes to repositories that belong
to others. These might be open source projects that you use in your work.
We will see how Git and services like GitHub or GitLab can be used to suggest modificaon
without having to ask for write access to the repository and accept modificaons without
having to grant write access to others.
Exercise
⚙ Exercise preparaon
Exercise: Collaborang within the same repository (25 min)
Technical requirements:
If you create the commits locally: Being able to authencate to GitHub
Part of team/exercise room Following on your own
Maintainer (team lead):
Create an exercise repository by generang from a template using this template:
hps://github.com/coderefinery/template-forking-workflow-exercise called
forking-workflow-exercise
In this case we do not add collaborators to the repository (this is the point of this
example).
Share the link to the newly created repository with your group.
Learners in exercise team: Fork the newly created repository (not the “coderefinery”
one) and then clone your fork (if you wish to work locally).

What is familiar from the previous workshop days:
Forking a repository (previous lesson)
Creang a branch (previous lesson)
Comming a change on the new branch (previous lesson)
Opening and merging pull requests (previous lesson)
What will be new in this exercise:
Opening a pull request towards the upstream repository.
Pull requests can be coupled with automated tesng.
Learning that your fork can get out of date.
Aer the pull requests are merged, updang your fork with the changes.
Learn how to approach other people’s repositories with ideas, changes, and requests.
Exercise tasks:
1. Open an issue in the upstream exercise repository where you describe the change you
want to make. Take note of the issue number.
2. Create a new branch in your fork of the repository.
3. Make a change to the recipe book on the new branch and in the commit cross-
reference the issue you opened. See the walk-through below for how to do this.
4. Open a pull request towards the upstream repository.
5. Team leaders will merge the pull requests. For individual parcipants, the instructors
and workshop organizers will review and merge the pull requests. During the review,
pay aenon to the automated test step (here for demonstraon purposes, we test
whether the recipe contains an ingredients and an instrucons secons).
6. Aer few pull requests are merged, update your fork with the changes.
7. Check that in your fork you can see changes from other people’s pull requests.
Help and discussion
Help! I don’t have permissions to push my local changes
Maybe you see an error like this one:
Or like this one:
Please make sure you have the correct access rights
and the repository exists.
failed to push some refs to cr-workshop-exercises/forking-workflow-exercise.git

In this case you probably try to push the changes not to your fork but to the original
repository and in this exercise you do not have write access to the original repository.
The simpler soluon is to clone again but this me your fork.
✔ Recovery
But if you want to keep your local changes, you can change the remote URL to point to
your fork. Check where your remote points to with git remote --verbose .
It should look like this (replace your-user with your GitHub username):
It should not look like this:
In this case you can adjust “origin” to point to your fork with:
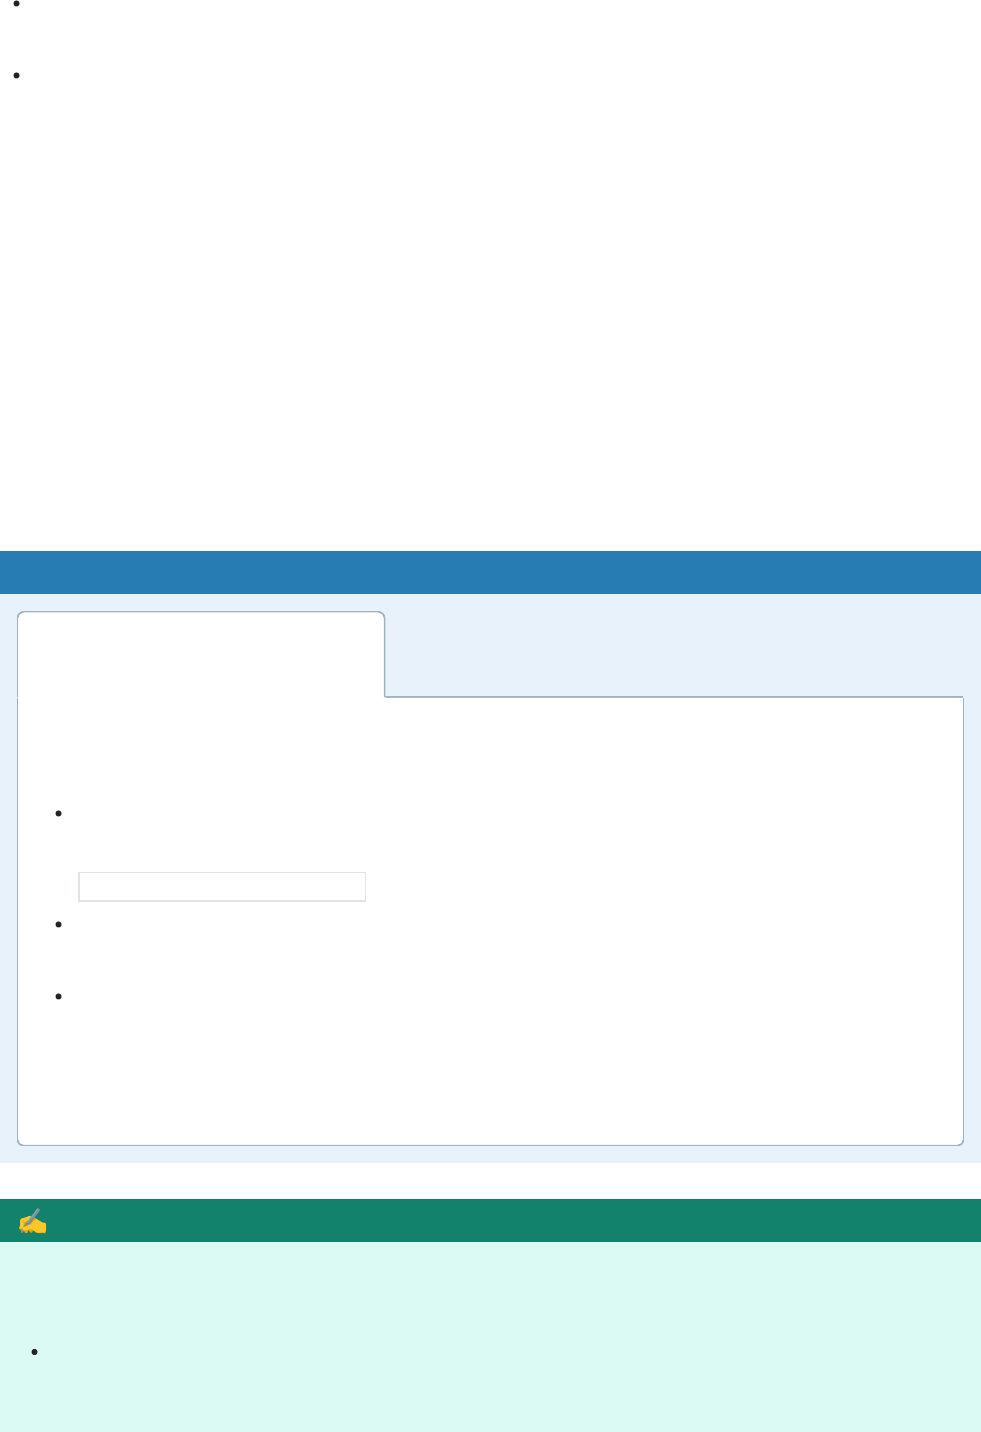
Opening a pull request towards the upstream repository
We have learned in the previous episode that pull requests are always from branch to
branch. But the branch can be in a different repository.
When you open a pull request in a fork, by default GitHub will suggest to direct it towards
the default branch of the upstream repository.
This can be changed and it should always be verified, but in this case this is exactly what we
want to do, from fork towards upstream:
$ git remote --verbose
origin [email protected]:your-user/forking-workflow-exercise.git (fetch)
origin [email protected]:your-user/forking-workflow-exercise.git (push)
$ git remote --verbose
origin [email protected]:cr-workshop-exercises/forking-workflow-exercise.git (fetch)
origin [email protected]:cr-workshop-exercises/forking-workflow-exercise.git (push)
$ git remote set-url origin [email protected]:your-user/forking-workflow-exercise.git
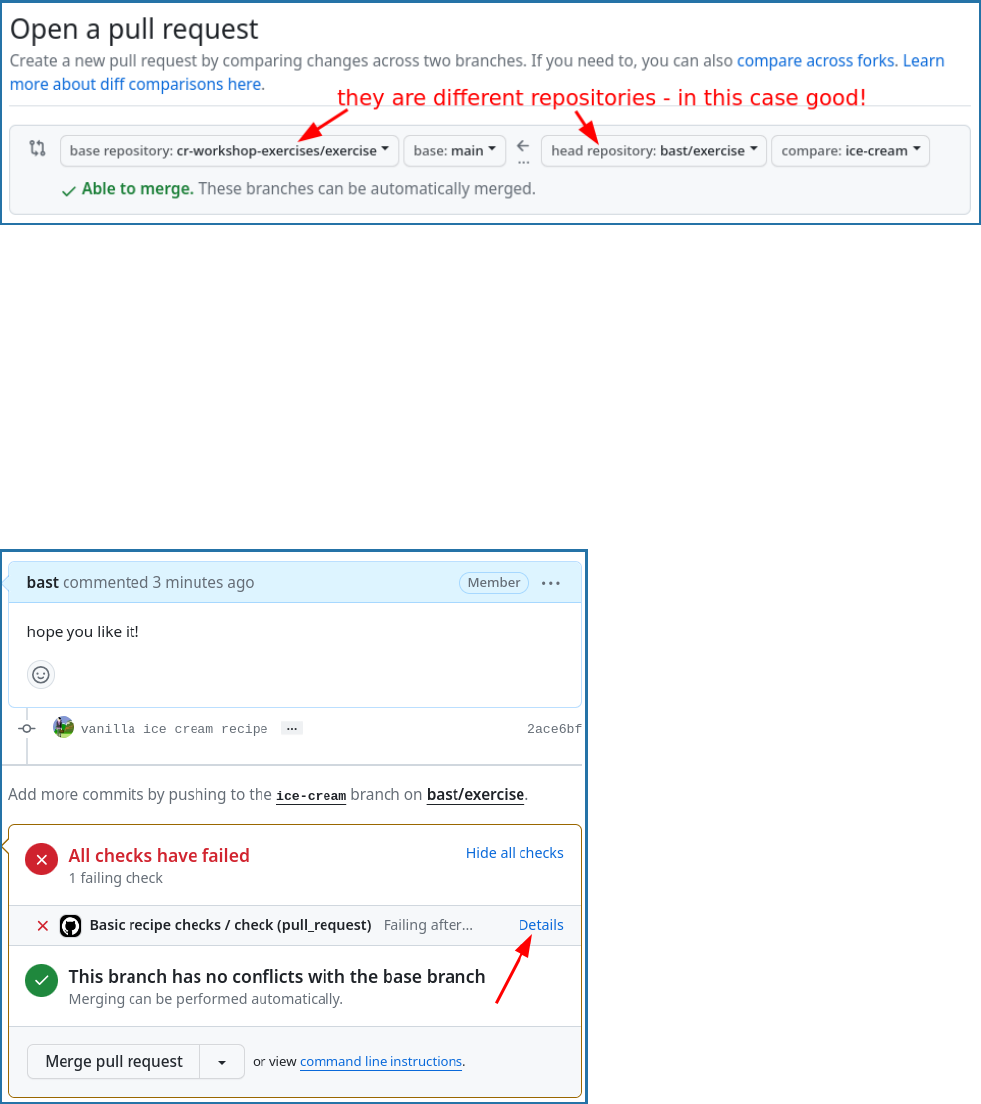
Pull requests can be coupled with automated testing
We added an automated test here just for fun and so that you see that this is possible to do.
In this exercise, the test is silly. It will check whether the recipe contains both an ingredients
and an instrucons secon.
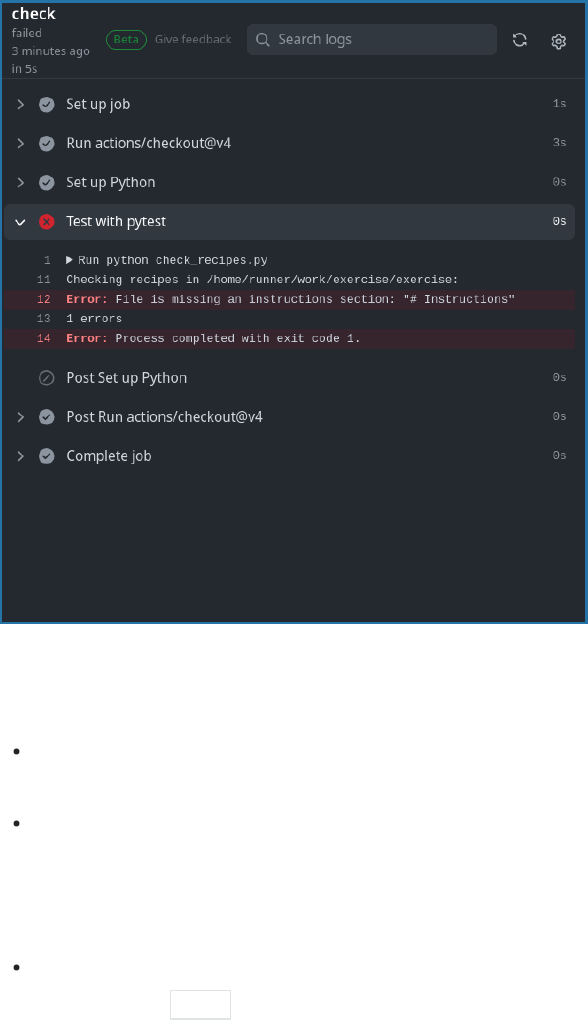
In this example the test failed:
Click on the “Details” link to see the details of the failed test:
How can this be useful?
The project can define what kind of tests are expected to pass before a pull request can
be merged.
The reviewer can see the results of the tests, without having to run them locally.
How does it work?
We added a GitHub Acons workflow to automacally run on each push or pull request
towards the main branch.
What tests or steps can you image for your project to run automacally with each pull
request?
How to update your fork with changes from upstream
This used to be difficult but now it is two mouse clicks.
Navigate to your fork and noce how GitHub tells you that your fork is behind. In my case, it
is 9 commits behind upstream. To fix this, click on “Sync fork” and then “Update branch”:
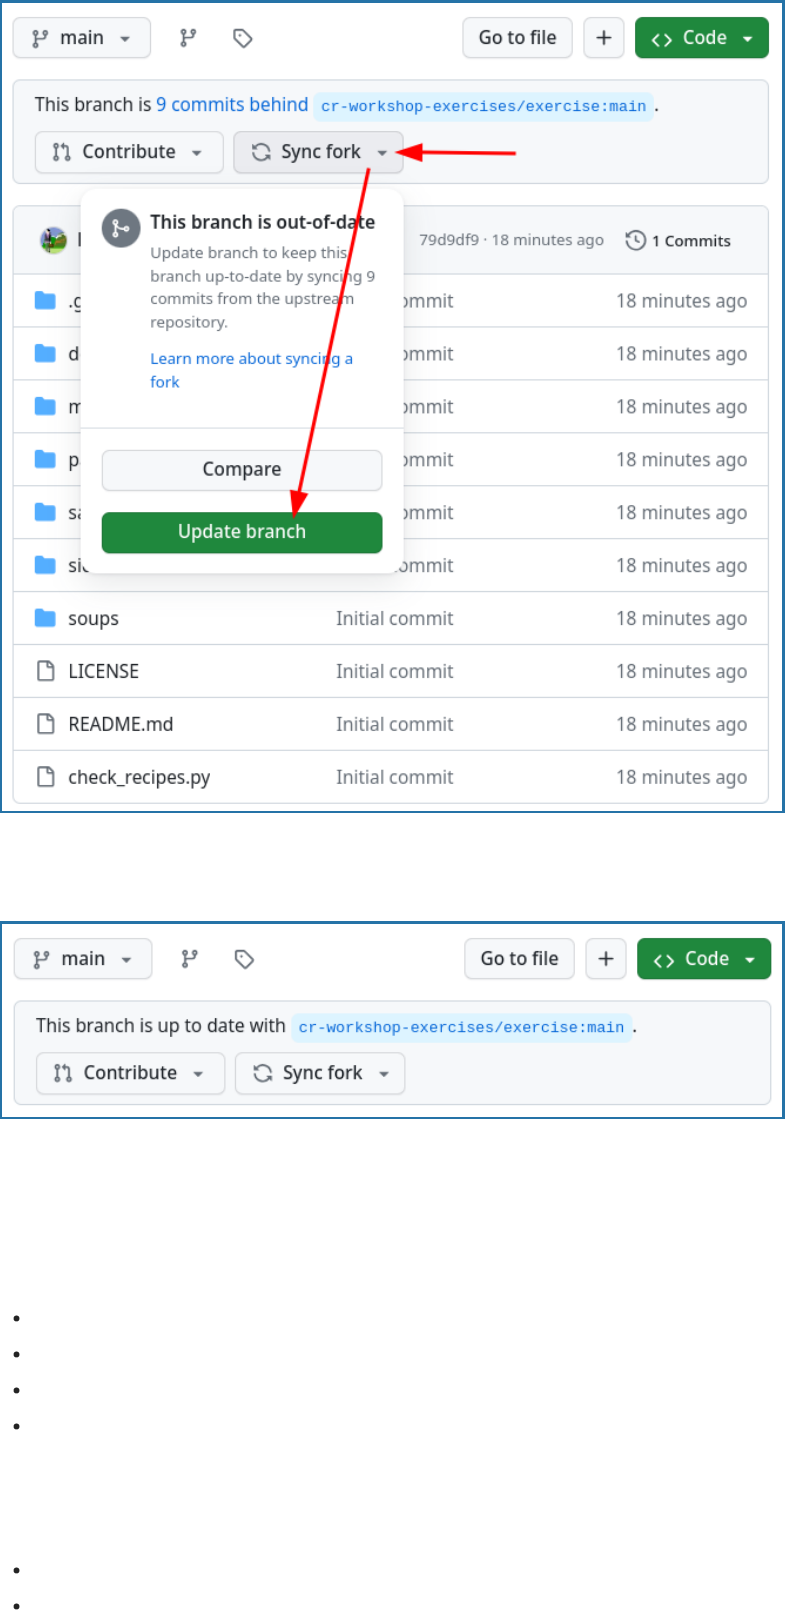
Aer the update my “branch is up to date” with the upstream repository:
How to approach other people’s repositories with ideas, changes, and
requests
Contribung very minor changes
Clone or fork+clone repository
Create a branch
Commit and push change
Open a pull request or merge request
If you observe an issue and have an idea how to fix it
Open an issue in the repository you wish to contribute to
Describe the problem
If you have a suggeson on how to fix it, describe your suggeson
Possibly discuss and get feedback
If you are working on the fix, indicate it in the issue so that others know that somebody is
working on it and who is working on it
Submit your fix as pull request or merge request which references/closes the issue
Movaon
Inform others about an observed problem
Make it clear whether this issue is up for grabs or already being worked on
If you have an idea for a new feature
Open an issue in the repository you wish to contribute to
In the issue, write a short proposal for your suggested change or new feature
Movate why and how you wish to do this
Also indicate where you are unsure and where you would like feedback
Discuss and get feedback before you code
Once you start coding, indicate that you are working on it
Once you are done, submit your new feature as pull request or merge request which
references/closes the issue/proposal
Movaon
Get agreement and feedback before wring 5000 lines of code which might be
rejected
If we later wonder why something was done, we have the issue/proposal as reference
and can read up on the reasoning behind a code change
Summary
This forking workflow lets you propose changes to repositories for which you have no
access.
This is the way that much modern open-source soware works.
You can now contribute to any project you can view.
Collaborating within the same repository
Objecves
Understand how to collaborate using a centralized workflow.
Understand the difference between local branch, origin/branch, and remote branch.
Instructor note
30 min teaching
30 min exercises
Meaning of “central” in a distributed version control
In this episode, we will explore the usage of a centralized workflow for collaborang online
on a project within one repository on GitHub. This means that everyone has access to that
central repository - convenient (but doesn’t scale to a huge project).
In the next secon, we will see that Git is distributed version control. This means that any
type of repository links that you can think of can be implemented - not just “everything
connects to one central server”.
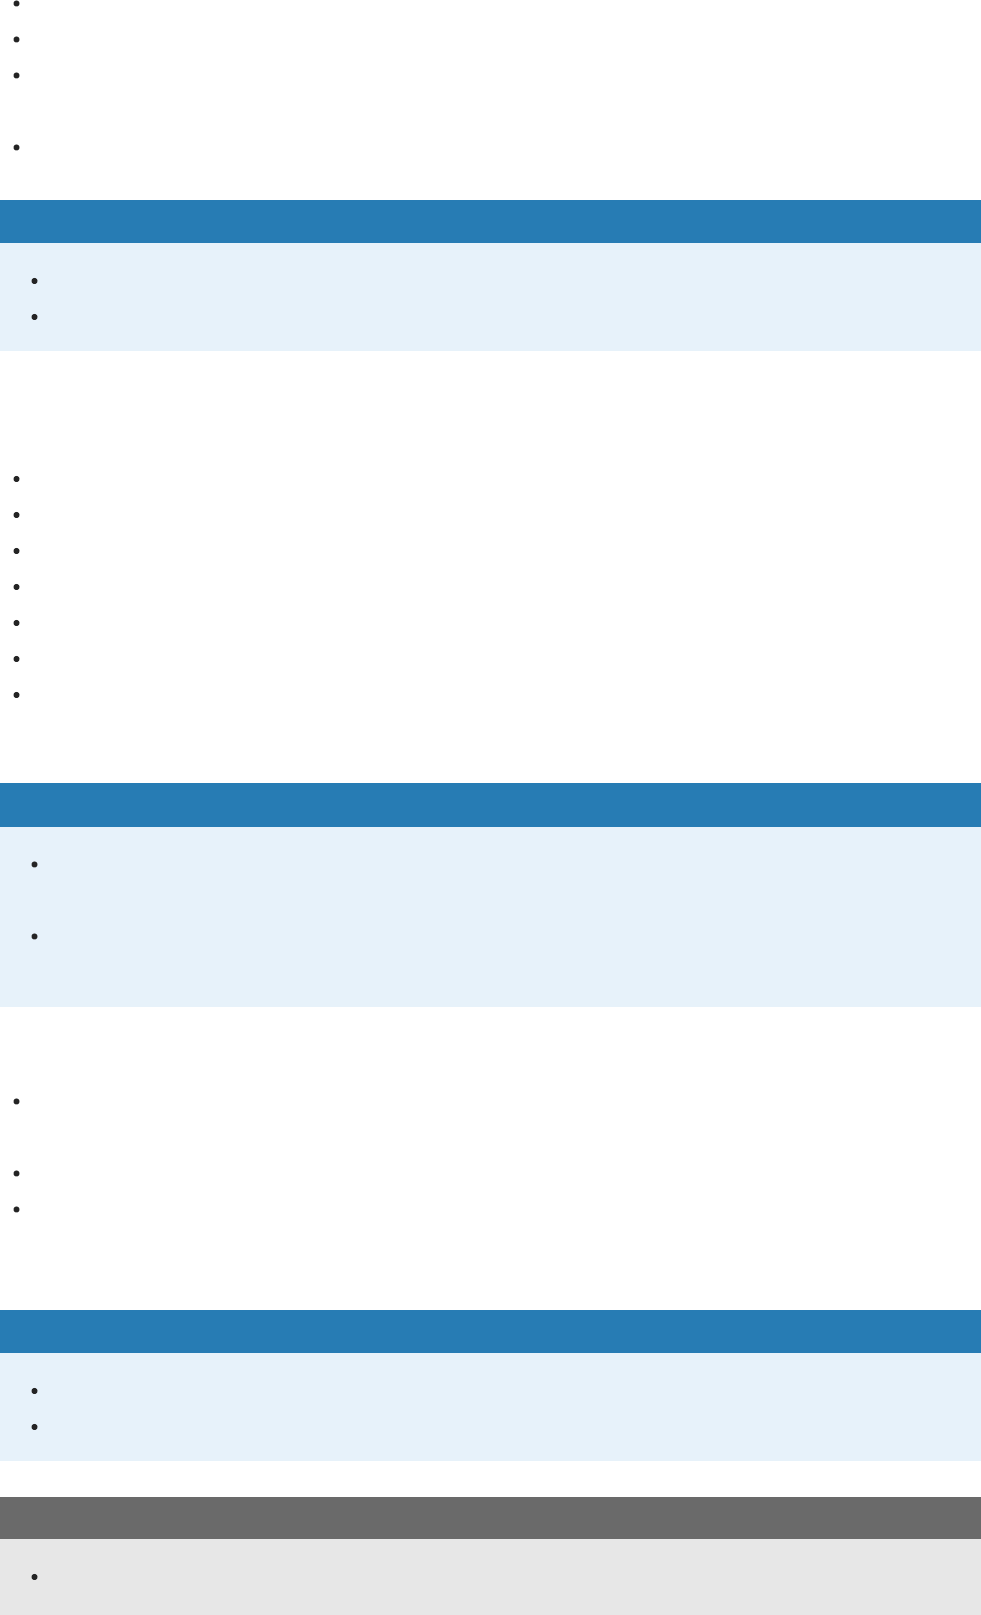
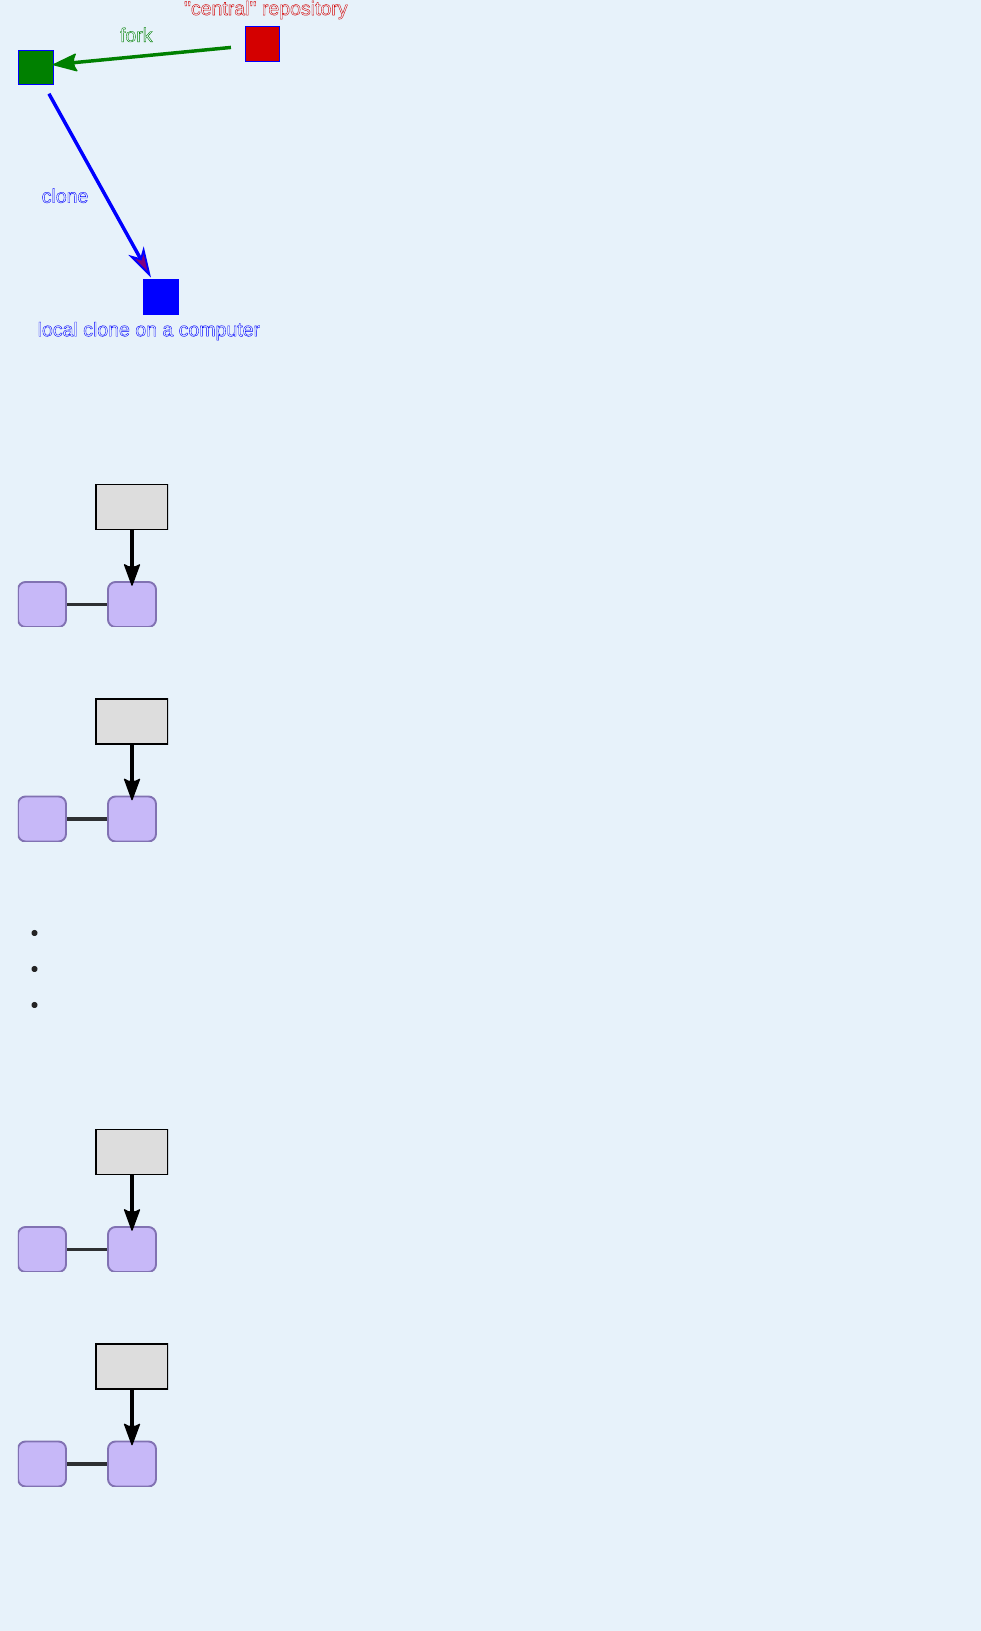
Centralized layout
"central" repository"central" repository
local clone on a computerlocal clone on a computer
Centralized layout. Red is the repository on GitHub. Blue is where all contributors work on their
own computers.
Features:
Typically all developers have both read and write permissions (double-headed arrows).
Suited for cases where all developers are in the same group or organizaon or project.
Everybody who wants to contribute needs write access.
Good idea to write-protect the main branch (typically main or master ).
Real life examples:
Within the CodeRefinery team we mostly use this approach:
hps://github.com/coderefinery
hps://github.com/ropensci/plotly
Exercise
We are working on combining the steps into one exercise.
Exercise preparation
In this exercise we will pracce collaborave centralized workflow in groups (but you can
also collaborate with us as individual). One person (maintainer) will create the exercise
repository, and collaborators will contribute to it. We’ll discuss how this leads to code review
and discuss a number of typical pialls.
⚙ Exercise preparaon
Part of team/exercise room Following on your own
Form not too large groups (4-5 persons).
Each group needs to appoint someone who will host the shared GitHub
repository: the maintainer. This is typically the exercise lead (if available).
Everyone else is a collaborator.
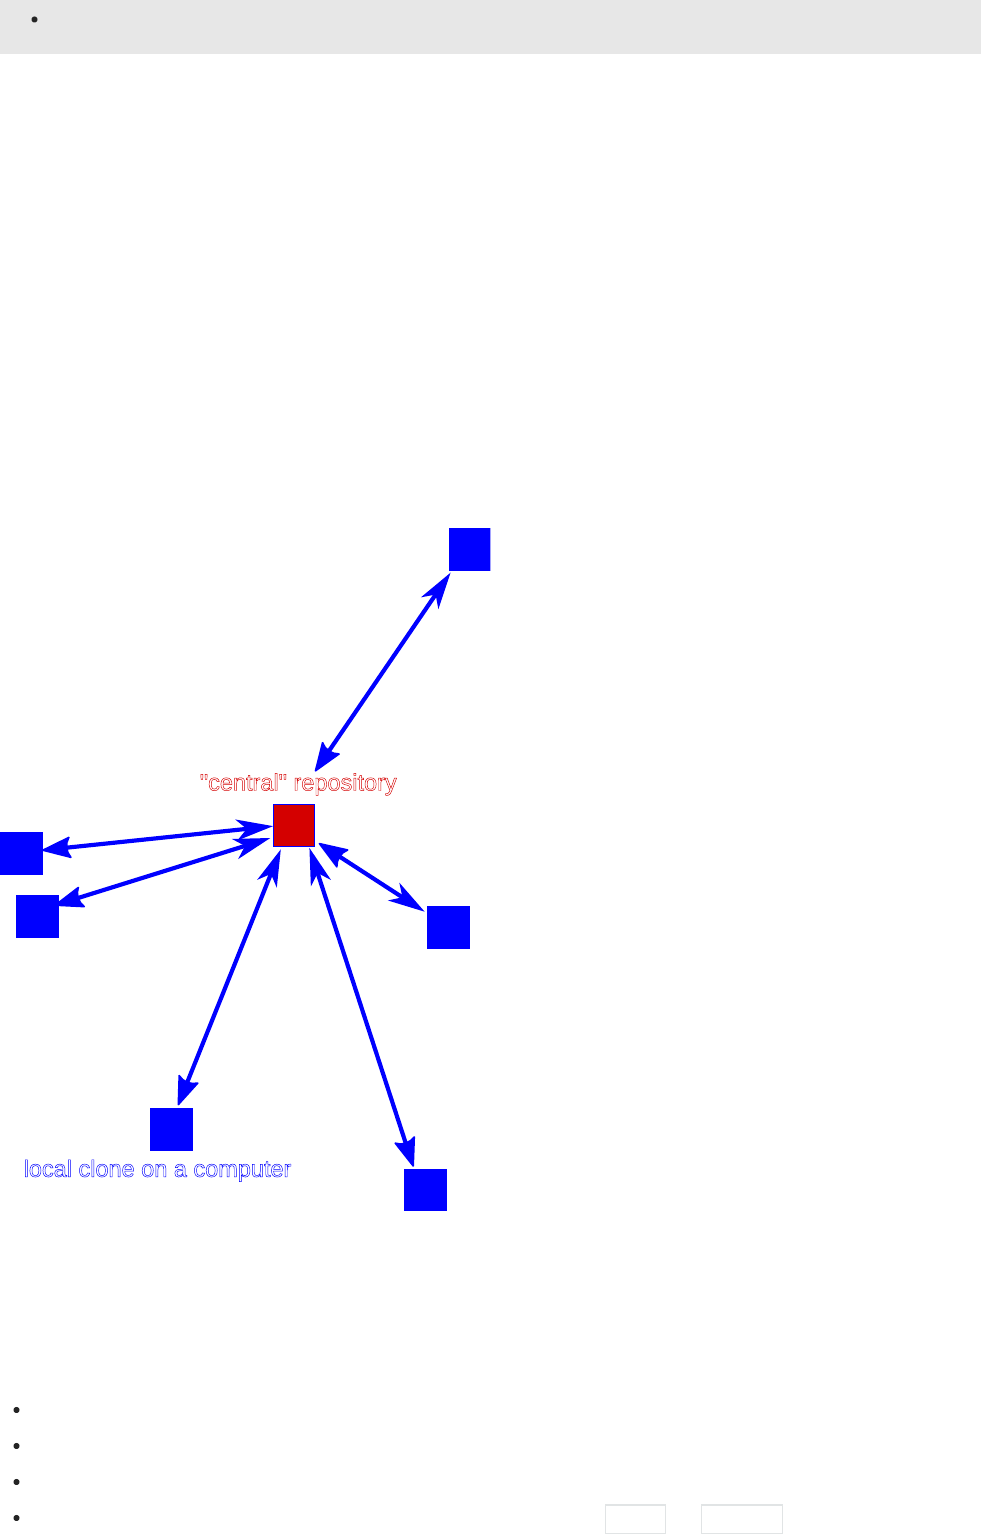
The maintainer (one person per group) generates a new repository from the
template hps://github.com/coderefinery/template-centralized-workflow-
exercise called centralized-workflow-exercise (There is no need to ck “Include
all branches” for this exercise):
Don’t forget to accept the invitaon
Check hps://github.com/sengs/organizaons/
Alternavely check the inbox for the email account you registered with GitHub.
GitHub emails you an invitaon link, but if you don’t receive it you can go to your
GitHub noficaons in the top right corner. The maintainer can also “copy invite
link” and share it within the group.
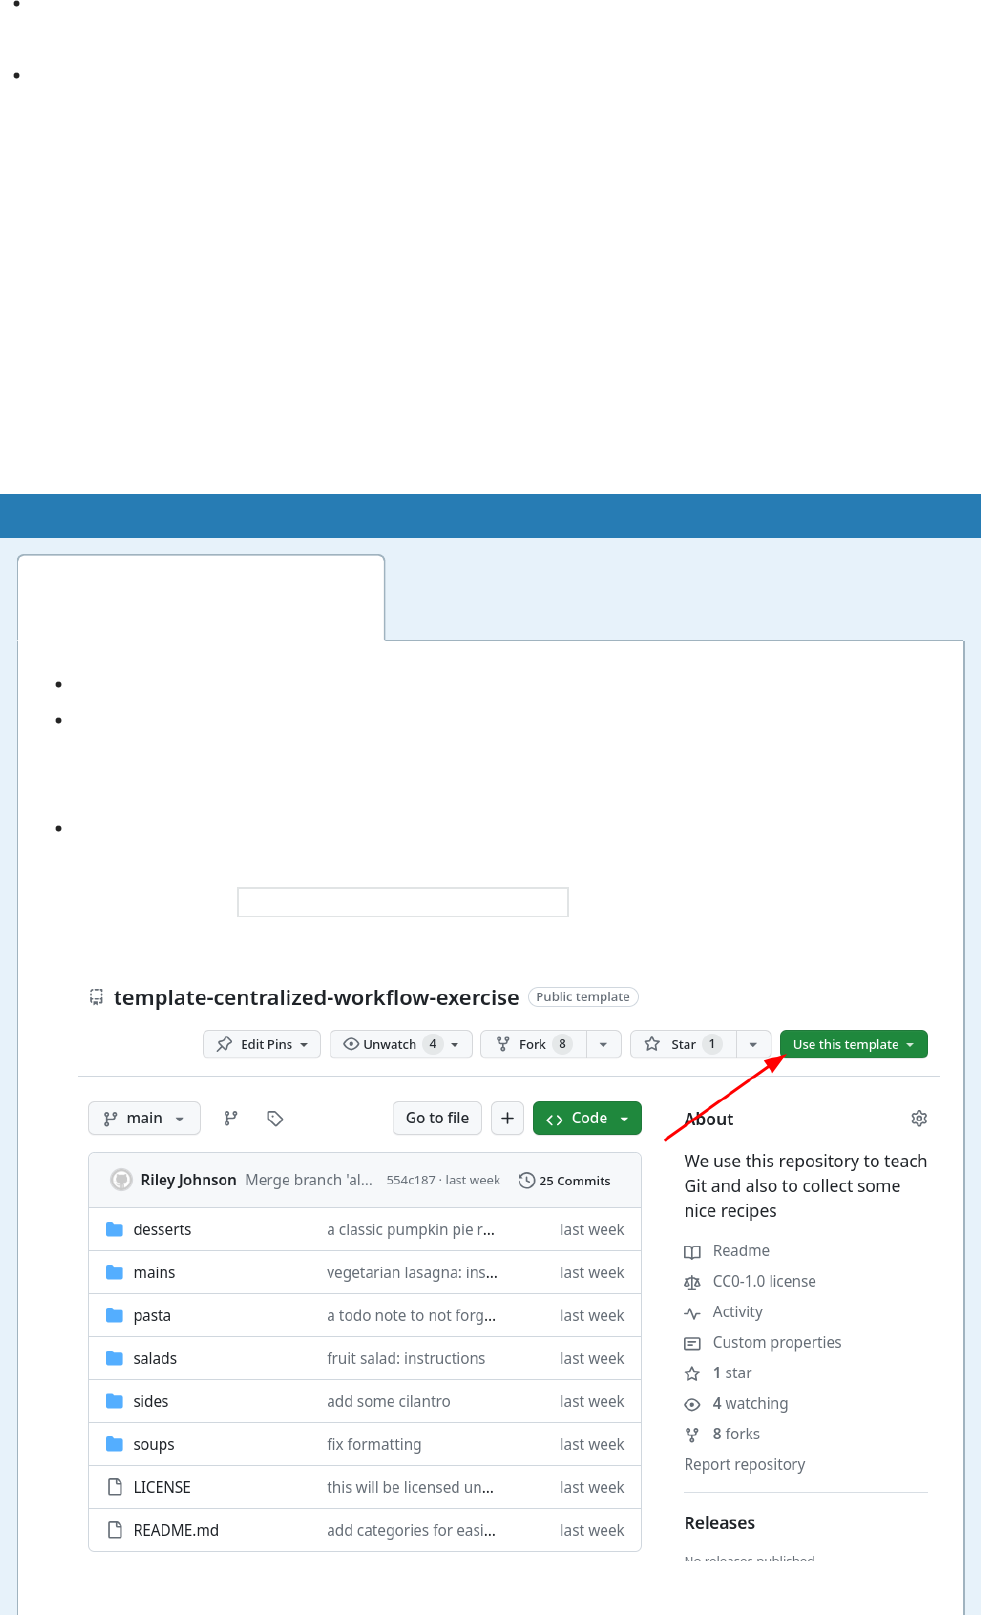
Watching and unwatching repositories
Now that you are a collaborator, you get nofied about new issues and pull
requests via email.
If you do not wish this, you can “unwatch” a repository (top of the project page).
However, we recommend watching repositories you are interested in. You can
learn things from experts just by watching the acvity that come through a
popular project.
Unwatch a repository by clicking “Unwatch” in the repository view, then “Parcipang and
@menons” - this way, you will get noficaons about your own interacons.
Then everyone in your group needs their GitHub account to be added as
collaborator to the exercise repository:
Collaborators give their GitHub usernames to their chosen maintainer.
Maintainer gives the other group members the newly created GitHub
repository URL.
Maintainer adds parcipants as collaborators to their project (Sengs →
Manage Access → Invite a collaborator).
Exercise: Part 1 - creating a pull request
Centralized-1: Clone a repository, add a file, push changes as a branch, and create a
pull request
Before we start with the exercise, instructor points to the preparaon (above).
Then work on steps A-H.
There are also oponal exercises.
Before and aer each acon you take, run the following informaonal commands:
git graph - almost every me
git status - when you modify files
Hint for breakout rooms
If the helper in the room is the one who sets up the central repository, they cannot easily
demostrate the steps via screen-sharing as the repository’s maintainer. A good alternave
is to have one of the learners screen-share and get advice on the steps from other
learners and helpers!
Step A. Clone your maintainer’s group repository
Where REPOSITORY-URL is the repository created by the exercise maintainer.
Clone using the SSH path you get from the webpage (the one that starts with
able to push later.
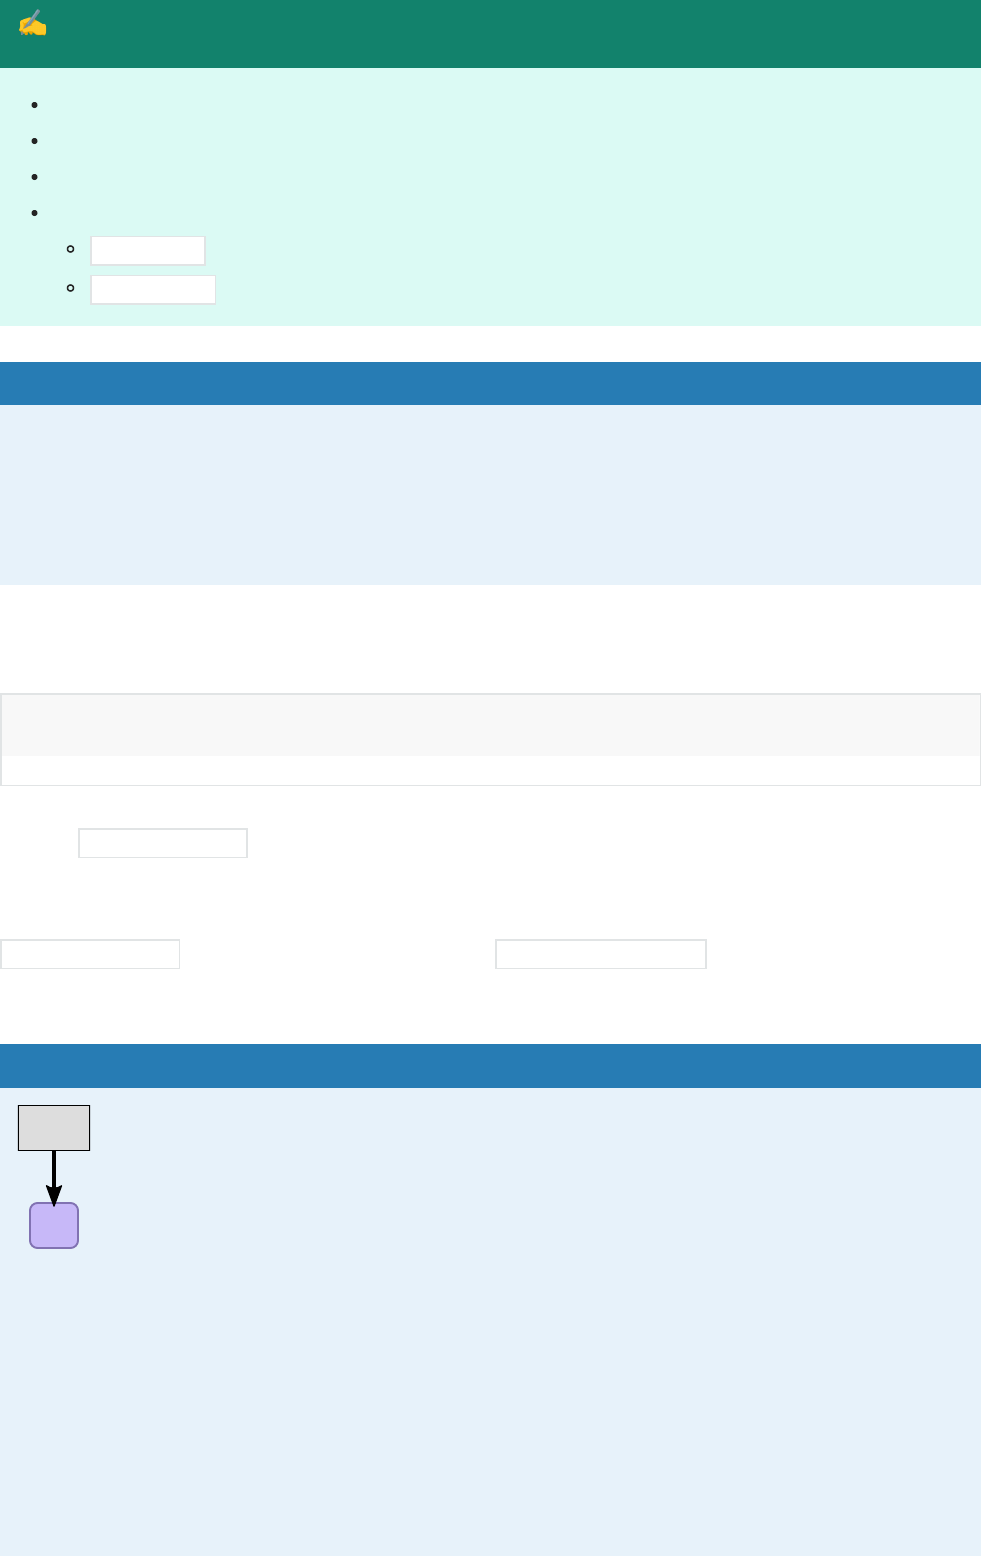
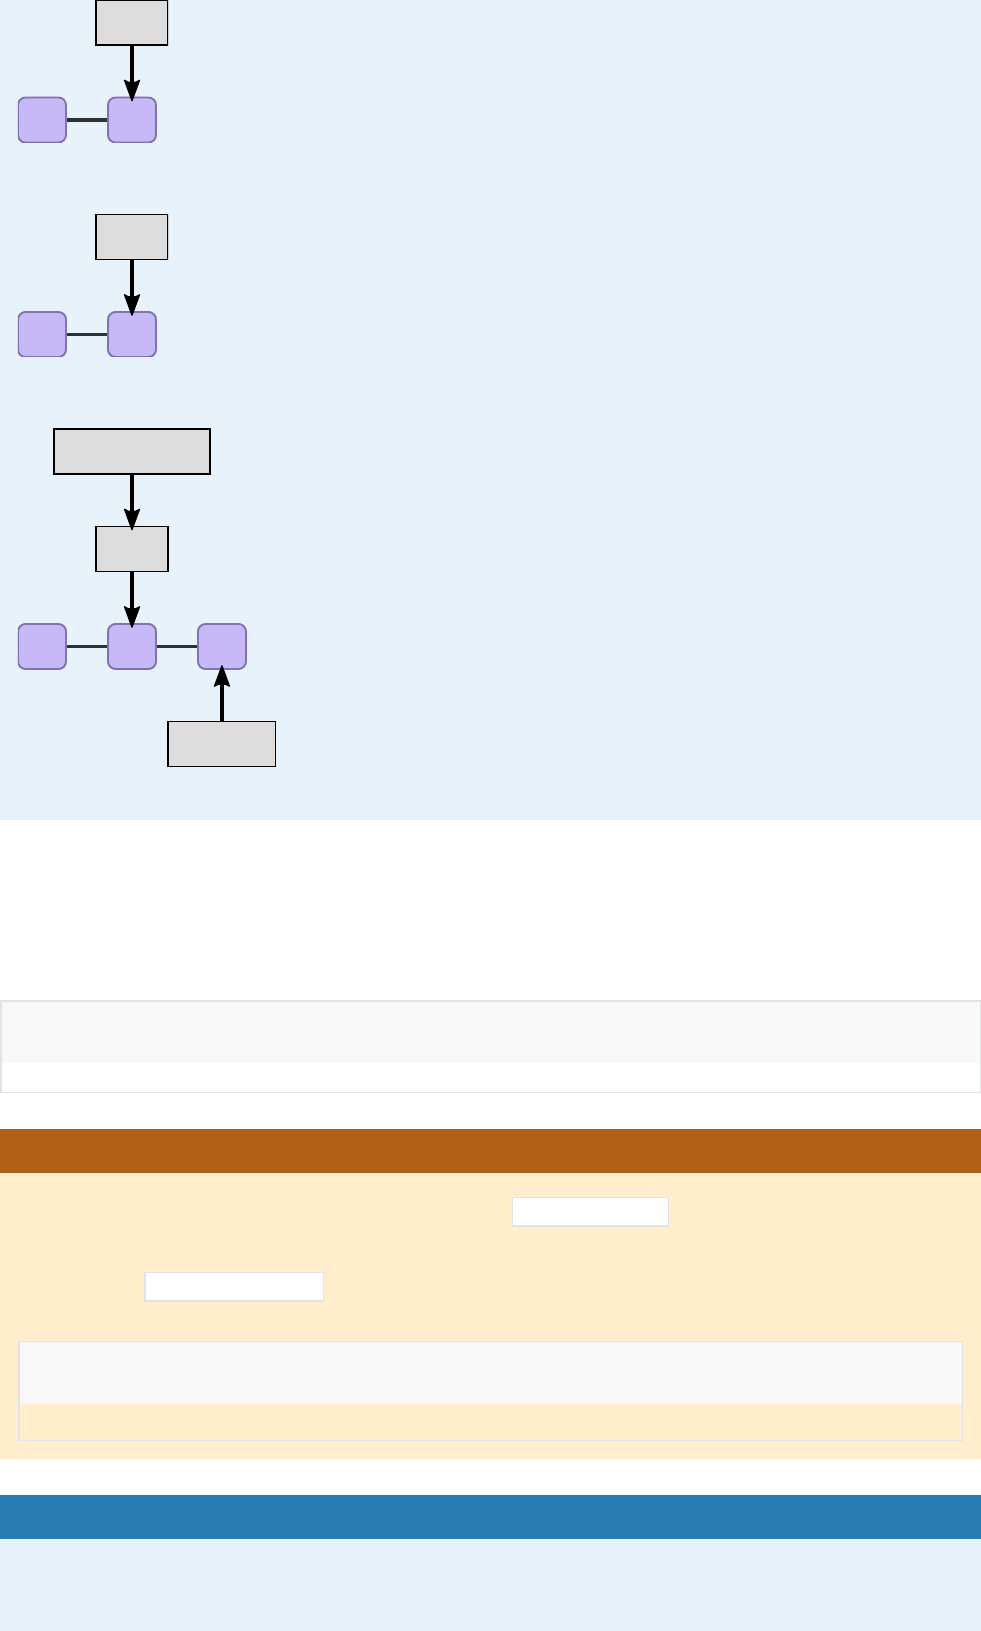
Representaon of what happens when you clone
c1
main
remote or central
$ git clone REPOSITORY-URL centralized-workflow-exercise
c1
origin/main
main
HEAD
local
Here and in what follows, “c1” is a commit, “b1” etc. are commits on side branches and
“m1” is a merge commit.
We clone the enre history, all branches, all commits. In our case, we have one branch
(we did not include all branches when creang our repository from template) and we
have only one commit (inial commit).
git clone creates pointers origin/main so you can see the branches of the origin.
origin refers to where we cloned from.
origin is a shortcut for the full URL.
origin/main is a read-only pointer.
The branches starng with origin/ only move during git pull or git fetch or git
push .
Only git pull or git fetch or git push require network.
All other operaons are local operaons.
Step B. Change directory into the newly created directory
Try to find out where this repository was cloned from using git remote -v .
Step C. Create a branch yourname-somefeature pointing at your commit
Create a branch from the current main . Also adapt “yourname-somefeature” to a beer
name:
$ cd centralized-workflow-exercise
$ git branch yourname-somefeature main
$ git switch yourname-somefeature
The yourname- prefix has no special meaning here (not like origin/ ): it is just part of a
branch name to indicate who made it.
Step D. Create a file with a unique name, e.g.: yourusername.txt
In this file share your favourite cooking recipe or haiku or Git trick or whatever (we will push
soon to a public repository so don’t share something you don’t want to become public for the
duraon of the exercise).
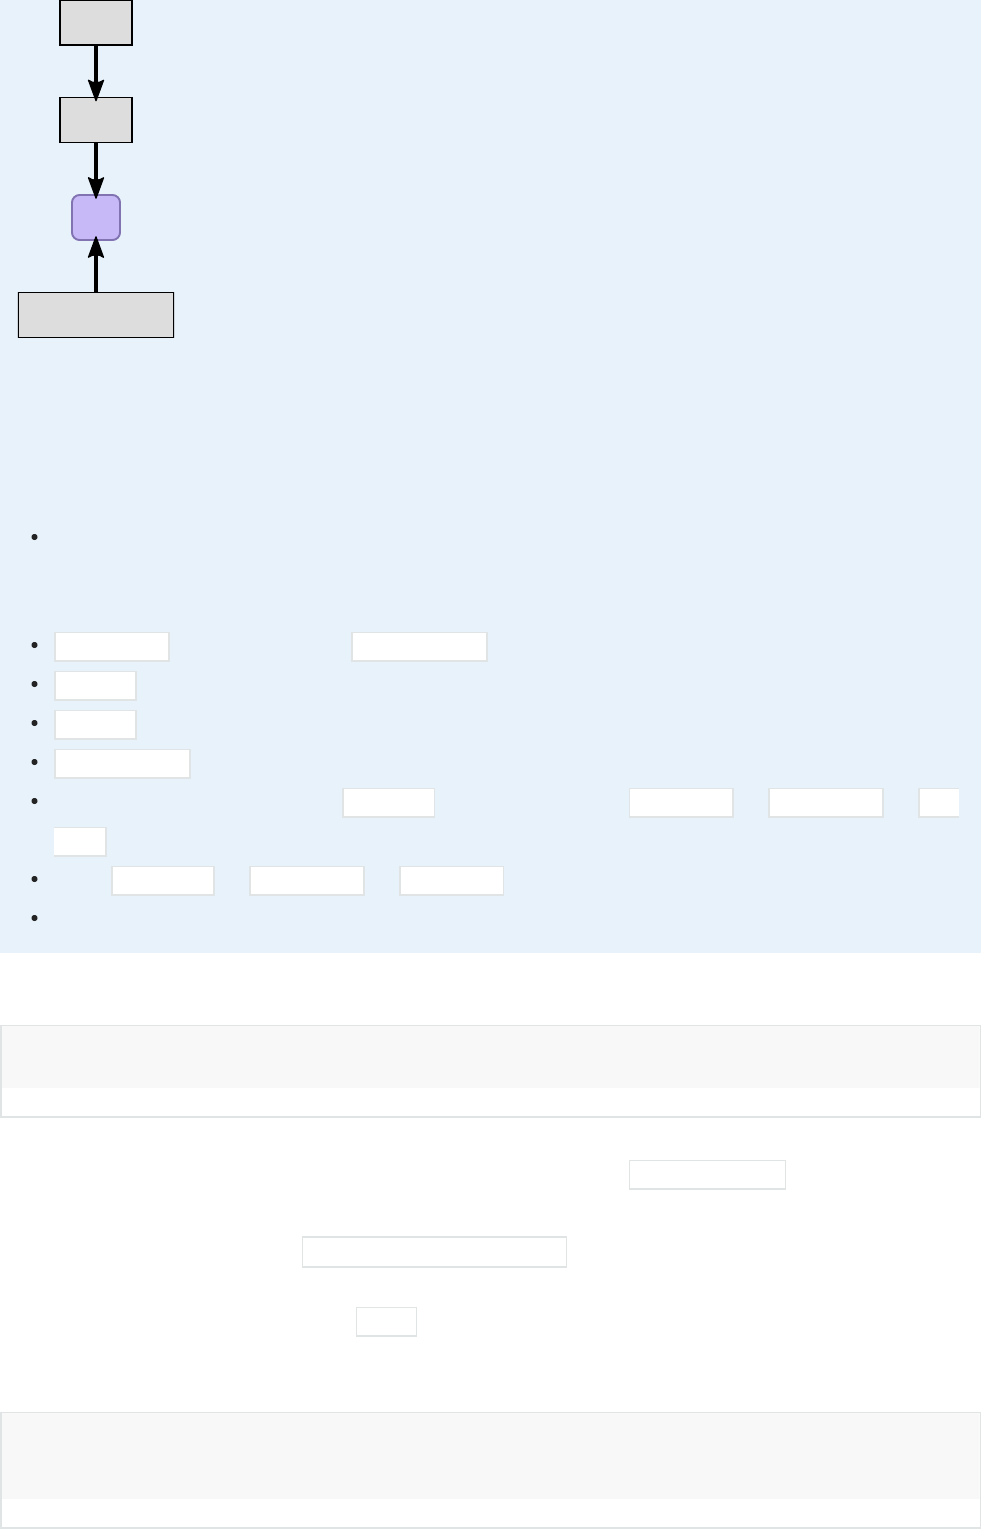
Step E. Stage and commit the change
The commit only exists locally
c1
main
remote or central
c1
b1
yourname-somefeature
HEAD
main
origin/main
local (read figure le to right)
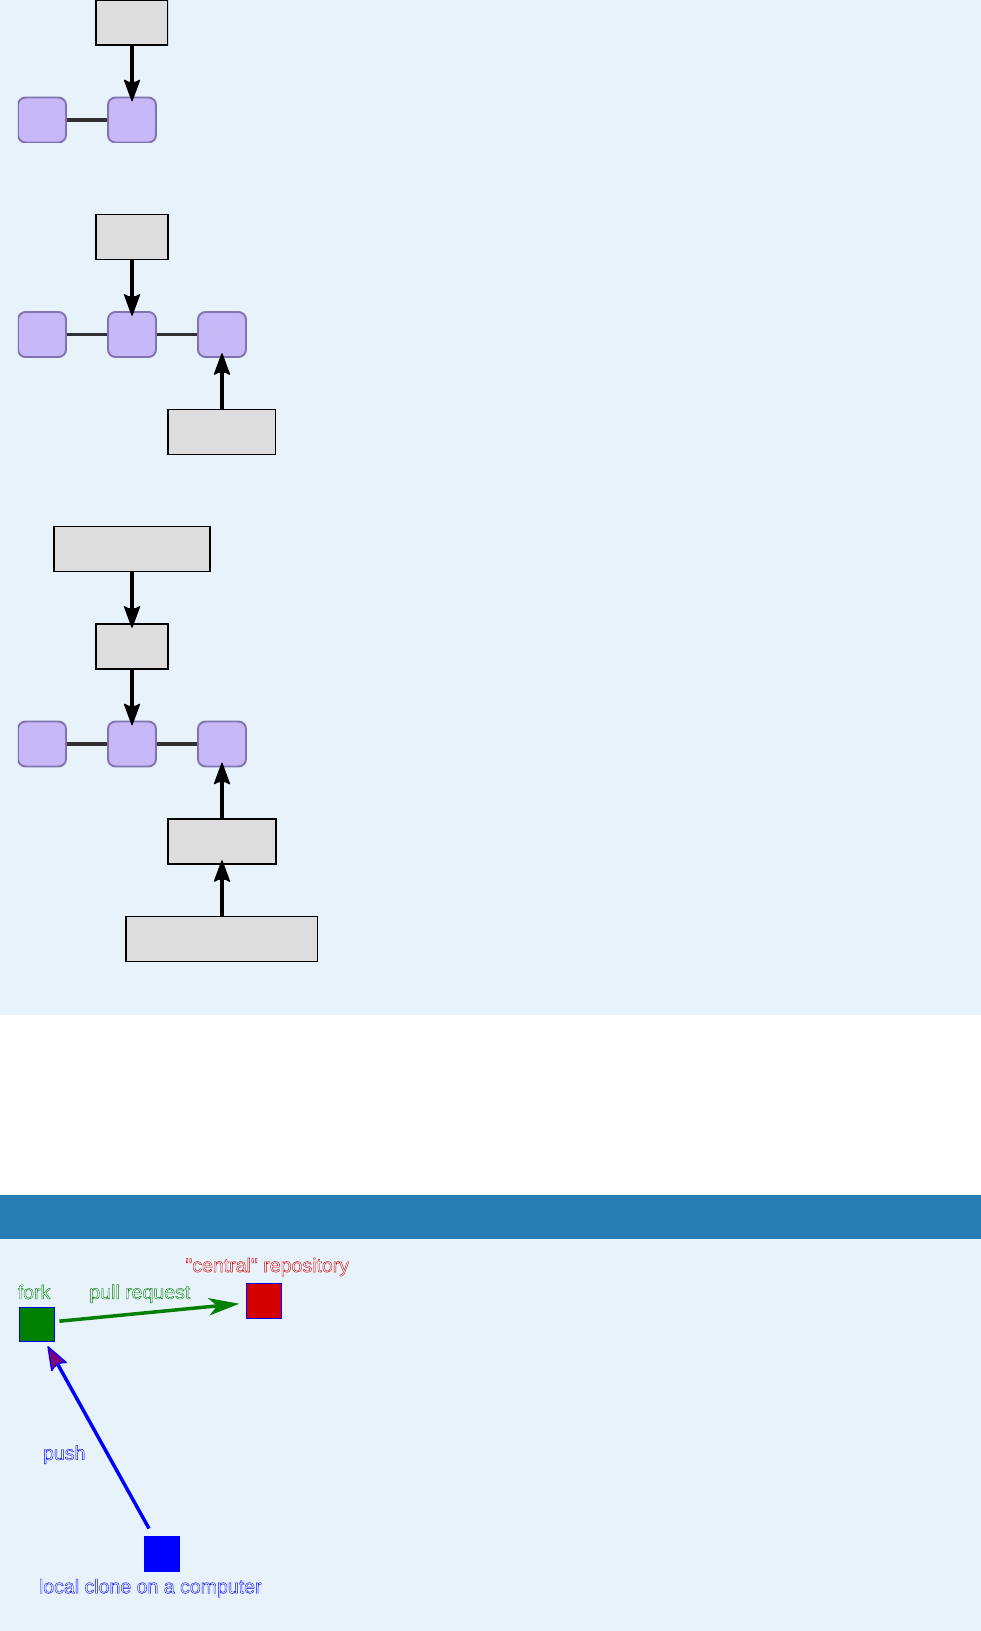
Step F. Push your change as a new branch
If you get a password request for hps://github.com when you try to push
$ git add yourusername.txt
$ git commit
$ git push origin -u yourname-somefeature
Probably you cloned with the HTTPS URL (see git remote -v to confirm). You can
change this to SSH by going to the repository page, clicking “Code”, copying the SSH URL
(starts with [email protected]: ), and then updang the URL with:
Now the commit also exists on the remote repository
c1
b1
yourname-somefeature
main
remote or central (read figure le to right)
c1
b1
yourname-somefeature
HEAD
main
origin/main
local (read figure le to right)
Meaning of -u
The -u or --set-upstream will connect the local branch with the newly created
upstream/remote branch and track it. This has the following advantages:
If you from here on only type git push or git pull without branchname, Git will
know what branch you refer to (depending also on your Git configuraon). However,
we sll recommend to explicitly type where you want to push/pull to/from and which
branch explicitly.
$ git remote set-url origin SSH-REPOSITORY-URL
When you type git status , Git will inform you whether your local branch is ahead or
behind the upstream branch that it tracks.
However, also without the -u this step and the rest of the exercise will work. The fact
that the local and remote branch are not connected is not a problem if you explicitly type
out the remote and branch name every me.
Step G. Browse the network of branches and commits
Aer you have pushed your branch and other parcipants have too, browse the network of
branches and commits (on GitHub click on Insights -> Network) and discuss what you see.
Step H. Submit a pull request
Submit a pull request from your branch towards the main branch. Do this through the web
interface.
Meaning of a pull request: think of it as change proposal. In a popular project, it means that
anyone can contribute with almost no work on the maintainer’s side - a big win.
There are several opons to open a pull request:
Follow the link printed to terminal output when git-pushing a branch to GitHub/GitLab
Visit the GitHub repository in the browser aer pushing the branch and click on the
green buon “Compare & pull request”
Click on “Pull requests” on top of the GitHub repository and either “Compare & pull
request” or “New pull request”
Click on “Branches” and then “New pull request” from the respecve branch
Exercise: Part 2 - code review and merging changes
Centralized-2: Merge the pull requests (together)
We do step 2A and 2B together (instructor demonstrates, and everybody follows
along in their repositories).
Instructor note
At this stage it might be good to show how to submit and how to review a pull request.
When co-teaching change roles and switch screenshares also.
Discuss what you look at when subming.
Discuss what you look at when reviewing.
Step 2A. Discuss and accept pull requests
We do this step together on the main screen (in the main room) or on stream. The instructor
shows a submied pull request, discusses what features to look at, and how to discuss and
review.
At the same me, helpers can review open pull requests from their exercises groups.
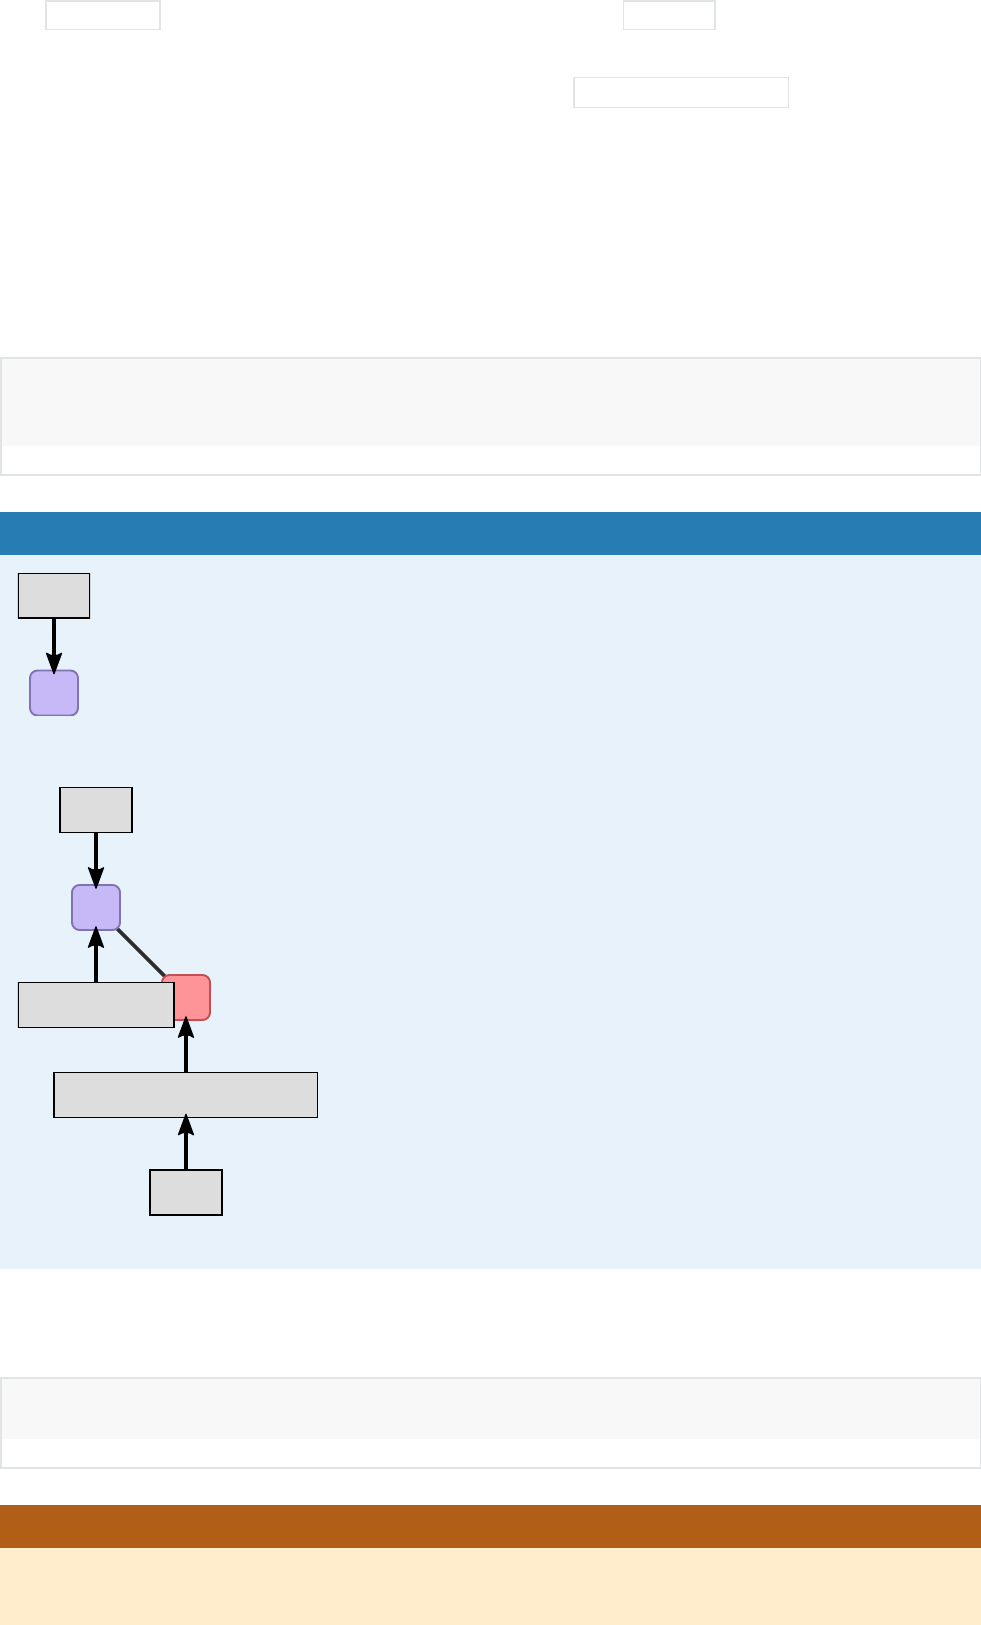
Once the pull-request is accepted, the change is merged
c1 m1
b1
yourname-somefeature
main
remote or central
c1
b1
yourname-somefeature
HEAD
main
origin/main
local
Finally also discuss the “network” on GitHub.
Instructor note
At this stage demonstrate how to suggest small changes to pull/merge requests:
GitHub
GitLab
Discussion
Naming

In GitLab or BitBucket these are named merge requests, not pull requests.
Which one do you feel is more appropriate and in which context? (The name pull
request may make more sense in the forking workflow: next episode).
It can be useful to think of them as change proposals.
Pull requests can be used for code review
We recommend that pull requests are reviewed by someone else in your group.
Collaborave learning
OK if students and junior researchers review senior researchers
In our example everyone has write access to the “central” repository.
Pull requests are from branch to branch
They originate from a source branch and are directed towards a branch.
Not from commit to branch.
Pull requests create new commits on the target branch.
They do not create new branches.
Protected branches
A good seng for large projects is to make the main branch protected and all
changes to it have to go through code review.
Centralized workflow with protected branches is a good setup for many projects.
Read more
This is a great resource: Praccal git PRs for small teams
Step 2B. Update your local copy
Your branch yourname-somefeature is not needed anymore but more importantly, you need to
sync your local copy: Everybody needs to do this step in their exercise repository but we do
this together in the main room so that we can discuss this step and ask quesons.
$ git switch main
$ git pull origin main
c1 m1
b1
yourname-somefeature
main
remote or central
c1 m1
b1
yourname-somefeature
main
HEAD
origin/main
local
Optional exercises
(oponal) Centralized-3: Cross-referencing issues using “#N”
We will submit another change by a pull request but this me we will first create an
issue.
1. Open an issue on GitHub and describe your idea for a change. This gives others the
chance to give feedback/suggesons. Note the issue number, you will need it in step
3.
2. Create a new branch and switch to it.
3. On the new branch create a commit and in the commit message write what you did,
but also add that this “closes #N” (replace N by the actual issue number from step 1).
4. Push the branch and open a new pull request. If you forgot to refer to the issue
number in step 3, you can sll refer to it in the pull request form (add a “closes #N” to
the tle or descripon).
5. Note how now commits, pull requests, and issues can be cross-referenced by
including #N .
6. Noce how aer the pull request is merged, the issue gets automacally closed. This
only happens for certain keywords like closes or fix .
7. Discuss the value of cross-referencing them and of auto-closing issues with commits
or pull requests.
See also the GitHub documentaon for more examples.
(oponal) Centralized-4: Why did we create a feature branch “yourname-
somefeature”? (exercise/discussion)
Pushing directly to the main branch is perfectly fine for simple personal projects - the
pull-request workflows covered here are for larger projects or for collaborave
development. Guidelines for simpler workflows are given in the how much Git is
necessary? episode of the git-intro lesson.
In collaborave development, whenever we update our repository we create a new
branch and create a pull-request. Let’s now imagine that everyone in your group (or one
person on two different clones) makes a new change (create a new file) but without
creang a new branch.
1. You all create a new file in the main branch, stage and commit your change locally.
2. Try to push the change to the upstream repository:
You probably see something like this:
The push only worked for one parcipant (one clone).
Discuss why push for everybody else in this group was rejected?
✔ Soluon
The push for everyone except one person fails because they are missing one commit in
their local repository that exists on the remote. They will first need to pull the remote
changes before pushing their own, which will usually result in a merge commit.
Discussion: How to make changes to remote branches
If there is a remote branch somefeature , we can create a local branch and start tracking
origin/somefeature like this:
$ git push origin main
$ git push
To https://github.com/user/repo.git
! [rejected] main -> main (non-fast-forward)
error: failed to push some refs to 'https://github.com/user/repo.git'
To prevent you from losing history, non-fast-forward updates were rejected
Merge the remote changes (e.g. 'git pull') before pushing again. See the
'Note about fast-forwards' section of 'git push --help' for details.
Once we track a remote branch, we can pull from it and push to it:
We can also delete remote branches:
Creang pull requests from the command line
There are several possibiles:
hps://cli.github.com/
hps://hub.github.com/
hps://github.com/NordicHPC/git-pr
How you can find out in which repositories you are a collaborator
Visit hps://github.com/sengs/repositories where you will see an overview of all
repositories you have write access to.
GitHub/GitLab organizaons
Projects oen start under a personal namespace.
If you want the project to live beyond the interest or work me of one person, one
can share projects under an “organizaon”.
You can then invite collaborators to an organizaon.
This is what we do in the CodeRefinery project: hps://github.com/coderefinery
Keypoints
Centralized workflow is oen used for remote collaborave work.
origin refers to where you cloned from (but you can relocate it).
origin/mybranch is a read-only pointer to branch mybranch on origin .
These read-only pointers only move when you git fetch / git pull or git push .
$ git switch somefeature
$ git pull origin somefeature
$ git push origin somefeature
$ git push origin --delete somefeature
Forking workflow
Objecves
Get a mental representaon of what is happening on GitHub/GitLab.
Get comfortable with the forking workflow.
Instructor note
30 min teaching
30 min exercises
Forking layout
"central" repository"central" repository
local clone on a computerlocal clone on a computer
forkfork
(once)(once)
pull req.pull req.
Forking workflow. Red is the central repository, where only owners have access. Green are forks on
GitHub (copy for a single user to work on). Blue are local copies where contributors work on their
own computer.
In the forking layout, again we call one repository the “central” repository but people push to
forks (their own copies of the repository on GitHub/GitLab/Bitbucket).
Features:
Anybody can propose contribuons without asking for advance permission (to public
projects).
Maintainer sll has full control over what is merged.
Contributors now have more than one remote to work with.
This is used by almost all large (and small) open-source projects these days. Real life
examples:
NumPy
JupyterLab
Discussion: Why do we create a fork and not only a clone?
It is not easy to show my changes on my computer to somebody else.
The maintainer cannot pull from my laptop.
The cloud provider is a trusted place to pull from and allows review before pulling.
Backup.
Working with multiple remotes
In the forking layout described above we work with mulple remotes, in this case two
remotes: One remote refers to the “central” repository, and the other remote refers to the
fork.
There is nothing special about the name origin . The origin is an alias/placeholder
(think of “scky note” referring to an URL).
We can name these aliases as we like.
We can add and remove remotes:
To see all remotes:
Warning
We will work with a new repository for this exercise!
For this exercise we will fork a different repository compared to earlier today. Please step
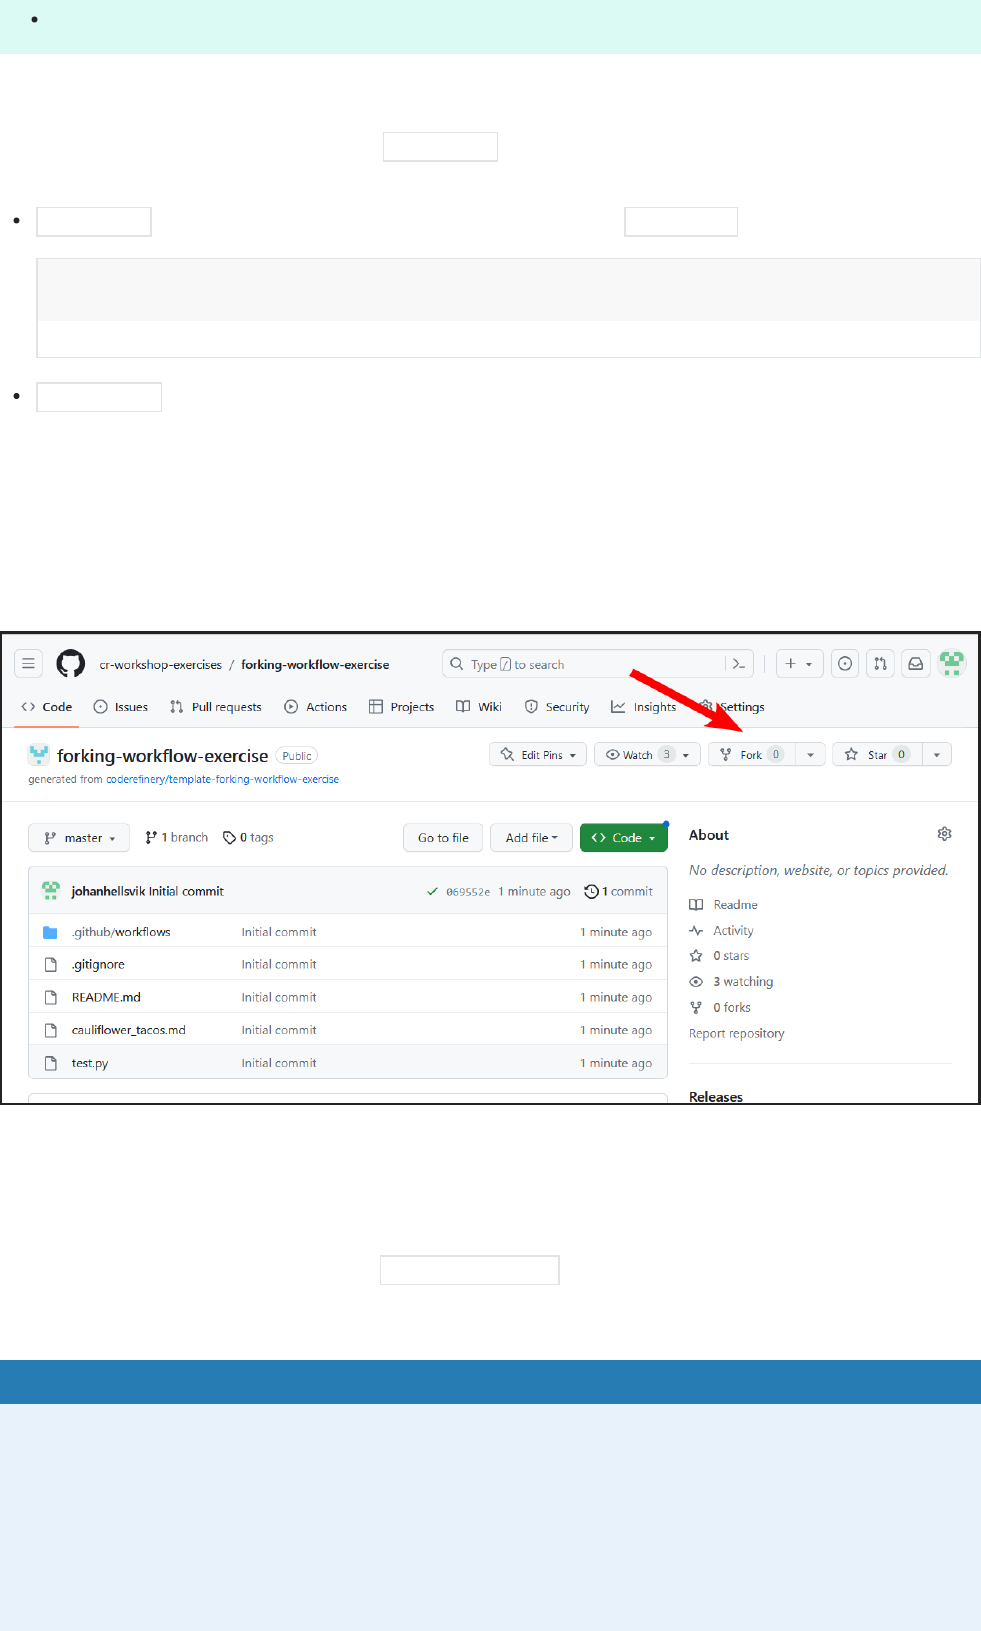
out of the repository and check that you fork the forking-workflow-exercise.
$ git remote add upstream https://github.com/project/project.git
$ git remote rm upstream
$ git remote add group-repo https://example.com/exciting-project.git
$ git remote rm group-repo
$ git remote add upstream https://github.com/project/project.git
$ git remote add downstream https://github.com/userX/project.git
$ git remote --verbose
Exercise
We are working on combining the steps into one exercise.
Exercise preparation
⚙ Exercise preparaon
Exercise: Part 1 - creating a pull request
Distributed-1: Fork a repository and create a pull request
As an example we will collaboravely develop a cookbook for taco recipes, inspired by
tacofancy.
Objecves:
Learn how to fork, modify the fork, and open a pull request towards the central
repository.
Learn how to update your fork with changes that others have already made to the
forked repository.
Exercise:
Maintainer prepares an exercise repository (see above; this will take 5-10 minutes).
Learners work on steps A-F (15-20 minutes).
There are two oponal steps aer step E for those who want more.
Aer step E you take a break or help others. Please ask quesons both during group
work and in the collaborave document.
Part of team/exercise room Following on your own
Maintainer (team lead):
Create an exercise repository by generang from a template using this template:
hps://github.com/coderefinery/template-forking-workflow-exercise called
forking-workflow-exercise
In this case we do not add collaborators to the repository (this is the point of this
example).
Share the link to the newly created repository with your group.
Learners in exercise team: Fork the newly created repository (not the “coderefinery”
one) and then clone your fork.
We will review the pull requests together and then update forks.
Before and aer each acon you take, run the following informaonal commands. Carefully
observe what happens, especially in git graph :
git graph - almost every me. As a reminder, to define git graph use:
git status - when you modify files.
Step A: Fork and clone
First fork the exercise repository (please carefully check with your exercise group which
repository you should fork).
How to fork.
Then clone your fork to your computer. The repository URL should include your username.
Clone using the SSH path you get from the webpage, not the hps URL from the web
browser. The URL should start with [email protected]: . Otherwise, you won’t be able to push
later.
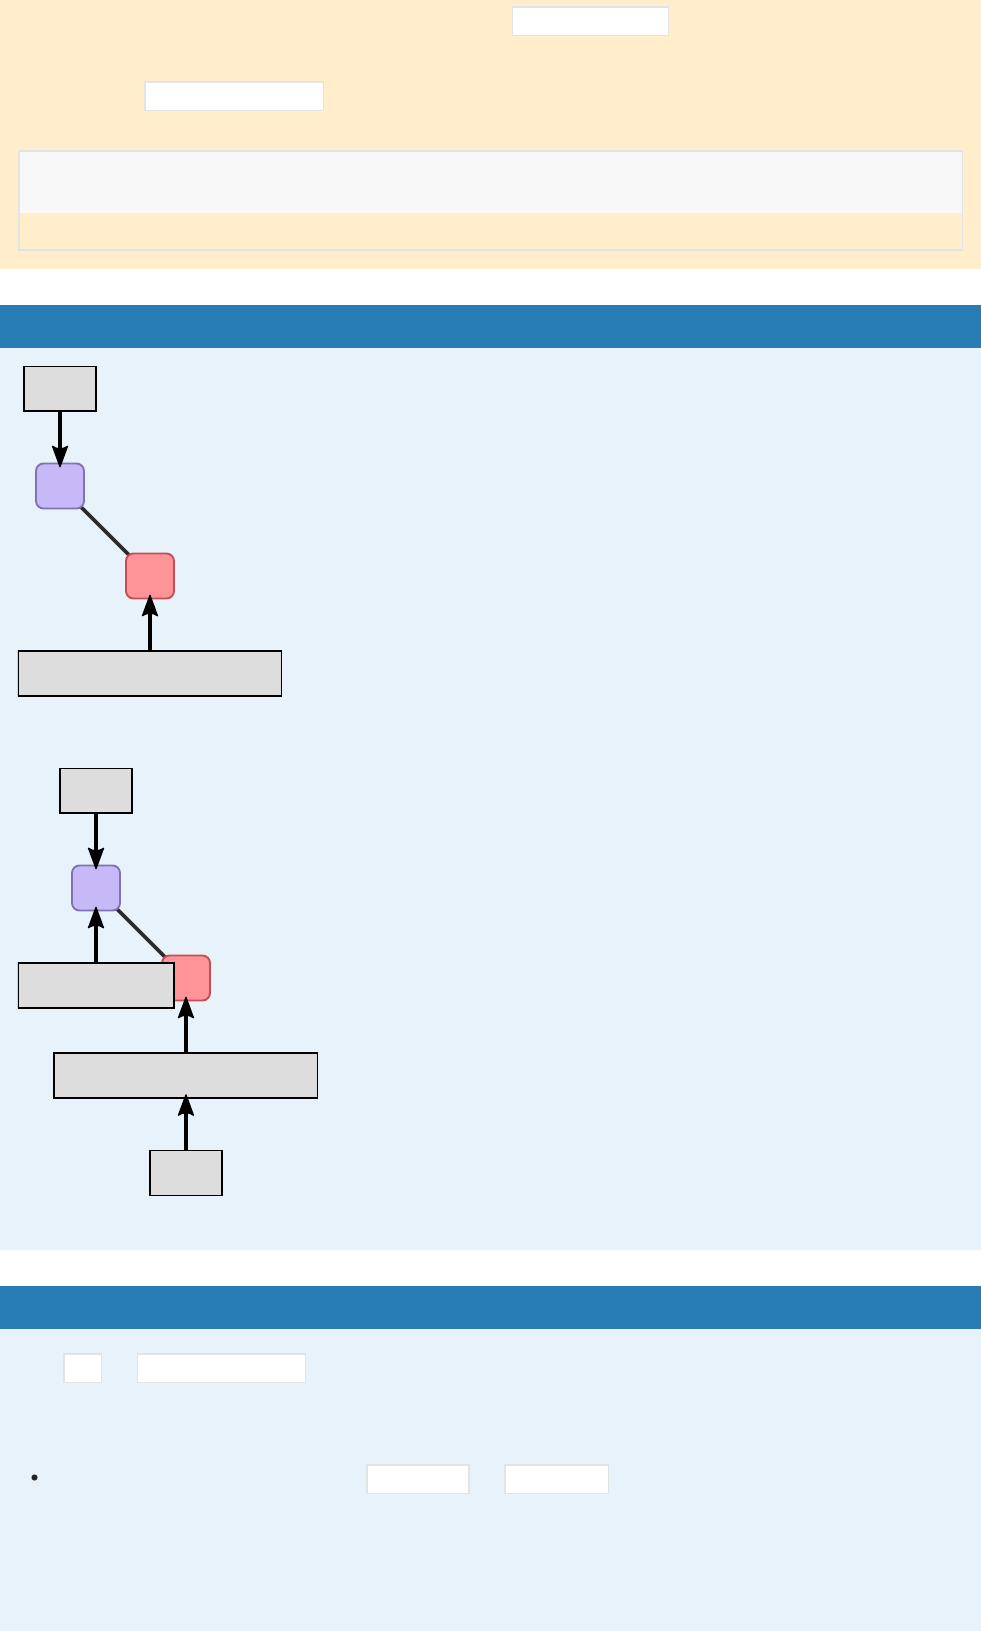
Pictorial representaon of this step
Here is a pictorial representaon of this part:
$ git config --global alias.graph "log --all --graph --decorate --oneline"
"central" repository"central" repository
local clone on a computerlocal clone on a computer
forkfork
cloneclone
Forking followed by cloning.
This is how it looks aer we fork:
c1 c2
main
central
c1 c2
main
fork
A fork is basically a (bare) clone.
The forked repo and the fork are in principle independent repositories.
When forking we copy all commits, all branches.
Aer we clone the fork we have three in principle independent repositories:
c1 c2
main
central
c1 c2
main
fork

c1 c2
main
origin/main
local
Step B: Open an “issue” as a change proposal
Before we start any coding, open a new “Issue” on the central repository as a “proposal”
where you describe your idea for a recipe with the possibility to collect feedback from
others. Aer creang this issue note the issue number. We will later refer to this issue
number.
Discuss why it can be useful to open an issue before starng the actual coding.
Step C: Modify and commit
Before we do any modificaon, we create a new branch and switch to it: this is a good reflex
and a good pracce. Choose a branch name which is descripve of its content. For example:
On the new branch create a new file which will hold your recipe, for instance
traditional_coderefinery_tacos.md (but change the name). You can get inspired here.
Hopefully we all use different file names, otherwise we will experience conflicts later (which
is also interesng!).
There is also a file called test.py which will automacally verify whether your recipe
contains the string “taco” (case insensive). This is there to slowly introduce us to automated
tesng.
Once you are happy with your recipe, commit the change and in your commit message
reference the issue which you have opened earlier with “this is my commit message; closes
#N” (use a more descripve message and replace N by the actual issue number from step B).
Pictorial representaon of this step
And here is a picture of what just happened:
$ git branch myname-feature # describes both who it belongs to and the purpose
$ git switch myname-feature
c1 c2
main
central
c1 c2
main
fork
c1 c2 c3
feature
main
origin/main
local
Step D: Push your changes to the fork
Now push your new branch to your fork. Your branch is probably called something else than
“myname-feature”. Also verify where “origin” points to.
If you get a password request for hps://github.com when you try to push
Probably you cloned with the HTTPS URL (see git remote -v to confirm). You can
change this to SSH by going to the repository page, clicking “Code”, copying the SSH URL
(starts with [email protected]: ), and then updang the URL with:
Pictorial representaon of this step
$ git push origin myname-feature
$ git remote set-url origin REPOSITORY-URL
c1 c2
main
central
c1 c2 c3
feature
main
fork
c1 c2 c3
feature
origin/feature
main
origin/main
local
Step E: Open a pull request
Then file a pull request from the branch on your fork towards the main branch on the central
repository.
Pictorial representaon for steps D and E
"central" repository"central" repository
local clone on a computerlocal clone on a computer
pull requestpull request
pushpush
forkfork

Push followed by a pull request.
A pull-request means: “please review my changes and if you agree, merge them with a
mouse-click”.
Once the pull-request is accepted, the change is merged:
c2 m1
c3
c1
main
central
c1 c2 c3
feature
main
fork
c1 c2 c3
feature
origin/feature
main
origin/main
local
Step F: View your pull request
Go to the central repository, and list all pull requests and view your your pull request.
Remember that the pull request is created on the original repostory.
Wait here unl we integrate all pull requests into the central repo together.
Observe how the issues automacally close aer the pull requests are merged (provided the
commit messages contain the right keywords).
(oponal) Distributed-2: Send a conflicng pull request
If you complete parts A-E much earlier than others, try to open another pull request
where you ancipate a conflict with your first pull request.
(oponal) Distributed-3: Making changes to your pull request aer it has been
opened.
You can do that by pushing addional commits to the same branch where you opened the
pull request from. Observe how they end up added to your pull request.
Exercise: Part 2 - code review and merging changes
We do this step together. The instructor shows a submied pull request, discusses what
features to look at, and how to discuss and review.
At the same me, maintainers can review open pull requests from their exercises groups.
(oponal) Distributed-4: Squash merge a pull request
If you complete this exercise much earlier than others, create a new pull request with two
or more commits.
Then, when reviewing the change as maintainer, accept these with “Squash and merge”
and later compare the source and target repositories/branches how they differ aer the
small commits got squashed into one.
Exercise: Part 3 - Updating forks
We do this part aer the contribuons from all parcipants have been integrated.
Once this is done, pracce to update your fork with the merged changes from others and
verify that you got the files created by other parcipants.
Make sure that the contribuons from other parcipants are not only on your local
repository but really also end up in your fork.
On GitHub it is possible to update the fork by pressing a buon (see screenshot below):
Updang the fork via GitHub web interface.
Updang the fork using the command line
Remotes are aliases. We can use the URLs a remote directly. instead of aliases like origin
or upstream .
Here we pull from the central repo and push to our fork:
Here is a pictorial representaon of this part:
"central" repository"central" repository
local clone on a computerlocal clone on a computer
pushpush pull/fetchpull/fetch
forkfork
Pull followed by push to a different remote.
Updang the fork using the command line (longer version)
Below is a step by step recipe with pictorial representaons which hopefully makes clear
what happens in each step.
$ git switch main
$ git pull CENTRAL-REPOSITORY-URL main
$ git push FORK-URL main
c2 m1
c3
c1
main
central
c1 c2 c3
feature
main
fork
c3
c2 m1c1
feature
origin/feature
upstream/mainmain
origin/main
local
$ git remote add central CENTRAL-REPOSITORY-URL
$ git fetch central
$ git switch main
$ git merge central/main
c2 m1
c3
c1
main
central
c1 c2 c3
feature
main
fork
c3
c2 m1c1
feature
origin/feature
main
upstream/main
origin/main
local
c2 m1
c3
c1
main
central
$ git push origin main

c2 m1
c3
c1
feature
main
fork
c2 m1
c3
c1
feature
origin/feature
main
origin/main
upstream/main
local
Luke Skywalker: You know, I did feel something. I could almost see the remote.
Ben Kenobi: That’s good. You’ve taken your first step into a larger world.
[from Star Wars Episode IV - A New Hope]
Discussion: Always create a feature branch
For each pull request create a new branch. Movaon:
Limits the risk that commits get accidentally appended to an open pull request
(remember: pull requests are from branch to branch, not from commit to branch).
History-rewrite (rebased and/or squashed commits) on the central repository does not
lead to a diverging branch on the fork.
How to contribute changes to somebody else’s project
Objecves
Avoid frustraon and surprises by first discussing and then coding.
Instructor note
15 min teaching/discussion
Contributing very minor changes
Clone or fork+clone repository
Create a branch
Commit and push change
Open a pull request or merge request
If you observe an issue and have an idea how to fix it
Open an issue in the repository you wish to contribute to
Describe the problem
If you have a suggeson on how to fix it, describe your suggeson
Possibly discuss and get feedback
If you are working on the fix, indicate it in the issue so that others know that somebody is
working on it and who is working on it
Submit your fix as pull request or merge request which references/closes the issue
Movaon
Inform others about an observed problem
Make it clear whether this issue is up for grabs or already being worked on
If you have an idea for a new feature
Open an issue in the repository you wish to contribute to
In the issue, write a short proposal for your suggested change or new feature
Movate why and how you wish to do this
Also indicate where you are unsure and where you would like feedback
Discuss and get feedback before you code
Once you start coding, indicate that you are working on it
Once you are done, submit your new feature as pull request or merge request which
references/closes the issue/proposal
Movaon
Get agreement and feedback before wring 5000 lines of code which might be
rejected
If we later wonder why something was done, we have the issue/proposal as reference
and can read up on the reasoning behind a code change
WIP (work in progress) merge requests and draft pull requests
Convenon: Pull requests or merge requests starng with “WIP” or “Dra” are not to be
merged yet
They are there to collect feedback on unfinished work
On GitHub you can create dra pull requests which cannot be merged unl marked ready
for review.
Also GitLab offers same mechanism (merge request starng with “WIP” or “Dra”)
Movaon
Collect feedback before it is finished and before it becomes more difficult to change
Communicate to others what is parally done if it affects their work
Licenses matter
If you submit code that is derivave work or code somebody else wrote, clarify license
If you receive pull requests with a lot of code, clarify its license and copyright with the
submier, before merging
How to make sure that you don’t merge malicious code
(this is typically not a problem for most of us but can be a problem for some)
Since commit hashes depend on all their parents you cannot modify the past without all
future hashes changing
Projects like hps://github.com/torvalds/linux or hps://github.com/Homebrew/brew
have to be extremely careful what they accept
Browse the code changes before merging them
If you get an extremely large changeset, ask for more informaon
Possibly verify whether the submier is not trying to impersonate somebody you know
Git commits can be PGP signed to verify authencity
Keypoints
Communicate and discuss before coding massive changes.
Cross-reference discussions, proposals, and code changes.
Hooks
Objecves
Learn how to couple scripts to Git repository events.
Instructor note
10 min teaching/demonstraon
Somemes you would like Git events (commits, pushes, etc.) to trigger scripts which take
care of some tasks. Hooks are scripts that are executed before/aer certain Git events.
They can be used to enforce nearly any kind of policy for your project. There are client-side
and server-side hooks.
Client-side hooks
You can find and edit them here:
pre-commit : before commit message editor (example: make sure tests pass)
prepare-commit-msg : before commit message editor (example: modify default messages)
commit-msg : aer commit message editor (example: validate commit message paern)
post-commit : aer commit process (example: noficaon)
pre-rebase : before rebase anything (example: disallow rebasing published commits)
post-rewrite : run by commands that rewrite commits
post-checkout : aer successful git checkout (example: generang documentaon)
post-merge : aer successful merge
pre-push : runs during git push before any objects have been transferred
$ ls -l .git/hooks/
pre-auto-gc : invoked just before the garbage collecon takes place
See also hps://pre-commit.com, a framework for managing and maintaining mul-language
pre-commit hooks.
Example for a pre-commit hook which checks whether a Python code is PEP 8-compliant
using pycodestyle:
Server-side hooks
You can typically edit them through a web interface on GitHub/GitLab.
pre-receive : before accepng any references
update : like pre-receive but runs once per pushed branch
post-receive : aer enre process is completed
Typical use:
Maintenance work
Automated tests
Refreshing of documentaon/website
Sanity checks
Code style checks
Email noficaon
Rebuilding soware packages
Actions, workflows, and continuous integration services
GitHub and GitLab let you define workflows/acons/recipes which are triggered by e.g. git
push or by a release (tag creaon). They can be customized and almost any automaon you
can think of becomes possible.
These services use hooks under the hood. These days, project are more likely to use these
higher-level services rather than Git hooks directly.
You can read more about these services here:
GitHub Acons
GitLab CI
In our projects we use these services to:
#!/usr/bin/env bash
# ignore errors due to too long lines
pycodestyle --ignore=E501 myproject/
Build websites
Build documentaon
Run tests
Create containers
Package and upload packages
Spellchecking
Non-bare and bare repositories
Objecves
Understanding the difference between non-bare and bare repositories.
Being able to create a common repository for a group on our local computer or server.
Instructor note
10 min teaching/demonstraon
Non-bare repository
A non-bare repository contains .git/ as well as a snapshot of your tracked files that you
can directly edit called the working tree (the actual files you can edit).
This is where we edit and commit changes.
When we create a repository with git init , it is a non-bare, “normal”, repository.
Bare repository
A bare repository contains only the .git/ part, no files you can directly edit.
By convenon the names of bare repositories end with .git to emphasize this.
We never do actual eding work inside a bare repository.
GitHub, GitLab, etc. store a bare repository.
You can also create a bare repository on your computer/server to store your private
repository.
If we have enough me, the instructor demonstrates how to create a bare repository on the
local computer:
Bare-1: Create and use a bare repository
Create a new local repository with git init .
$ cd /path/to/example
$ git init
Populate it with a file and a commit or two.
Create one or two branches.
Clone this repository on the same computer with either --bare or --mirror :
Inspect the bare repository.
Clone the bare repository:
Inside the clone inspect git remote -v .
Inside the clone create a commit and push the commit to origin .
The bare repository can be cloned several mes and one can exercise pushing and
pulling changes.
Keypoints
We do programming work inside non-bare repositories.
We can create a local common bare repository where we can push to and pull from.
Quick reference
Other cheatsheets
See the git-intro cheatsheet for the basics.
Interacve git cheatsheet
Very detailed 2-page git cheatsheet
Glossary
remote
Roughly, another git repository on another computer. A repository can be linked to several
other remotes.
push
Send a branch from your current repository to another repository
fetch
Update your view of another repository
pull
$ git clone --bare /path/to/example /path/to/example-bare
$ git clone /path/to/example-bare /path/to/example-clone
$ cd /path/to/example-clone
Fetch (above) and then merge
origin
Default name for a remote repository.
origin/NAME
A branch name which represents a remote branch.
main
Default name for main branch.
merge
Combine the changes on two branches.
conflict
When a merge has changes that affect the same lines, git can not automacally figure out
what to do. It presents the conflict to the user to resolve.
issue
Feature of web repositories that allows discussion related to a repository.
pull request
A GitHub/Gitlab feature that allows you to send a code suggeson using a branch, which
allows one-buon merging. In Gitlab, called “merge request”.
git hook
Code that can run before or aer certain acons, for example to do tests before allowing
you to commit.
bare repository
A copy of a repository that only is only the .git directory: there are no files actually
checked out. Directory names usually like something.git
Commands we use
This excludes most introduced in the git-intro cheatsheet.
Setup:
git clone URL [TARGET-DIRECTORY] : Make a copy of exisng repository at <url>,
containing all history.
Status:
git status : Same as in basic git, list status
git remote [-v] : List all remotes
git graph : see a detailed graph of commits. Create this command with git config --
global alias.graph "log --all --graph --decorate --oneline"
General work:
git switch BRANCH-NAME : Make a branch acve.
git push [REMOTE-NAME] [BRANCH:BRANCH] : Send commits and update the branch on the
remote.
git pull [REMOTE-NAME] [BRANCH-NAME] : Fetch and then merge automacally. Can be
convenient, but to be careful you can fetch and merge separately.
git fetch [REMOTE-NAME] : Get commits from the remote. Doesn’t update local branches,
but updates the remote tracking branches (like origin/NAME).
git merge [BRANCH-NAME] : Updates your current branch with changes from another
branch. By default, merges to the branch is is tracking by default.
git remote add REMOTE-NAME URL : Adds a new remote with a certain name.
List of exercises
Full list
This is a list of all exercises and soluons in this lesson, mainly as a reference for helpers and
instructors. This list is automacally generated from all of the other pages in the lesson. Any
single teaching event will probably cover only a subset of these, depending on their interests.
Instructor guide
Approximate schedule
Times here are in CE(S)T.
08:50 - 09:00 (10 min) So start and icebreaker queson
09:00 - 09:15 (15 min) Recap Git, any HedgeDoc quesons to highlight
09:15 - 09:25 (10 min) Concepts around collaboraon
Explain terms: Pull, push, clone, fork. Focus on pull and not fetch.
Focus more on clone and less on generang from templates and imporng.
09:25 - 10:00 (35 min) Collaborang within the same repository
Exercise (incl preparaon)
10:00 - 10:10 (10 min) Break
10:10 - 10:30 (20 min) Collaborang within the same repository
Demo and Q/A
10:30 - 11:00 (30 min) Praccing code review
11:00 - 12:00 (60 min) Break
12:00 - 12:50 (50 min) Distributed version control and forking workflow
Concepts and what are exercise outcomes

Exercise
12:50 - 13:00 (10 min) Break
13:00 - 13:30 (30 min) Discussion, demonstraon, Q&A, feedback, what to expect next
week
Preparing exercises within exercise groups
Exercise leads typically prepare exercise repositories for the exercise group (although the
material speaks about “maintainer” who can also be one of the learners). Preparing the first
exercise (centralized workflow) will take more me than preparing the second (forking
workflow). Most preparaon me is not the generang part but will go into communicang
the URL to the exercise group, communicang their usernames, adding them as
collaborators, and waing unl everybody accepts the GitHub invitaon to join the newly
created exercise repository.
Preparing exercises for the live stream
This takes 30-60 minutes to set up. Allocate the me for this before the workshop.
It requires coordinang with co-instructors and communicaon with learners on days 1
and 2.
Create the centralized exercises in an organizaon (not under your username) so that you
can give others admin access to add collaborators. Also this way you can then fork
yourself if needed.
For CR workshops, the exercises were placed under hps://github.com/cr-workshop-
exercises. The instructors or team leads need to have owner status in the organizaon in
order to invite people.
We have created two versions of each a day in advance to signal which one might end up
being discussed on recording/stream:
centralized-workflow-exercise-recorded
centralized-workflow-exercise
forking-workflow-exercise-recorded
forking-workflow-exercise
Protect the default branch of the two centralized-* repositories.
How to give access to centralized-workflow-exercise and centralized-workflow-exercise-
recorded repositories:
We created an organizaon team, stream-exercise-participants . The centralized
workflow exercise repos have this team added as a collaborator (not the forking - they
fork so they don’t need write access there).
We created a fih repository, access-requests with an issue template.
Learners who are not part of an exercise group and want to parcipate in this exercise
will open an issue in the access-requests repository. We use the access-requests
repository so that learners don’t get emails from all other access requests once they get
added to the team.
Make sure you have 2 other people who have admin access and can help you adding
learners who request access 5 minutes aer the exercise starts.
The day/morning before the day of the lesson the instructor or team leader now has to
invite the learners to the team (not to specific repositories):
1. Copy the learners GitHub username from the issue.
2. Go to team member page, example linked here and invite that username to the team
(this means first clicking invite and then scrolling down to click the “add username to
…” buon. This sends an email to that users email that is connected to their GitHub
account.
3. In the issue, copy following text (or similar) to the issue and “close with comment”:
Example email requesng learners to join
Why we teach this lesson
In order to collaborate efficiently using Git, it’s essenal to have a solid understanding of how
remotes work, and how to contribute changes through pull requests or merge requests. The
git-intro lesson teaches parcipants how to work efficiently with Git when there is only one
developer (more precisely: how to work when there are no remote Git repositories yet in the
picture). This lesson dives into the collaborave aspects of Git and focuses on the possible
collaborave workflows enabled by web-based repository hosng plaorms like GitHub.
This lesson is meant to directly benefit workshop parcipants who have prior experience
with Git, enabling them to put collaborave workflows involving code review directly into
pracce when they return to their normal work. For novice Git users (who may have learned
a lot in the git-intro lesson) this lesson is somewhat challenging, but the lesson aims to
introduce them to the concepts and give them confidence to start using these workflows
later when they have gained some further experience in working with Git.
Intended learning outcomes
By the end of this lesson, learners should:
We have added you to the CodeRefinery exercise repository.
What you should do before the exercise starts:
You will get an invitation from GitHub to your email address (that GitHub knows
about). Please accept that invitation so that you can participate in the
collaborative exercise.
To make sure you don't get too many emails during the exercise, don't forget to
"unwatch" both https://github.com/cr-workshop-exercises/centralized-workflow-
exercise and https://github.com/cr-workshop-exercises/centralized-workflow-
exercise-recorded.
To "unwatch", go to the repository and click the "Unwatch" button (top middle of
the screen) and then select "Participating and @mentions".

Understand the concept of remotes
Be able to describe the difference between local and remote branches
Be able to describe the difference between centralized and forking workflows
Know how to use pull requests or merge requests to submit changes to another projects
Know how to reference issues in commits or pull/merge requests and how to auto-close
issues
Know how to update a fork
Be able to contribute in code review as submier or reviewer
Interesting questions you might get
If parcipants run git graph they might noce origin/HEAD . This has been omied from
the figures to not overload the presentaon. This pointer represents the default branch of
the remote repository.
Timing
The centralized collaboraon episode is densest and introduces many new concepts, so at
least an hour is required for it.
The forking-workflow exercise repeats familiar concepts (only introduces forking and
distributed workflows), and it takes maybe half the me of the first episode.
The “How to contribute changes to somebody else’s project” episode can be covered
relavely quickly and offers room for discussion if you have me le. However, this
should not be skipped as this is perhaps the key learning outcome.
Typical pitfalls
Difference between pull and pull requests
The difference between pull and pull requests can be confusing, explain clearly that pull
requests or merge requests are a different mechanism specific to GitHub, GitLab, etc.
Pull requests are from branch to branch, not from commit to branch
The behavior that addional commits to a branch from which a pull request has been created
get appended to the pull request needs to be explained.
Other practical aspects
In in-person workshops parcipants really have to sit next to someone, so that they can
see the screens. From the beginning.
Emphasize use of git graph a lot, just like in the git-solo lesson.
