
Verity Confidential
Cloud Agent for Linux
Installation Guide
May 07, 2024
2
Copyright 2016-2024 by Qualys, Inc. All Rights Reserved.
Qualys and the Qualys logo are registered trademarks of Qualys, Inc. All other trademarks
are the property of their respective owners.
Qualys, Inc.
919 E Hillsdale Blvd
4th Floor
Foster City, CA 94404
1 (650) 801 6100

Verity Confidential
Table of Contents
Preface................................................................................................................. 5
About Qualys ........................................................................................................................... 5
Contact Qualys Support .......................................................................................................... 5
Get Started .........................................................................................................6
Qualys Cloud Agent Introduction .......................................................................................... 6
Cloud Agent Platform Availability for Linux ........................................................................ 6
A few things to consider... ...................................................................................................... 6
Cloud Agent requirements ............................................................................................... 6
What are the installation steps? ..................................................................................... 7
Run as user and user’s default group ............................................................................. 7
Need help with troubleshooting? .................................................................................... 7
Privileges - what are my options? .......................................................................................... 7
Considerations to Select an Option ................................................................................. 8
Installation ........................................................................................................ 10
Tips and best practices ......................................................................................................... 10
How to download Agent Installer ........................................................................................ 11
Installation steps ................................................................................................................... 13
What you’ll need ............................................................................................................. 13
Steps to install Agents .................................................................................................... 13
Install Agents in Gold Images ........................................................................................ 14
Relocation with Linux RPM Installer ............................................................................. 14
What happens next? ....................................................................................................... 15
Troubleshooting .............................................................................................................. 15
Proxy configuration ............................................................................................................... 16
Multiple Proxy Server support in Proxy URL (Linux Agent 2.5 or later) .......................... 18
Anti-Virus and HIPS Exclusions ........................................................................................... 19
Using the Host ID from Previous Installation ..................................................................... 20
Configuration for Agent-ID Service ..................................................................................... 20
Configuration Tool...........................................................................................21
Command line options ......................................................................................................... 21
Use cases ................................................................................................................................ 25
On Demand Scan ............................................................................................26
Best Practices ..................................................................................................28
Upgrading Cloud Agent ......................................................................................................... 28
Uninstalling Cloud Agent ..................................................................................................... 28
Agentless Tracking and Cloud Agents ................................................................................ 29
Known Issues .................................................................................................. 30
Certificate Support on RHEL 5.4..................................................................31
Certificate Support on SUSE Linux Enterprise 11 ....................................33
Proxy Configuration Encryption Utility .....................................................34
Preface
About Qualys
5
Preface
Welcome to Qualys Cloud Agent for Linux. This user guide describes how to install cloud
agents on hosts in your network.
About Qualys
Qualys, Inc. (NASDAQ: QLYS) is a pioneer and leading provider of cloud-based security and
compliance solutions. The Qualys Cloud Platform and its integrated apps help businesses
simplify security operations and lower the cost of compliance by delivering critical
security intelligence on demand and automating the full spectrum of auditing,
compliance and protection for IT systems and web applications.
Founded in 1999, Qualys has established strategic partnerships with leading managed
service providers and consulting organizations including Accenture, BT, Cognizant
Technology Solutions, Deutsche Telekom, Fujitsu, HCL, HP Enterprise, IBM, Infosys, NTT,
Optiv, SecureWorks, Tata Communications, Verizon and Wipro. The company is also a
founding member of the Cloud Security Alliance (CSA). For more information, please visit
www.qualys.com.
Contact Qualys Support
Qualys is committed to providing you with the most thorough support. Through online
documentation, telephone help, and direct email support, Qualys ensures that your
questions will be answered in the fastest time possible. We support you 7 days a week,
24 hours a day. Access support information at www.qualys.com/support/.

Get Started
Qualys Cloud Agent Introduction
6
Get Started
Thank you for your interest in Qualys Cloud Agent!
This document tells you all about installing Qualys Cloud Agent for Linux. We’ll tell you
about Requirements, Installation Steps, Proxy Configuration, Anti-Virus and HIPS
Exclusions, how to use our Agent Configuration Tool, Best Practices and more.
Qualys Cloud Agent Introduction
Qualys Cloud Platform gives you everything you need to continuously secure all of your
global IT assets. Now with Qualys Cloud Agent, there’s a revolutionary new way to help
secure your network by installing lightweight cloud agents in minutes, on any host
anywhere - server, virtual machine, laptop, desktop or cloud instance.
Get informed quickly on Qualys Cloud Agent (CA).
Cloud Agent Platform Availability for Linux
For the most current list of supported cloud agents with versions and modules on the
Qualys Cloud Platform, please refer to the following article: Cloud Agent Platform
Availability Matrix
A few things to consider...
Cloud Agent requirements
- Your hosts must be able to reach your Qualys Cloud Platform (or the Qualys Private
Cloud Platform) over HTTPS port 443. Log into the Qualys Cloud Platform and go to Help >
About to see the URL your hosts need to access.
- To install Cloud Agent for Linux, you must have root privileges, non-root with Sudo root
delegation, or non-root with sufficient privileges (VM license only). Proxy configuration is
supported. Learn more
Hardware Requirements
For Cloud Agent Linux, the following are minimum system requirements:
- The Cloud Agent requires minimum 512 MB RAM if you are using VM/PC. Minimum 1GB
RAM is required for VM/PC + FIM.
- Minimum 100 MB of available disk space is required.
Video Tutorials
Cloud Agent Platform Introduction (2m 10s)
Getting Started Tutorial (6m 34s)

Get Started
Privileges - what are my options?
7
What are the installation steps?
Our Cloud Agent UI walks you through the steps to install agents on your hosts. Once the
agent is installed you will need to provision it using our agent configuration tool. You
might want to configure proxy settings for our agent to communicate with our cloud
platform.
Run as user and user’s default group
Typically, the agent installation requires root level access on the system (for example in
order to access the RPM database). After the Cloud Agent has been installed it can be
configured to run in a specific user and group context using our configuration tool. This
ability limits the level of access of the Cloud Agent. Learn more
Need help with troubleshooting?
We recommend you inspect the agent’s log file located here:
/var/log/qualys/qualys-cloud-agent.log
Privileges - what are my options?
The Qualys Cloud Agent offers multiple deployment methods to support an organization’s
security policy for running third-party applications and least privilege configuration. As
vulnerability and configuration assessments need to be comprehensive with
authenticated scans, the Cloud Agent installs as a daemon with SYSTEM level privileges
and does not require authentication records to access local system data and artifacts.
This can be updated to any of the following options.
1.Use a non-root account with sufficient privileges:
The specific privileges required are:
• Execute “rpm” for automatic update
• Agent requires certain commands to operate which vary from environment to
environment.
Non-root users with limited access may not be able to access certain areas of the system,
such as applications installed with root privileges, and may have insufficient results or
lack of functionality.
2.Use a non-root account with Sudo root delegation
Either the non-root user needs to be assigned direct sudo privileges assigned or through a
group membership. Ensure that NOPASSWD option is configured.
Learn more
Troubleshooting
Error messages
Get Started
Privileges - what are my options?
8
Here is an example of an agent user entry in sudoers file (where “agentuser” is the
username for the account that you use to install the Linux Agent):
%agentuser ALL=(ALL) NOPASSWD: ALL
You can also use secure Sudo. When you set UseSudo=1, the agent tries to find the custom
path in the secure_path parameter located in the /etc/sudoers file. This can be used to
restrict the path from where commands are picked up during data collection. If this
parameter is not set, the agent refers to the PATH variable to locate the command by
running sudo sh.
3.Use an account with root privileges
Typically, you may start with a comprehensive assessment for vulnerabilities and
misconfigurations, including privilege access for administrators and root. This agent
configuration provides the Cloud Agent for Linux with all the required privileges (for
example to access the RPM database) to conduct a complete assessment on the host
system and allows for high fidelity assessments with less management overhead.
However, after the Qualys Cloud Agent is installed, it can be configured to run as a specific
user and group context using our configuration tool. When you create a non-privileged
user with full sudo, the user account is exclusive to the Qualys Cloud Agent and you can
disable SSH/ remote login for that user if needed.
The Qualys Cloud Agent does not require SSH (Secure Shell). You can also assign a user
with specific permissions and categories of commands that the user can run. If the path is
not provided in the command, the system provides the path and only a privileged user can
set the PATH variables.
Considerations to Select an Option
The Qualys Cloud Agent uses multiple methods to collect metadata to provide asset
inventory, vulnerability management, and Policy Compliance (PC) use cases. Some of
these methods include running commands to collect a list of installed applications and
versions, running processes, network interfaces, and so on.
Root access is required for some detections, including most detections that are part of PC
(reading global config files related to system-wide security settings and gathering
information from more than one user account). There is an exceptionally low number of
QIDs in VM module that require root, other QIDs run fine without root. However, those
that do need elevated privileges are likely to result into False negatives, if the user does
not have the necessary privileges.
Qualys also provides a scan tool that identifies the commands that need root access in
your environment. For this scan tool, connect with the Qualys support team. You can
decide whether to elevate/grant the required permissions to run the commands or risk
losing visibility to the information. You can grant permissions only for the specific
commands/binaries that are failing.
Get Started
Privileges - what are my options?
9
Qualys sanitizes the PATH variable to remove any directory which is world writable as a
security measure, which is designed to ensure that the Qualys Cloud Agent does not
execute any custom-made scripts. This provides the option to harden or allow the path,
where you can configure the set of allowed directories, on which the commands can be
executed during our data collection.
Qualys uses the system-appended paths to run or assume root integrity. As per NIST SP
800-53 Revision 5, control for Vulnerability Monitoring and Scanning RA-5 indicates that
in certain situations, the nature of the vulnerability scanning may be more intrusive and
require privileged access authorization to selected system components to facilitate more
thorough vulnerability scanning.
For PC scans, we require the sudo/root privilege. With non-root privilege, the PC report is
unreliable and does not provide a complete covering of CIS&DISA policies. As per CIS
benchmarks, root privileges are required for specific detections, including most detections
that are part of PC (reading global config files related to system-wide security settings and
gathering information from more than one user account). Refer to any CIS benchmark (for
example, https://workbench.cisecurity.org/benchmarks/493) on Linux which broadly
assumes that operations are being performed as the root user.
Following is the paragraph from the CIS benchmark document:
“The guidance within broadly assumes that operations are being performed as the root
user. Non-root users may not be able to access certain areas of the system, especially after
remediation has been performed. It is advisable to verify the root user’s path integrity and
the integrity of any programs being run prior to execution of commands and scripts
included in this benchmark.”
For Patch Management, Endpoint Detection and Response (EDR), and File Integrity
Monitoring (FIM) modules, use an account with root privileges to hook into a system,
perform real-time-time monitoring, to install patches etc., as these modules are not
dependent on any signatures/command execution.
Installation
Tips and best practices
10
Installation
It’s easy to install Cloud Agent for Linux. We’ll walk you through the steps quickly.
Qualys provides installers and packages for each supported operating system that are
coded for each Qualys platform. It's not possible to connect an agent coded for one
platform to another platform. Organizations can use their existing software distribution
tools (SCCM, BigFix, rpm, Casper, etc.) to install the agent into target machines. Cloud
Agent can be installed into gold images including VM templates and cloud provider
images such as Amazon AWS, Microsoft Azure, and Google Compute Platform.
The platform supports detection of duplicate agent IDs and automatically re-provisions
the duplicate agents. The section Install Agents in Gold Images describes how to install an
agent into a gold image without initial provisioning. This is the recommended method to
prevent duplicate asset records.
Customers using software distribution tools must package the Qualys-provided installer
along with the specific Activation Key and Customer ID strings to install properly. Do not
package up the artifacts that are installed by the agent into your own installer as the
installation environment is keyed for that specific machine when the agent is installed;
doing so will create duplicates that the platform may not be able to easily de-duplicate.
Keep in mind - Depending on your environment, you might need to take steps to support
communications between agent hosts on your network and the Qualys Cloud Platform.
Tips and best practices
How to download Agent Installer
Installation steps
Proxy configuration
Multiple Proxy Server support in Proxy URL (Linux Agent 2.5 or later)
Need to Bypass Proxy?
Using the Host ID from Previous Installation
Tips and best practices
What is an activation key? You’ll need an agent activation key to install agents. This
provides a way to group agents and bind them to your subscription with Qualys Cloud
Platform. You can create different keys for various business functions and users.
Benefits of adding asset tags to an activation key Tags assigned to your activation key will
be automatically assigned to agent hosts. This helps you manage your agents and report
on agent hosts.
Running the agent installer You’ll need to run the installer from an elevated command
prompt, or use a systems management tool using elevated privileges.
Installation
How to download Agent Installer
11
Be sure to activate agents to provision agents for modules - Vulnerability Management
(VM), Policy Compliance (PC), or File Integrity Monitoring (FIM). Activating an agent for a
module consumes an agent license. You can set up auto activation by defining modules
for activation keys, or do it manually in the Cloud Agent UI.
What happens if I skip activation? Agents will sync inventory information only to the
cloud platform (IP address, OS, DNS and NetBIOS names, MAC address), host assessments
will not be performed.
How many agents can I install? You can install any number of agents but can activate an
agent only if you have a license. The Agents tab in the Cloud Agent UI tells you about your
installed agents.
Check to be sure agents are connected Once installed agents connect to the Qualys Cloud
Platform and provision themselves. You can see agent status on the Agents tab - this is
updated continuously. If your agent doesn’t have a status, it has not successfully
connected to the cloud platform and you need to troubleshoot.
net-tools package You may need to install the net-tools package on agent endpoints, if not
already present, in order to run network commands. This is required on systems running
Red Hat Enterprise Linux, Oracle Enterprise Linux, and CentOS version 7.1 since some
commands like netstat, /sbin/ifconfig, route are deprecated.
How to download Agent Installer
Here’s how to download an installer from the Qualys Cloud Platform and get the
associated Activation ID and Subscription ID.
Installation
How to download Agent Installer
12
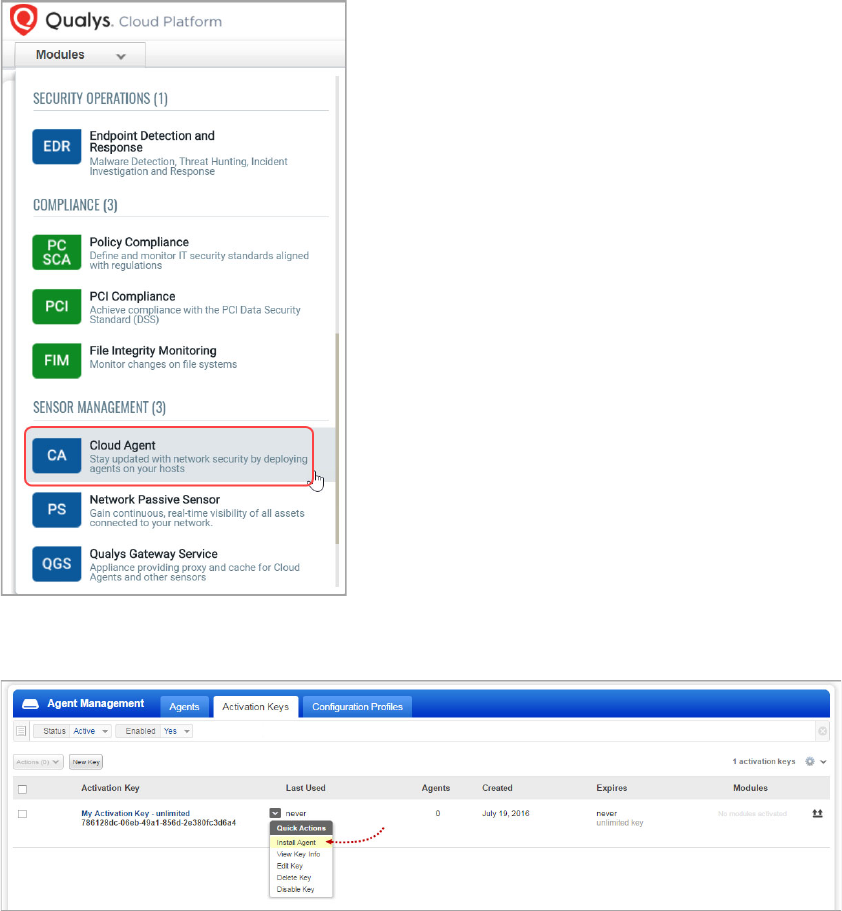
Log into the Qualys Cloud Platform and select CA for the Cloud Agent module.
Choose an activation key (create one if needed) and select
Install Agent from the Quick
Actions menu.
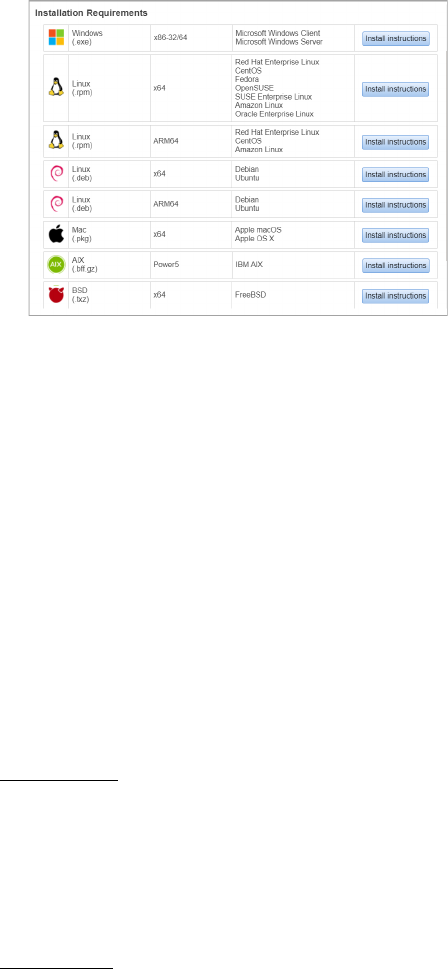
Click
Install instructions for the target host.
Installation
Installation steps
13
Installation steps
What you’ll need
To install cloud agents, you’ll need to download the Cloud Agent installer and get the
associated ActivationID and CustomerID. Just log into the Qualys Cloud Platform, go to the
Cloud Agent (CA) module, and follow the installation steps for Linux (.rpm) or Linux (.deb)
to get everything you need.
Cloud Agent requirements
Steps to install Agents
1. Copy the Qualys Cloud Agent installer onto the target host.
2. Install the Qualys Cloud Agent using the following commands for x64. Depending on
the package(x64 or ARM64), following commands varies.
Linux (.rpm)
> sudo rpm -ivh qualys-cloud-agent.x86_64.rpm
> sudo /usr/local/qualys/cloud-agent/bin/qualys-cloud-agent.sh
ActivationId=xxxxxxxx-xxxx-xxxx-xxxx-xxxxxxxxxxxx
CustomerId=xxxxxxxx-xxxx-xxxx-xxxx-xxxxxxxxxxxx
ServerUri=<qualys_pod_url>/CloudAgent
Linux (.deb)
> sudo dpkg --install qualys-cloud-agent.x86_64.deb
> sudo /usr/local/qualys/cloud-agent/bin/qualys-cloud-agent.sh
ActivationId=xxxxxxxx-xxxx-xxxx-xxxx-xxxxxxxxxxxx
CustomerId=xxxxxxxx-xxxx-xxxx-xxxx-xxxxxxxxxxxx
ServerUri=<qualys_pod_url>/CloudAgent
What happens? The Agent installer
is downloaded to your local system,
and in the UI you’ll see the
associated Activation key ID and
Subscription ID - copy and paste this
to a safe place, you’ll need it to
complete the installation.
Installation
Installation steps
14
Install Agents in Gold Images
These steps are similar to installing on Linux (.rpm) hosts, with an extra step to restart the
Qualys Cloud Agent service and AMI instance.
1. Start the Gold Image instance.
2. Copy the Qualys Cloud Agent RPM onto the instance.
3. Install the Qualys Cloud Agent RPM using the following command:
> sudo rpm -ivh qualys-cloud-agent.x86_64.rpm
4. Run the Qualys Cloud Agent installation command:
> sudo /usr/local/qualys/cloud-agent/bin/qualys-cloud-agent.sh
ActivationId=xxxxxxxx-xxxx-xxxx-xxxx-xxxxxxxxxxxx
CustomerId=xxxxxxxx-xxxx-xxxx-xxxx-xxxxxxxxxxxx
ServerUri=<qualys_pod_url>/CloudAgent
5. Stop Qualys Cloud Agent service:
> sudo service qualys-cloud-agent stop
6. Stop the instance and create an image out of the instance. This completes the bake-in
process.
When the instance is started it will activate the Cloud Agent which will provision itself
and continue functioning as expected.
Relocation with Linux RPM Installer
Linux RPM installer now supports up to three relocation paths during the installation
process if there is a need to install the Cloud Agents in locations different from the default
locations.
Any/all of the following agent categories can be relocated:
- Binaries/Libraries/Data- Default location: /usr/local/qualys relocated to <any
path>/qualys.
- Configuration - Default location: /etc/qualys relocated to <any path>/qualys.
- Log Files - Default location: /var/log/qualys relocated to <any path>/qualys.
The relocation uses standard RPM relocation capabilities that specifies the default
location (listed above) and the new location. Example installation argument -
rpm --relocate /usr/local=/opt/ --relocate /etc=/etc/opt/config
--relocate/var/log=/var/opt -ivh qualys-cloud-agent-
<package>x86_64.rpm
Same permissions as that of the default directories are set on the relocated directories.
Symbolic links are used in each of the default locations to reference the new locations
and are required to be present in the default locations

Installation
Installation steps
15
Notes: Relocation is only available for new agent installations.
- You cannot relocate an existing installation.
- For relocating an existing installation, uninstall the existing installation completely and
execute a new installation. Note that this creates a new agent UUID for the installation.
What happens next?
We’ll start syncing asset data to the cloud!
Once installed an agent connects to the Qualys Cloud Platform and provisions itself. We
would expect you to see your first asset discovery results within a few minutes. The first
assessment scan in the cloud takes some time, after that scans complete as soon as new
host metadata is uploaded to the cloud platform.
Troubleshooting
You’ll find helpful information in Qualys online help.
Cloud agents installed on RHEL 5.4 may throw SSL communication errors while trying to
communicate with the Qualys Platform. This happens when the certificate files are not
present on the host asset. Click here for solution to fix the issue.
Cloud agents installed on SUSE Linux Enterprise 11 may throw a file not found error for
the certificate ca-bundle.crt when trying to communicate with the Qualys Platform. This
happens when the certificate files are not present on the host asset. Click here for solution
to fix the issue.
You might also be interested in...
Proxy configuration
Multiple Proxy Server support in Proxy URL (Linux Agent 2.5 or later)
Need to Bypass Proxy?
Using the Host ID from Previous Installation
If you are reinstalling the agent on the same machine, and you want to reuse the earlier
hostid, set HostIdSearchDir to /root/hostdir.
Learn more
Troubleshooting
Error messages

Installation
Proxy configuration
16
Proxy configuration
Good to Know By default the Cloud Agent for Linux will operate in non-proxy mode. The
agent can be configured to use an HTTPS proxy for internet access.
Note:
- For Azure Security Center (ASC), use an HTTP proxy.
- If proxy connection fails then agent will NOT attempt a direct connection outbound (Fail
Closed).
What are my options?
The agent can be configured to use an HTTPS proxy in one of these ways:
1) /etc/sysconfig/qualys-cloud-agent - applies to Cloud Agent for Linux (.rpm)
2) /etc/default/qualys-cloud-agent - applies to Cloud Agent for Linux (.deb)
3) /etc/environment - applies to Cloud Agent for Linux (.rpm) and Linux (.deb)
Tip - Option 3) is a better choice if the systemwide proxy will be used by the agent.
Tell me the steps
Here are the steps to enable the Linux agent to use a proxy for communication with our
cloud platform:
1) if /etc/sysconfig/qualys-cloud-agent file doesn't exist create it
2) add 1 of the following lines to the file (1 line only):
https_proxy=https://[<username>:<password>@]<host>[:<port>]
qualys_https_proxy=https://[<username>:<password>@]<host>[:<port>]
where <username> and <password> are specified if the https proxy uses authentication. If
special characters are embedded in the username or password (e.g. @, :, $) they need to be
url-encoded. where <host> is the proxy server's IPv4 address or FQDN. where <port> is the
proxy's port number.
If the proxy is specified with the https_proxy environment variable, it will be used for all
commands performed by the Cloud Agent. If the proxy is specified with the
qualys_https_proxy environment variable, it will only be used by the Cloud Agent to
communicate with our cloud platform.
Note: You can use the Proxy Configuration Encryption Utility to encrypt the user name
and password that you provide to the proxy environment variable.
3) change the permissions using these commands:
Linux (.rpm)
chown <cloud_agent_user> /etc/sysconfig/qualys-cloud-agent
chmod 600 /etc/sysconfig/qualys-cloud-agent

Installation
Proxy configuration
17
Linux (.deb)
chown <cloud_agent_user> /etc/default/qualys-cloud-agent
chmod 600 /etc/default/qualys-cloud-agent
Where <cloud_agent_user> is a user configured through the Configuration Tool.
4) restart qualys-cloud-agent service using the following command:
service qualys-cloud-agent restart
PAC file support
You can also set automatic proxy with the Proxy Auto-Configuration (PAC) file. The URL to
the PAC file must be set in http_proxy or https_proxy in the
https_proxy=pac+http://url.to/proxy.pac format.
For different ways to configure the agent to use proxy, see What are my options? section.
Note: You can use PAC files only with the Cloud Agent for Linux version 5.0 and later.
Need to Bypass Proxy?
By default the Cloud Agent for Linux will operate in non-proxy mode. But in the event, if
you are already using proxy mode and need to switch to non-proxy mode, you need to
configure agent to use no_proxy in /etc/environment. Environment variable 'no_proxy' is
used to bypass proxy. Curl library honors 'no_proxy' environment variable. If ‘no_proxy’ is
set, curl will not use proxy even if any proxy environment variable is set.
Here are the steps to enable the Linux agent to use a no_proxy for communication with
our cloud platform:
1) Edit /etc/environment file.
2) Add following line (bold faced) where qualys_https_proxy is mentioned:
qualys_https_proxy=https://[<username>:<password>@]<host>[:<port>]
no_proxy=<pod domain name>
Note: For init.d based systems, you need to prefix 'export' to ‘no_proxy’ line.
Installation
Multiple Proxy Server support in Proxy URL (Linux Agent 2.5 or later)
18
Multiple Proxy Server support in Proxy URL (Linux Agent 2.5 or
later)
The Cloud Agent has support for multiple proxy servers defined in the Proxy URL. You can
have up to five proxy servers included in the proxy URL.
Note: You can define multiple proxy servers in PAC file in Cloud Agent for Linux 5.0 and
later. To view how to configure multiple proxy servers in PAC file, refer to PAC file vendor's
documentation.
Each time the Cloud Agent connects to the Qualys Platform, it always uses the first proxy
server in the ordered list.
If the connection using the first proxy server fails, the Cloud Agent will failover to the next
configured proxy in case of http failures. If the connections using all the configured
proxies fail, the Cloud Agent attempts a direct connection to the Qualys Cloud Platform.
To activate this feature on the newly-installed Agent, the ProxyFailOpen parameter must
be set to 1.
You can use the Configuration Tool to the set the proxy order to be sequential or random.
The agent does not maintain a history of last proxy server used.
This proxy configuration can be used with the Qualys Gateway Service or third-party
proxy servers. There is no requirement that the failover proxy servers need to be on the
same subnet as the first proxy server; as long as the Cloud Agent can connect to other
proxy servers even on other subnets, the agent will use those proxy server(s) if the first
proxy server is not available.
You can configure multiple proxies in any of the files mentioned in the section What are
my options?
Multiple proxies can be configured with qualys_https_proxy or https_proxy environment
variables. It is recommended that you provide multiple proxies in the qualys_https_proxy
environment variable.
The following example shows how to set multiple proxies:
qualys_https_proxy=”https://[<username>:<password>@]<host1>:<port>;
https://[<username>:<password>@]<host2>:<port>;
https://[<username>:<password>@]<host3>:<port>”
The list of proxies must be given in double quotes (“...”) and separated by a semi-colon (;),
and if ";" is embedded in username/password, you must url-encode it. You can use the
Proxy Configuration Encryption Utility to encrypt the user name and/or password that
you provide to the proxy environment variable.
You can combine multiple proxy certificates into a single file, and place it at same location
as earlier /etc/qualys/cloud-agent/cert/ca-bundle.crt. Ensure that all certificates are valid,
else you might get SSL/certificate errors.
Note: If you update the proxy settings, Cloud Agent must be restarted.
Installation
Anti-Virus and HIPS Exclusions
19
Anti-Virus and HIPS Exclusions
Have Anti-Virus or HIPS software installed? To avoid conflicts with Cloud Agent, ensure
that you exclude the following files, directories, and processes from all security software
installed on the system.
Directory list used by Cloud Agent installation
/etc
/etc/init.d
/etc/qualys
/etc/qualys/cloud-agent
/etc/qualys/cloud-agent/.centos
/etc/qualys/cloud-agent/cert
/etc/qualys/cloud-agent/.suse
/etc/qualys/cloud-agent/.systemd
/usr/local
/usr/local/qualys
/usr/local/qualys/cloud-agent
/usr/local/qualys/cloud-agent/bin
/usr/local/qualys/cloud-agent/lib
/usr/share/doc
/usr/share/doc/qualys-cloud-agent-<version>
Agent daemon process “qualys-cloud-agent”
The agent runs as daemon process “qualys-cloud-agent”.
The agent runs various read-only commands during the scanning process. These are the
same commands run by a scan using a scanner appliance. Learn more
https://community.qualys.com/message/16520
Some transient files are created during agent execution
/usr/local/qualys/cloud-agent/Config.db
- this is the current agent configuration
/usr/local/qualys/cloud-agent/manifests/*.db
- this contains manifests used during agent based scans
Installation
Using the Host ID from Previous Installation
20
Using the Host ID from Previous Installation
If you are reinstalling an agent on a host and you wish to use the same hostid used in the
previous installation, set the hostid directory location to the same location used in the
previous installation.
For example, let's say in the previous installation you use HostIdSearchDir=/root/hostdir
while setting the activation key, it creates hostid under /root/hostdir/qualys/. When you
uninstall the agent it doesn't remove /root/hostdir/qualys/hostid.
If you are reinstalling the agent on the same machine, and you want to reuse the earlier
hostid, set HostIdSearchDir to /root/hostdir.
Configuration for Agent-ID Service
The Cloud Agent needs high privileges to activate the agent-id service on selected ports.
Once agent-id service is activated, the scanner connects to the defined ports and retrieves
correlation ID during the scan.
However, if you do not want the agent-id service to run with high privileges, use one of the
following methods.
- Run the agent-id service as a non-root user regardless of the UseSudo value when
User=option is configured. This is applicable only for Cloud Agent Linux version 4.9 and
later.
or
- Configure the Cloud Agent using non-root privileges by using the following command:
/usr/local/qualys/cloud-agent/bin/qualys-cloud-agent.sh
User='username' UseSudo=1

Configuration Tool
Command line options
21
Configuration Tool
The Agent Configuration Tool gives you many options for configuring Cloud Agent for
Linux after installation. You’ll find this tool at /usr/local/qualys/cloud-agent/qualys-
cloud-agent.sh.
Our configuration tool allows you to:
- Provision agents
- Configure logging - set a custom log level and log file path
- Enable Sudo to run all data collection commands
- Configure the daemon to run as a specific user and/or group
- Change the ActivationID, CustomerID and/or platform configuration
The Agent will automatically pick up changes made through the configuration tool so
there is no need to restart the agent or reboot the agent host.
Note: While switching from low privileged user to high privileged user, it is not
recommended to directly run the configuration tool on the already running agents. The
user should first stop the agent and then run the configuration tool to switch to a high
privileged user.
Command line options
qualys-cloud-agent.sh supports these command line options.
Configuration option Description
ActivationId A valid activation key ID (UUID). This value is obtained
from the Cloud Agent UI (go to Activation Keys, select a key
then View Key Info). This parameter is required to provision
an agent.
CustomerId A valid customer ID (UUID). This value is obtained from the
Cloud Agent UI (go to Activation Keys, select a key then
Install Agent). This parameter is required to provision an
agent.

Configuration Tool
Command line options
22
LogLevel A log level (0-5). A higher value corresponds to more
verbosity. Default is mapped to information (3).
0 - mapped to fatal
1 - mapped to error
2 - mapped to warning
3 - mapped to information
4 - mapped to debug
5 - mapped to trace
Note: In a debug/trace mode, the log file may contain
sensitive command-line parameters or passwords for
configuration files, if the passwords are in clear-text
format. Qualys recommends you use a password vault or
token-based authentication instead of storing passwords in
the configuration file. Storing passwords in configuration
files can result in non-compliance with ISO, SOC, PCI-DSS,
HIPAA, and FedRAMP guidelines.
LogFileDir A full path to the log file. By default the path is
/var/log/qualys/
UseSudo Set to 1 to run all data collection commands using the sudo
escalation method. By default sudo is not used (0).
Limitations of using UseSudo=1
SudoCommand A command for privilege escalation such as
SudoCommand pbrun. If the command has spaces it must
be double quoted.
User A valid username if you want the daemon to run as a
certain user. The daemon will start as root but will drop to
the specified user, and continue running as the specified
user.
Group A valid group name if you want the daemon to run as a
certain group. The daemon will switch to the specified
group (if any).
HostIdSearchDir (Available using Linux Agent 1.3.3 and later) The directory
where the host ID file is located. This file contains a host ID
tag assigned to the system by Qualys. By default the
directory is /etc/ and the location of the host ID file is
/etc/qualys/hostid
LogDestType (Available using Linux Agent 1.3.3 and later) The
destination of log lines generated by Linux Agent. Set to file
or syslog. If set to file specify the location of the log file. By
default the destination is a log file:
/var/log/qualys/qualys-cloud-agent.log
Configuration option Description
Configuration Tool
Command line options
23
ServerUri Use this option to migrate the agent from one Qualys
subscription to another (on same POD or PCP).
ServerUri takes the URL of the Qualys shared Pod or PCP
you want to migrate the Agent to, in the following format:
ServerUri=<http_url>/CloudAgent
where <http_url> is the URL of the Qualys shared Pod or
PCP.
If the subscription is on the same POD, the ServerUri is the
same.
Use this option along with ActivationId and CustomerId in
order to move the agent to another Qualys shared Pod or
PCP.
Note: The agent requires the appropriate Activation ID and
Customer ID that are on the new subscription/platform.
The original IDs cannot be used as they are unique per
subscription.
CmdMaxTimeOut Execution of a command is dropped if the time taken to
execute is more than the specified value. Default timeout is
1800 seconds (30 minutes).
ProcessPriority Specify the Linux niceness scale between -20 to 19 to set a
priority for the Qualys cloud agent process. The lower the
number the more priority the agent process gets. Default
value is zero.
UseAuditDispatcher Set UseAuditDispatcher to 1 if you want to run FIM along
with auditd enabled.
Agent version 2.0.2 required auditd to be disabled on the
host. These agents when upgraded to 2.1 through selfpatch
retain this setting where UseAuditDispatcher is set to 0.
Agents with 1.x version are set with UseAuditDispatcher=1
on selfpatch to 2.1. Fresh installation of 2.1 agent comes
with UseAuditDispatcher=1 (by default) where you can run
FIM along with auditd enabled.
QualysProxyOrder If you are using multiple proxies, set the proxy order to be
sequential or random.
Sequential:
QualysProxyOrder=sequential OR
QualysProxyOrder=seq
Random: QualysProxyOrder=random
MaxRandomScanInterval (This is supported for Agent version between 2.6.4 to 3.3)
This option will enabled the Agent to upload at the
configured VM scan interval and adding a randomized
interval. The random interval can be any value between 0
and the configured MaxRandomScanInterval seconds.
MaxRandomScanInterval can be set to any value between
0 (default) to 4294967295.
ScanDelayVM (This is supported for Agent version greater than or equal
to 4.6) The time added to the start of vm scanning for new
installs and new manifest download. Default value is 0
(zero) and that means no delay added. Range is between 0
to 43200.
Configuration option Description

Configuration Tool
Command line options
24
Limitations of using UseSudo=1
If you configure the cloud agent for UseSudo=1 to run commands using the sudo
escalation method, you may face any of the following issues:
- Commands run by the cloud agent or any script added in the cloud agent manifest, fail
to get the custom path set in the PATH environment.
- Scan results show empty values for service_list, bios_info, and service_info, when the
agents fails to find related path in the PATH environment.
This happens because when you set UseSudo=1, the agent tries to find the custom path in
the secure_path parameter located in the /etc/sudoers file. If this parameter is not set, the
agent then tries to find the custom path in the path that is used when you run sudo sh.
To resolve this issue, add your custom path or the path used by the agent while scanning
for service_list, bios_info, and service_info, to the secure_path parameter. If you have
disabled secure_path parameter, add the respective paths to the path that is used when
you run sudo sh.
Alternatively, you can configure the agent for UseSudo=0.
Note: For RHEL platforms, if you run argument UseSudo=0 with agent configuration tool
and do revocation, qualys-cloud-agent process is still running in background. Ideally,
qualys-cloud-agent process should have stopped after revocation. This is known
limitation with UseSudo=0 while it works for UseSudo=1.
ScanDelayPC (This is supported for Agent version greater than or equal
to 4.6) The time added to the start of pc scanning for new
installs and new manifest download. Default value is 0
(zero) and that means no delay added. Range is between 0
to 43200.
MaxRandomScanIntervalV
M
(This is supported for Agent version greater than or equal
to 4.6) This option will enabled the Agent to upload at the
configured VM scan interval and adding a randomized
interval. The random interval can be any value between 0
and the configured MaxRandomScanIntervalVM seconds.
MaxRandomScanIntervalVM can be set to any value
between 0 (default) to 43200.
MaxRandomScanIntervalPC (This is supported for Agent version greater than or equal
to 4.6) This option will enabled the Agent to upload at the
configured PC scan interval and adding a randomized
interval. The random interval can be any value between 0
and the configured MaxRandomScanIntervalPC seconds.
MaxRandomScanIntervalPC can be set to any value
between 0 (default) to 43200.
ProxyFailOpen Set the ProxyFailOpen to 1 to enable the proxy failover
behavior as described in the Multiple Proxy Server support
in Proxy URL (Linux Agent 2.5 or later) section.
Note: This is applicable for the Cloud Agent for Linux
version 6.2 and later.
Configuration option Description
Configuration Tool
Use cases
25
Use cases
Example 1 – Provision Agent
The following example shows how to provision Qualys Cloud Agent. Please note that this
method of activation will assume that root user should be used by the agent.
$ /usr/local/qualys/cloud-agent/bin/qualys-cloud-agent.sh
ActivationId="022224c8-31c7-11e5-b4f7-0021ccba987e"
CustomerId="146556fa-31c7-11e5-87b6-0021ccba987e"
Example 2 – Use non-root account
The following example shows how to configure Qualys Cloud Agent to use a non-root
account for running data collection commands.
$ /usr/local/qualys/cloud-agent/bin/qualys-cloud-agent.sh
ActivationId="022224c8-31c7-11e5-b4f7-0021ccba987e"
CustomerId="146556fa-31c7-11e5-87b6-0021ccba987e" UseSudo=1
User=scanuser
Group=wheel
Keep in mind - A new group needs to exist when the configuration command runs. The
expectation is that the non-root user will be added to the specified group to allow it to
access binary and temporary files that comprise Qualys Cloud Agent. In order to perform
unattended data collection the non-root user needs to have sudo privilege without a
password.
Example 3 – Raise logging level
It is also possible to instruct Qualys Cloud Agent to log events at a higher than normal
logging level using the following command:
$ /usr/local/qualys/cloud-agent/bin/qualys-cloud-agent.sh
LogLevel=4
Note: We’ve omitted the ActivationID and CustomerID parameters to illustrate the
configuration tool can be used to adjust the log level after provisioning.
Example 4 – Change platform
The following example shows how to configure Qualys Cloud Agent to re-provision to a
new platform:
qualys-cloud-agent.sh ActivationId="022224c8-31c7-11e5-b4f7-
0021ccba987e" CustomerId="146556fa-31c7-11e5-87b6-0021ccba987e"
ServerUri="https://qagpublic.qg2.apps.qualys.com/CloudAgent"
On Demand Scan
26
On Demand Scan
You can run an On Demand Scan to instruct the agent to immediately scan as long as the
agent is not already scanning. The On Demand Scan runs independently of the interval
scan that you configure in the Configuration Profile and will reset the scan interval on the
local agent after a successful scan.
Prerequisite: The agent must be activated for that specific Qualys application for which
you are running the On Demand Scan. When activated, the Agent downloads manifests
for that application from the Qualys platform; if the manifest is not present for that type,
On Demand Scan will not execute.
Use the cloudagentctl.sh script to run the OnDemand Scan. You’ll find this script at
/usr/local/qualys/cloud-agent/bin/.
># ./cloudagentctl.sh action={demand} type={vm|pc|inv|udc|sca|vmpc}
cputhrottle={0-1000}
Where action and type are mandatory parameters.
action is “demand”, meaning an On Demand Scan.
type is the application for which you want to run the scan (the agent must be activated for
the respective application first).
Note: "vmpc" is a legacy application manifest and most likely may not be present.
cputhrottle is 1-1000. Default is 0, which is no throttling.
For example, to initiate an On Demand Scan for the Vulnerability Management
application (VM) with no throttling:
># ./cloudagentctl.sh action=demand type=vm
The script calls the agent to run asynchronously in the background and returns to the
shell prompt. The script prints a ControlId that you can track in the log file. The ControlId
is the timestamp of the script initiation, e.g. On-Demand-Request ControlId:
20200427151136.0
The On Demand Scan logs to the same log file as the agent at /var/log/qualys/qualys-
cloud-agent.log. You can find the logging for the scan initiation and completion in the log
file.
2020-04-27 15:11:36.474 [qualys-cloud-
agent][9710]:[Information]:[140048573286144]:OnDemandRequest Params:
ControlID=20200427151136.0, Action=OnDemand, Type=VM, CPUThrottle=0"
If the agent is currently performing an interval scan for the same type, the On Demand
Scan will delay waiting for the currently running scan to finish. The script will print a log
line with this status.
2020-04-27 15:11:36.474 [qualys-cloud-
agent][9710]:[Information]:[140048573286144]:Interval Event of same type
is in progress with state INTERVAL_EVENT_SCAN
On Demand Scan
27
2020-04-27 15:11:36.474 [qualys-cloud-
agent][9710]:[Information]:[140048573286144]:OnDemand request for
Control ID : 20200427151136.0 will be delayed.
If the script errors due to the manifest file not being present, check whether the Cloud
Agent is activated for that particular application. If agent is activated but you still get
manifest related errors while running the On Demand Scan command, the agent may not
have downloaded the manifest for that application. You can manually force a manifest
download by deactivating then reactivating the agent for that application from the Cloud
Agent user interface module. If that doesn't correct the issue, contact Qualys Support.
Once an On Demand Scan is complete the results are logged in the log file located at
/var/log/qualys/qualys-cloud-agent.log.

Best Practices
Upgrading Cloud Agent
28
Best Practices
Here are some best practices for managing your cloud agents. Refer to the Cloud Agent
Technical Whitepaper for additional documentation and best practices.
Upgrading Cloud Agent
The Qualys Cloud Platform can be used to upgrade agents to newer available versions
when agents check into the platform, depending on the settings in the Configuration
Profile.
Software distribution tools can package the Cloud Agent installer of a newer version to
upgrade already installed agents. In those cases the agents are not configured to auto-
upgrade versions.
Use following commands to upgrade your Cloud Agent:
Linux RPM based system
rpm -Uvh
package_file
.rpm
Linux Debian based system
dpkg -i
package_file
.deb
Note: If needed, restart agent using /usr/local/qualys/cloud-
agent/bin/qagent_restart.sh command.
Uninstalling Cloud Agent
Uninstalling the agent from the Cloud Agent module UI or API
When you uninstall a cloud agent using the Cloud Agent module user interface or Cloud
Agent API, the agent and license is removed from the Qualys subscription. We’ll also purge
the associated agent host record and scan results for any licensed modules, i.e.
Vulnerability Management, Policy Compliance.
Uninstalling the agent from the host itself
When you uninstall a cloud agent from the host itself (using the uninstall utility), the
agent record, its license usage, and scan results are still present in the Qualys
subscription. In order to remove the agent’s host record, license, and scan results use the
Cloud Agent module user interface or Cloud Agent API to uninstall the agent.
Linux RPM based system
sudo rpm -e qualys-cloud-agent
Linux Debian based system
sudo dpkg --purge qualys-cloud-agent
Best Practices
Agentless Tracking and Cloud Agents
29
Agentless Tracking and Cloud Agents
Say you’re already using Agentless Tracking on hosts and now you’re ready to install
Cloud Agent on the same hosts. You’ll want to use the same host ID tag installed on the
host. This will help you to avoid duplicate assets for the same host in your account.
You can configure the location of the host ID file installed on your Linux hosts with the
recommended default of /etc (the agent will create/use a 'qualys' directory under /etc).
This is recommended best practice if you are interested in using Linux Agent and
Agentless Tracking to evaluate the same host.
Once configured, the same file with the same host ID tag is accessed by our service when
the host is evaluated using 1) Agentless Tracking AND 2) Cloud Agent.
What are the steps?
1) Check your Unix authentication record
This is the record you’re using to access the system using Agentless Tracking. You’ll see
the location of the host ID file configured for the authentication record.
Want help with Agentless Tracking? Log into the Qualys Cloud Platform, go to Help >
Contact Support and search for Agentless Tracking.
2) Install the Agent
Use the agent configuration tool (qualys-cloud-agent.sh) and the HostIdSearchDir option
to install the Linux Agent and configure the location of the host ID file. Be sure this
location matches the location defined in your authentication record. By default
HostIdSearchDir is set to /etc/. To stay consistent with the Agentless Tracking location
Qualys appends “/qualys/hostid” to the path provided.
Example - Install as root user and set host ID file to /mydir/qualys/hosted
$ /usr/local/qualys/cloud-agent/bin/qualys-cloud-agent.sh
ActivationId="022224c8-31c7-11e5-b4f7-0021ccba987e"
CustomerId="146556fa-31c7-11e5-87b6-0021ccba987e"
HostIdSearchDir="/mydir/
Known Issues
30
Known Issues
Here are some known issues/limitations in the cloud agents.
– FIM rules displayed using the command auditctl do not show system calls. The
rules work successfully even though system calls are not seen.
– There is audit limitation to set the full directory path while configuring profile for
FIM. You can set the limited path in the Rule Details from module - FIM >
Configuration > Profiles. Use Case: If you have a file (for example, a file with
filename) under directory /root/test/directoryname and if you delete
directoryname, audit system does not provide correct file path. In that case the
file present with /root/test/directoryname/filename is considered as
/root/test/filename by fimc process.
– Audit rules should not have rules to exclude EOE and CWD audit records in order
to parse a event in the agent. You need to restart your agent after removing these
rules.
– For CentOS 7.6.1810, Red Hat Enterprise Linux 7.6, and Amazon Linux 2, rename
event with mv command does not work if you have created FIM config profile with
rule to rename a directory or a file.
– Cloud Agent with version 3.0 or later terminates when user configures invalid
sudo command using qualys-cloud-agent.sh script or HostID file has insufficient
permissions.
– If the remediation manifest is received during polling before clone detection, it will
be executed by both the agents. If the clone machine acknowledges manifest
before the master starts polling, master agent won't receive remediation manifest,
but the status will be updated as per status reported by the clone instance.
– Remediation manifest execution fails if you switch from root user to non-sudo
user while execution is in progress. You must execute the remediation manifest
with the root user.
– For the Debian based systems, software installedDate is always shown as 1970-01-
01 as these systems do not save the date in their package database. Therefore, the
cloud agent cannot capture date and it’s shown default as 1970-01-01.
– For the SUSE 15 SP4 system, the audit.service file contains
protectSystem=full parameter. This parameter sets read only access to all
the sensitive folders and prohibits to create socket files. You can use/add
ReadWritePaths parameter in audit.service file to select the files to give read-
write permissions. When you add ReadWritePaths=/usr/local/qualys/ in
/usr/lib/systemd/system/auditd.service file, the required socket files are
created. Restart the auditd service and cloud agent service to run the EDR
process.
Certificate Support on RHEL 5.4
31
Certificate Support on RHEL 5.4
Cloud agent installed on RHEL 5.4 may throw this error while trying to communicate with
the Qualys Platform. This happens when the certificate files are not present on the host
asset.
Http request failed: Peer certificate cannot be authenticated with
given CA certificates: SSL certificate problem: unable to get
local issuer certificate
To fix this issue, you must manually create the certificate files, and place them in the
appropriate location on the host asset.
Create the two cert files: cert1.crt and cert2.crt. Paste the contents in a text editor, and
then save the file with the extension “.crt”.
Use the following commands to append the contents of cer1.crt and cert2.crt at the end of
/etc/pki/tls/certs/ca-bundle.crt
cat cert1.crt >> /etc/pki/tls/certs/ca-bundle.crt
cat cert2.crt >> /etc/pki/tls/certs/ca-bundle.crt
Now restart the QAgent Service.
cert1.crt
subject= /C=US/O=DigiCert Inc/CN=DigiCert SHA2 Secure Server CA
issuer= /C=US/O=DigiCert Inc/OU=www.digicert.com/CN=DigiCert Global Root CA
-----BEGIN CERTIFICATE-----
MIIEvjCCA6agAwIBAgIQBtjZBNVYQ0b2ii+nVCJ+xDANBgkqhkiG9w0BAQsFADBh
MQswCQYDVQQGEwJVUzEVMBMGA1UEChMMRGlnaUNlcnQgSW5jMRkwFwYDVQQLExB3
d3cuZGlnaWNlcnQuY29tMSAwHgYDVQQDExdEaWdpQ2VydCBHbG9iYWwgUm9vdCBD
QTAeFw0yMTA0MTQwMDAwMDBaFw0zMTA0MTMyMzU5NTlaME8xCzAJBgNVBAYTAlVT
MRUwEwYDVQQKEwxEaWdpQ2VydCBJbmMxKTAnBgNVBAMTIERpZ2lDZXJ0IFRMUyBS
U0EgU0hBMjU2IDIwMjAgQ0ExMIIBIjANBgkqhkiG9w0BAQEFAAOCAQ8AMIIBCgKC
AQEAwUuzZUdwvN1PWNvsnO3DZuUfMRNUrUpmRh8sCuxkB+Uu3Ny5CiDt3+PE0J6a
qXodgojlEVbbHp9YwlHnLDQNLtKS4VbL8Xlfs7uHyiUDe5pSQWYQYE9XE0nw6Ddn
g9/n00tnTCJRpt8OmRDtV1F0JuJ9x8piLhMbfyOIJVNvwTRYAIuE//i+p1hJInuW
raKImxW8oHzf6VGo1bDtN+I2tIJLYrVJmuzHZ9bjPvXj1hJeRPG/cUJ9WIQDgLGB
Afr5yjK7tI4nhyfFK3TUqNaX3sNk+crOU6JWvHgXjkkDKa77SU+kFbnO8lwZV21r
eacroicgE7XQPUDTITAHk+qZ9QIDAQABo4IBgjCCAX4wEgYDVR0TAQH/BAgwBgEB
/wIBADAdBgNVHQ4EFgQUt2ui6qiqhIx56rTaD5iyxZV2ufQwHwYDVR0jBBgwFoAU
A95QNVbRTLtm8KPiGxvDl7I90VUwDgYDVR0PAQH/BAQDAgGGMB0GA1UdJQQWMBQG
CCsGAQUFBwMBBggrBgEFBQcDAjB2BggrBgEFBQcBAQRqMGgwJAYIKwYBBQUHMAGG
GGh0dHA6Ly9vY3NwLmRpZ2ljZXJ0LmNvbTBABggrBgEFBQcwAoY0aHR0cDovL2Nh
Y2VydHMuZGlnaWNlcnQuY29tL0RpZ2lDZXJ0R2xvYmFsUm9vdENBLmNydDBCBgNV
HR8EOzA5MDegNaAzhjFodHRwOi8vY3JsMy5kaWdpY2VydC5jb20vRGlnaUNlcnRH
bG9iYWxSb290Q0EuY3JsMD0GA1UdIAQ2MDQwCwYJYIZIAYb9bAIBMAcGBWeBDAEB
Certificate Support on RHEL 5.4
32
MAgGBmeBDAECATAIBgZngQwBAgIwCAYGZ4EMAQIDMA0GCSqGSIb3DQEBCwUAA4IB
AQCAMs5eC91uWg0Kr+HWhMvAjvqFcO3aXbMM9yt1QP6FCvrzMXi3cEsaiVi6gL3z
ax3pfs8LulicWdSQ0/1s/dCYbbdxglvPbQtaCdB73sRD2Cqk3p5BJl+7j5nL3a7h
qG+fh/50tx8bIKuxT8b1Z11dmzzp/2n3YWzW2fP9NsarA4h20ksudYbj/NhVfSbC
EXffPgK2fPOre3qGNm+499iTcc+G33Mw+nur7SpZyEKEOxEXGlLzyQ4UfaJbcme6
ce1XR2bFuAJKZTRei9AqPCCcUZlM51Ke92sRKw2Sfh3oius2FkOH6ipjv3U/697E
A7sKPPcw7+uvTPyLNhBzPvOk
-----END CERTIFICATE-----
cert2.crt
subject= /C=US/O=DigiCert Inc/OU=www.digicert.com/CN=DigiCert Global Root CA
issuer= /C=US/O=DigiCert Inc/OU=www.digicert.com/CN=DigiCert Global Root CA
-----BEGIN CERTIFICATE-----
MIIDrzCCApegAwIBAgIQCDvgVpBCRrGhdWrJWZHHSjANBgkqhkiG9w0BAQUFADBh
MQswCQYDVQQGEwJVUzEVMBMGA1UEChMMRGlnaUNlcnQgSW5jMRkwFwYDVQQLExB3
d3cuZGlnaWNlcnQuY29tMSAwHgYDVQQDExdEaWdpQ2VydCBHbG9iYWwgUm9vdCBD
QTAeFw0wNjExMTAwMDAwMDBaFw0zMTExMTAwMDAwMDBaMGExCzAJBgNVBAYTAlVT
MRUwEwYDVQQKEwxEaWdpQ2VydCBJbmMxGTAXBgNVBAsTEHd3dy5kaWdpY2VydC5j
b20xIDAeBgNVBAMTF0RpZ2lDZXJ0IEdsb2JhbCBSb290IENBMIIBIjANBgkqhkiG
9w0BAQEFAAOCAQ8AMIIBCgKCAQEA4jvhEXLeqKTTo1eqUKKPC3eQyaKl7hLOllsB
CSDMAZOnTjC3U/dDxGkAV53ijSLdhwZAAIEJzs4bg7/fzTtxRuLWZscFs3YnFo97
nh6Vfe63SKMI2tavegw5BmV/Sl0fvBf4q77uKNd0f3p4mVmFaG5cIzJLv07A6Fpt
43C/dxC//AH2hdmoRBBYMql1GNXRor5H4idq9Joz+EkIYIvUX7Q6hL+hqkpMfT7P
T19sdl6gSzeRntwi5m3OFBqOasv+zbMUZBfHWymeMr/y7vrTC0LUq7dBMtoM1O/4
gdW7jVg/tRvoSSiicNoxBN33shbyTApOB6jtSj1etX+jkMOvJwIDAQABo2MwYTAO
BgNVHQ8BAf8EBAMCAYYwDwYDVR0TAQH/BAUwAwEB/zAdBgNVHQ4EFgQUA95QNVbR
TLtm8KPiGxvDl7I90VUwHwYDVR0jBBgwFoAUA95QNVbRTLtm8KPiGxvDl7I90VUw
DQYJKoZIhvcNAQEFBQADggEBAMucN6pIExIK+t1EnE9SsPTfrgT1eXkIoyQY/Esr
hMAtudXH/vTBH1jLuG2cenTnmCmrEbXjcKChzUyImZOMkXDiqw8cvpOp/2PV5Adg
06O/nVsJ8dWO41P0jmP6P6fbtGbfYmbW0W5BjfIttep3Sp+dWOIrWcBAI+0tKIJF
PnlUkiaY4IBIqDfv8NZ5YBberOgOzW6sRBc4L0na4UU+Krk2U886UAb3LujEV0ls
YSEY1QSteDwsOoBrp+uvFRTp2InBuThs4pFsiv9kuXclVzDAGySj4dzp30d8tbQk
CAUw7C29C79Fv1C5qfPrmAESrciIxpg0X40KPMbp1ZWVbd4=
-----END CERTIFICATE-----
Certificate Support on SUSE Linux Enterprise 11
33
Certificate Support on SUSE Linux Enterprise 11
Cloud agent installed on SUSE Linux Enterprise 11 may throw the following error for the
certificate ca-bundle.crt when trying to communicate with the Qualys Platform. This
happens when the certificate files are not present on the host asset.
[qualys-cloud-agent][8056]:[Error]:Http request failed:Problem
with the SSL CA cert (path? access rights?): error setting
certificate verify locations:
CAfile: /etc/ssl/ca-bundle.crt
CApath: none
To fix this issue, you must manually install the certificate files in the appropriate location
on the host asset. You can either use the certificate files from your existing RHEL or
CentOS assets or download the certificate files from the following location:
https://curl.haxx.se/docs/caextract.html
Download the file cacert.pem and rename it to ca-bundle.pem.
Copy the certificate files (ca-bundle.pem) at the following default location on SUSE Linux
Enterprise 11:
/etc/ssl/
If you want to use a non default location, ensure that the directory path is added in the
/etc/qualys/cloud-agent/qagent.config file in the following manner:
{
"os": "Suse",
"cafile": "<CustomizedPath>"
}
Now restart the QAgent Service.
Proxy Configuration Encryption Utility
34
Proxy Configuration Encryption Utility
You can use the Proxy Configuration Encryption utility to encrypt the user name and/or
password (as needed) that you provide to the proxy environment variable
qualys_https_proxy or https_proxy.
The string-util utility is included in the Cloud Agent installation package. Install or extract
the Cloud Agent installation package to get the utility.
The string-util utility is to be used once on any system where it's installed to encrypt the
values that will be used on all systems running Cloud Agent that have the same
credentials. It is not required to run the utility on each system running Cloud Agent.
To use the encryption utility:
Go to /usr/local/qualys/cloud-agent/bin, and then export the LD_LIBRARY_PATH variable
to /usr/local/qualys/cloud-agent/lib.
export LD_LIBRARY_PATH=/usr/local/qualys/cloud-agent/lib
Use the following command to run the utility to encrypt the user name and/or password.
If you want to encrypt both, run the utility twice to separately encrypt the user name and
password.
Note: You need root privileges to run string-util. If the user name or password contain
special characters (e.g., @, :, $) they need to be url-encoded prior to using the utility.
To encrypt the user name (use double quotes):
./string-util "<user name_to_be_encrypted>"
For example,
./string-util "sys_account"
To encrypt the password (use double quotes):
./string-util "<password_to_be_encrypted>"
The utility returns the user name or password in encoded format.
For example,
sRpSHQP582a1+gaJwHOm3g==
Once you get the encrypted user name add/or password, unset the LD_LIBRARY_PATH
variable by using the following command:
export LD_LIBRARY_PATH=
Proxy Configuration Encryption Utility
35
Provide the encrypted user name and password to your proxy environment variable.
qualys_https_proxy=https://[<#encrypted_username>:<#encrypted_password>@
]<host>[:<port>]
The # delimiter indicates to the Cloud Agent that the user name and password are
encrypted. Not including the # indicates that the user name and password are in plain text
format.
For example (only encrypting password):
qualys_https_proxy=https://sys_account:#[email protected]
yco.com:8080
For example (encrypting username and password):
qualys_https_proxy=https://#uWpsHMSY932b2+fdcH723d==:#sRpSHQP582a1+gaJwH
[email protected]:8080
